background image

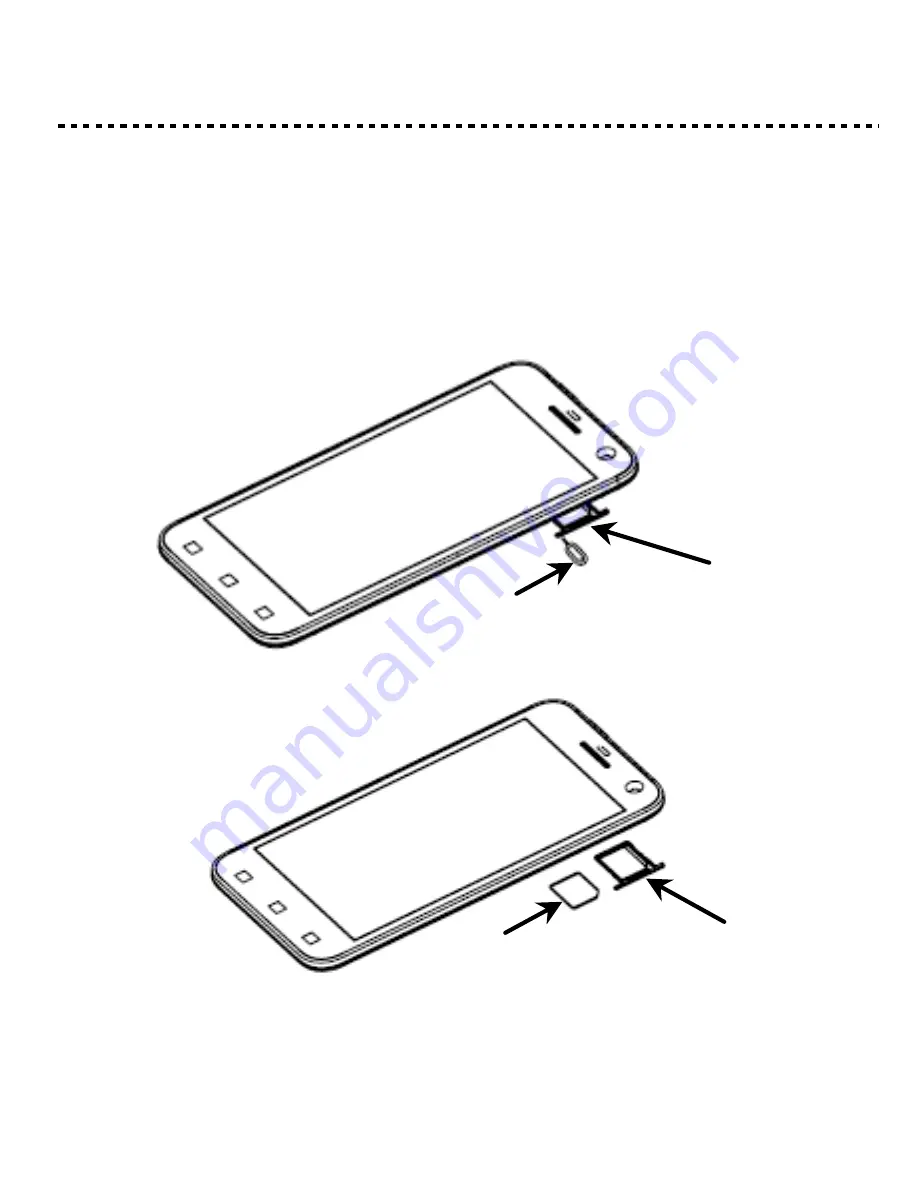
INSERT SIM CARD                                                                                   

 
Please insert the Micro SIM card following the below steps


Step 1: Plugin the SIM Card remover to the SIM card fixing seat 
and open the SIM card slot. 
Step 2: Put the Micro SIM card on the seat. 
Step 3: Put the seat into the SIM card slot. 


Tip:

 This mobile doesn

t support external MicroSD card.


SIM Card remover 

SIM Card fixing seat 

Micro SIM card 

SIM Card fixing seat 

Summary of Contents for Life Pro

Page 1: ...Life Pro User Manual...

Page 2: ...d web page loading fast multitasking and smooth video playback Intelligent Camera Capture the moment with the 13 MP rear camera with BSI 2 sensor 5 MP front camera with BSI sensor A host of camera fea...

Page 3: ...YOUR PHONE FRONT VIEW 2 Front Camera Receiver Sensor Back key Menu key Home key Home screen...

Page 4: ...YOUR PHONE BACK VIEW 3 USB Power port 3 5 mm Audio Jack Rear facing Camera Second Mic for reduce the noise Flash SIM card slot Volume Key Power Key Speaker First Mic...

Page 5: ...ARGE THE BATTERY Plug into wall Connect this end to phone s USB port Connect this end to plug Tip Be sure to charge your phone s battery for 4 hours after inserting it in the phone for the first time...

Page 6: ...he SIM Card remover to the SIM card fixing seat and open the SIM card slot Step 2 Put the Micro SIM card on the seat Step 3 Put the seat into the SIM card slot Tip This mobile doesn t support external...

Page 7: ...TURN THE PHONE ON OFF Hold down the power button to turn the phone on Hold down the power button then touch Power off to turn the phone off 6...

Page 8: ...to dim the screen press the power button When the screen is dimmed and you want to wake the phone press the power button and then drag the lock to the right TIP For additional protection easily set a...

Page 9: ...wallpaper Slide left or right to see more panels Touch an app to open it Touch to browse the web Touch to open Messages App Touch to open the App tray Touch to open the Contacts App Touch to open the...

Page 10: ...APPS 1 Touch to open the App tray 2 Touch an app to open it 9...

Page 11: ...notifications Notifications are described on the next page Notification icons Status icons Icon Description Mobile network strength Missed call Wi Fi connection Battery strength charge Bluetooth is ac...

Page 12: ...ATION PANEL The Notification panel is your center for new events like new e mail voicemail updates and more Touch to clear notifications Drag down to display notifications Touch a notification to resp...

Page 13: ...A CALL 1 From the Home screen touch 2 Dial a number using the dial pad 3 Touch to make call TIP You can use the Call Log Contacts tabs to quickly make a call Answer a call Drag to the right to answer...

Page 14: ...screen press then touch System settings Audio profiles General Voice call ringtone 2 Touch a ringtone to hear it then touch OK to select it FM 1 From the Home screen touch then touch GPS 1 From the H...

Page 15: ...app tap the screen to focus on a specific area 3 Tap camera button on the screen to take a picture SHOOT A VIDEO 1 Launch the camera by pressing the camera icon on the home screen 2 In the Camera app...

Page 16: ...pen it then touch the picture you want to share 3 Touch 4 Select a medium for sending the photo such as Gmail to mail the photo or Messages to send the photo via messaging CONNECT TO WLAN 1 Press Syst...

Page 17: ...review this product guide thoroughly with particular attention paid to any safety sections to be sure that you use your phone safely Please Note 1 Socket location while charging The socket outlet shal...

Page 18: ...ordance with the instructions may cause harmful interference to radio communications However there is no guarantee that interference will not occur in a particular installation If this equipment does...

Page 19: ...station antenna the lower the power output The exposure standard for wireless devices employing a unit of measurement is known as the Specific Absorption Rate or SAR The SAR limit set by the FCC is 1...

Page 20: ...dy Carry this device at least 10 mm away from your body to ensure RF exposure level compliant or lower to the reported level To support body worn operation choose the belt clips or holsters which do n...

Reviews: