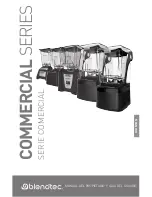
background image

102

ÍNDICE

SECCIÓN 1

 - PRECAUCIONES IMPORTANTES

 ��������������������������������������

103

SECCIÓN 2

 - DESEMBALAJE

 ���������������������������������������������������������������������������������

104

SECCIÓN 3

 - CONOZCA SU NUEVA LICUADORA

 ������������������������������

105

SECCIÓN 4

 - INFORMACIÓN GENERAL DE INSTALACIÓN Y 

FUNCIONAMIENTO

 �����������������������������������������������������������������������

106

 4.1

 -


STEALTH 895NBS™

 ����������������������������������������������������������������������

106

 4.2

 -


STEALTH 875 Y STEALTH 885™

 ���������������������������������������

118

 4.3

 -


CONNOISSEUR 825™

 ����������������������������������������������������������������

130

 4.4

 -


CHEF 775™

 ������������������������������������������������������������������������������������������

140

 4.5

 -


EZ 600™

 �������������������������������������������������������������������������������������������������

142

 4.6

 -


CHEF 600™

 ������������������������������������������������������������������������������������������

144

SECCIÓN 5

 - CUIDADO Y LIMPIEZA

 ����������������������������������������������������������������

146

SECCIÓN 6

 - RESOLUCIÓN DE PROBLEMAS

 ����������������������������������������

146

SECCIÓN 7

 - GARANTÍA

 ���������������������������������������������������������������������������������������������

150

APÉNDICE A

 - PLANTILLA DE AGUJERO EN LA ENCIMERA

 ���

153

Summary of Contents for CHEF 600

Page 1: ...USER GUIDE GUIDE DE L UTILISATEUR ET DU PROPRIÉTAIRE SÉRIES COMMERCIAL SERIE COMMERCIAL COMMERCIAL SERIES OWNER S MANUAL AND USER GUIDE GUIDE DEL L UTILISATEUR ET DU PROPRIETAIRE MANUAL DEL PROPIETARIO Y GUIA DEL USUAIRO ...

Page 2: ...RVIEW 4 4 1 STEALTH 895 4 4 2 STEALTH 875 STEALTH 885 16 4 3 CONNOISSEUR 825 28 4 4 CHEF 775 40 4 5 EZ 600 42 4 6 CHEF 600 44 SECTION 5 CARE AND CLEANING 46 SECTION 6 TROUBLESHOOTING 46 SECTION 7 WARRANTY 50 APPENDIX A COUNTERTOP HOLE TEMPLATE 53 FRANÇAIS GUIDE DE L UTILISATEUR ET DU PROPRIÉTAIRE 55 ESPAÑOL MANUAL DEL PROPIETARIO Y GUIA DEL USUARIO 99 ...

Page 3: ... substances by hand when the blender jar is on the motor base NEVER touch the blade with your fingers whether it is on or off the motor base NEVER place jar into drive socket if blender motor is operating DO NOT rock or remove the blender jar during operation These precautions will prevent personal injury and or damage to the blender 1 3 NEVER OPERATE THE BLENDER IF IT APPEARS DAMAGED If the blend...

Page 4: ...locations or when cleaning EACH POWER UNIT MUST BE PROTECTED BY A SEPARATE CIRCUIT BREAKER OR FUSE SEE MODEL FOR SPECIFICATIONS 1 11 NEVER ATTEMPT TO REPAIR THE POWER UNIT Never remove the blender motor cover The blender motor does not contain user adjustable or serviceable parts A qualified service agent must make all service adjustments Removing the cover or attempting to service the blender wil...

Page 5: ...ase in the space below You will need these when contacting Blendtec for service or questions Motor Serial Found on bottom of motor base _______________________ Date of Purchase ____________________________________________ Purchased From _____________________________________________ 2 3 REGISTERING YOUR BLENDER Register online at www blendtec com registration SECTION 3 GETTING TO KNOW YOUR BLENDER ...

Page 6: ... Installation Select a location that is near an electrical outlet Also consider proximity to ingredients and patrons as well as available counter space Place the blender on the counter in a spot where the air intake vents on the sides and exhaust on the back of the blender are unobstructed Ensure there is enough room above and around the unit to allow for unhampered movement of the sound enclosure...

Page 7: ...5 SOUND ENCLOSURE Figure 1 Stealth Dimensions Figure 2 Stealth Components BLADE ASSEMBLY HARDENED METAL DRIVE SOCKET MOTOR EASY CLEAN JAR STEALTH 24 62 cm 8 21 6 cm 9 23 cm 4 10 4 cm ENGLISH ...

Page 8: ...minimum space of 3 7 6 cm between the bottom of the motor and the lower shelf Cabinetry should not be closed it should allow air to flow freely from the outside to the inside of the cabinet space Plastic bags cups and so forth should not be stored closer than 3 7 6 cm from the bottom of the motor Cut a hole in the countertop 4 11 1 cm wide and 5 14 9 cm long see the countertop hole template in App...

Page 9: ...sly selected blend cycle button again 4 1 3 Automatic Cycle Operation Your Stealth blender is preprogrammed with multiple blender profiles to help operators achieve consistent blends with a minimum of training trial and error You can select from the following profiles and blend cycles Default Profile Button 1 Nitro 20 sec Button 2 Nitro 30 sec Button 3 Small Margarita Ice Cappuccino Button 4 Mediu...

Page 10: ...ge Milkshake 2 Button 6 Large Milkshake 3 4 1 4 Advanced Programming and Diagnostics Use the programming mode to Select a profile Change preprogrammed cycle numbers Check blend cycle counts Check the diagnostic error log Use a custom profile designed via the Blend Wizard Blendtec s online programming tool To enter programming mode 1 Touch and hold cancel exit button for 3 seconds 2 Use the scroll ...

Page 11: ...mall Smoothie w Fresh Fruit 17 Medium Smoothie 1 18 Medium Smoothie 2 19 Medium Smoothie 3 20 Medium Smoothie 4 21 Large Smoothie 1 22 Large Smoothie 2 23 Large Smoothie 3 24 Large Smoothie 4 25 Large Smoothie 5 26 Large Smoothie 6 27 Ultrathick Smoothie 1 28 Ultrathick Smoothie 2 29 Ultrathick Smoothie 3 30 Ultrathick Smoothie 4 31 50 Seconds Speed 1 32 50 Seconds Speed 2 33 50 Seconds Speed 3 34...

Page 12: ...Standard or Customer Profile category you can scroll through the profiles in the category and select the desired profile 5 Make this the active profile will appear on the screen Press the select button to confirm or the cancel exit button to return to the previous menu 4 1 6 Changing Programmed Cycle Buttons Temporarily Change Cycle Buttons To temporarily change cycle buttons when working in a sel...

Page 13: ...le then press select Note After you have disabled a number button you will notice that an asterisk appears after the profile name when you return to operation mode The disabled button will also not appear on control panel Loading a new profile on your blender will reset the profiles and enable all the cycle buttons again Permanently Disable Cycle Buttons To permanently change the cycle buttons in ...

Page 14: ...lender some of the advanced programming functions will be disabled The secured profile will be the active profile on the blender another profile cannot be made the active profile and a new profile cannot be imported to the blender unless it was created via your Blend Wizard account Additionally the blend cycles in the profile cannot be changed on the blender and the Enclosure Safety Mode Screen St...

Page 15: ...gs You can change various blender settings for optimal blending performance and function based on your needs Screen Standby Time You can adjust the length of time before the blender switches to standby mode 15 minutes 1 hour 6 hours or 12 hours To select a new standby time complete the following steps 1 Press and hold the cancel exit button for 3 seconds 2 Use the scroll button and then select Set...

Page 16: ...used Also for Stealth 875 only you can review the number of times the slider control bar has been used 1 Press and hold the cancel exit button for 3 seconds 2 Use the scroll button and then select Cycle Counts from the menu by touching the select button 3 Use the scroll button to see the number of cycles run in each category 4 Press the cancel exit button to return to the previous menu Note The pu...

Page 17: ... Note If the blender is in manual or automatic operation mode the USB flash drive menu will automatically load on the screen If the blender is in programming mode go to the main menu and select USB Flash Drive 3 Use the scroll button to find Export Counts then press the select button You will be asked if you want to export counts to the sth cnts csv file 4 Press the select button again to start th...

Page 18: ...ertop will obstruct motor ventilation If installing more than one blender allow 14 16 35 6 40 6 cm of center to center blender spacing If installing a sound enclosure allow a clearance of at least 5 14 cm from the sound enclosure to the wall and 26 66 cm from the countertop to any over the counter cabinetry Ensure lower cabinetry allows adequate airflow The blender draws ambient air into the vent ...

Page 19: ...17 SOUND ENCLOSURE Figure 1 Stealth Dimensions Figure 2 Stealth Components BLADE ASSEMBLY HARDENED METAL DRIVE SOCKET MOTOR EASY CLEAN JAR STEALTH 24 62 cm 8 21 6 cm 9 23 cm 4 10 4 cm ENGLISH ...

Page 20: ... and the jar lid is secured 4 Close the sound enclosure lid 5 On the control surface touch the desired blend cycle number pulse icon or desired location on the slider control bar 6 To stop a blend cycle before the programmed time elapses press the cancel exit button If you have enabled the Blend Cycle Pause feature press the previously selected blend cycle button to pause the cycle To resume the p...

Page 21: ...mmed with multiple blender profiles to help operators achieve consistent blends with a minimum of training trial and error You can select from the following profiles and blend cycles Multipurpose Profile Button 1 Small Milkshake Button 2 Granita Medium Milkshake Button 3 Small Margarita Ice Cappuccino Button 4 Medium Smoothie 4 Button 5 Large Smoothie 4 Button 6 50 Seconds Speed 7 When you turn th...

Page 22: ...The 11 Speed Capacitive Touch Slider is not available on the Stealth 885 model 4 2 6 Advanced Programming and Diagnostics Use the programming mode to Select a profile Change preprogrammed cycle numbers Check blend cycle counts Check the diagnostic error log Use a custom profile designed via the Blend Wizard Blendtec s online programming tool To enter programming mode 1 Touch and hold cancel exit b...

Page 23: ...2 19 Medium Smoothie 3 20 Medium Smoothie 4 21 Large Smoothie 1 22 Large Smoothie 2 23 Large Smoothie 3 24 Large Smoothie 4 25 Large Smoothie 5 26 Large Smoothie 6 27 Ultrathick Smoothie 1 28 Ultrathick Smoothie 2 29 Ultrathick Smoothie 3 30 Ultrathick Smoothie 4 31 50 Seconds Speed 1 32 50 Seconds Speed 2 33 50 Seconds Speed 3 34 50 Seconds Speed 5 35 50 Seconds Speed 7 36 50 Seconds Speed 9 37 P...

Page 24: ...ile will appear on the screen Press the select button to confirm or the cancel exit button to return to the previous menu 4 2 8 Changing Programmed Cycle Buttons Temporarily Change Cycle Buttons To temporarily change cycle buttons when working in a selected profile complete the following steps 1 Press and hold the cancel exit button for 3 seconds 2 Use the scroll button and then select Blend Cycle...

Page 25: ... and enable all the cycle buttons again Permanently Disable Cycle Buttons To permanently change the cycle buttons in a profile you can export the revised profile to a USB drive and then import the profile on the blender Or you can disable any number using the Blend Wizard my blendtec com and then export the revised profile to the blender 4 2 9 The Blend Wizard In addition to using the profiles and...

Page 26: ...the blender and the Enclosure Safety Mode Screen Standby Time Blend Cycle Pause and Slider Lockout settings cannot be modified To unlock these features complete the following steps 1 Log on to your Blend Wizard account at my blendtec com 2 Edit the secured profile selecting the option to turn off the secure blender mode or create a new profile with the secure blender mode turned off 3 Import the p...

Page 27: ...ding To enable or disable the enclosure safety feature complete the following steps 1 Press and hold the cancel exit button for 3 seconds 2 Use the scroll button and then select Settings from the menu by touching the select button 3 Use the select button to choose the Enclosure Safety Mode 4 Use the select button to toggle between disabling and enabling the enclosure safety feature 5 Press the can...

Page 28: ...e cancel exit button for 3 seconds 2 Use the scroll button and then select Settings from the menu by touching the select button 3 Use the scroll button and then select Slider Lockout from the menu by touching the select button 4 Use the select button to toggle between disabling and enabling the slider lockout 5 Press the cancel exit button to return to the previous menu Language The menus on the S...

Page 29: ... occurred in each category 4 Press the cancel exit button to return to the previous menu Exporting Blender Statistics Exporting blender statistics cycle counts errors settings and firmware versions is a way to save diagnostic information which Blendtec s customer service and repair experts will use if problems arise with your blender To export blender statistics to a USB drive complete the followi...

Page 30: ... cm A thicker countertop will obstruct motor ventilation If installing more than one blender allow 14 16 35 6 40 6 cm of center to center blender spacing If installing a sound enclosure allow a clearance of at least 5 14 cm from the sound enclosure to the wall and 26 66 cm from the countertop to any over the counter cabinetry Ensure lower cabinetry allows adequate airflow The blender draws ambient...

Page 31: ...9 SOUND ENCLOSURE BLADE ASSEMBLY HARDENED METAL DRIVE SOCKET MOTOR MOTOR BASE EASY CLEAN JAR CONNOISSEUR 825 Figure 4 Connoisseur 825 Dimensions 18 46 8 cm 22 57 2 cm 9 23 6 cm 9 23 7 cm 2 6 6 cm ENGLISH ...

Page 32: ...the blender by toggling the power switch on the front of the blender 2 Raise the sound enclosure lid 3 Place the blender jar on the motor base ensuring the jar is completely seated and the jar lid is secured 4 Close the sound enclosure lid 5 On the touchpad press the desired blend cycle number or pulse icon 6 Push any blend cycle button 1 through 5 to stop a blend cycle before the programmed time ...

Page 33: ...eed 7 When you turn the blender on for the first time this will be the default profile Smoothie Profile Button 1 Small Smoothie w Fresh Fruit Button 2 Medium Smoothie 4 Button 3 Granita Medium Milkshake Button 4 Medium Smoothie 3 Button 5 Large Smoothie 4 Button 6 Pulse Speed 7 Coffee Profile Button 1 Small Margarita Ice Cappuccino Button 2 Large Ice Cappuccino Button 3 Small Slushy Milkshake Butt...

Page 34: ...e desired function Note To return to the main menu from any submenu area tap the pulse button until the main menu screen appears The options available from the main menu are listed below numbered as displayed in the blender 1 PROFILES 1 Standard Profiles 1 Smoothie 2 Coffee 3 Multipurpose 4 Milkshake 2 Custom Profiles 2 BLEND CYCLES 1 Standard Blend Cycles 1 Salsa 2 Batter 3 Whole Juice 4 Soup 5 I...

Page 35: ...7 Ultrathick Smoothie 1 28 Ultrathick Smoothie 2 29 Ultrathick Smoothie 3 30 Ultrathick Smoothie 4 31 50 Seconds Speed 1 32 50 Seconds Speed 2 33 50 Seconds Speed 3 34 50 Seconds Speed 5 35 50 Seconds Speed 7 36 50 Seconds Speed 9 37 Pulse Speed 1 38 Pulse Speed 2 39 Pulse Speed 3 40 Pulse Speed 5 41 Pulse Speed 7 42 Pulse Speed 9 43 Disable Button 2 Custom Blend Cycles 3 CYCLE COUNTS 4 DIAGNOSTIC...

Page 36: ...l to the Blend Cycles menu and press button 5 to select 3 Use buttons 1 and 5 to scroll and select either the Standard or Custom Blend Cycles category 4 Use button 1 to scroll and find your desired cycle then press button 5 to select 5 Press the button you want to assign to the cycle then press button 5 to confirm or pulse button to cancel and return to the previous menu Note After you have custom...

Page 37: ...mber using the Blend Wizard my blendtec com and then export the revised profile to the blender 4 3 3 The Blend Wizard In addition to using the profiles and cycles preprogrammed on your blender you can use the Blend Wizard to create custom profiles and cycles For instructions on using the Blend Wizard to easily develop custom profiles and cycles visit my blendtec com Importing Custom Profiles and C...

Page 38: ...via your Blend Wizard account Additionally the blend cycles in the profile cannot be changed on the blender To unlock these features complete the following steps 1 Log on to your Blend Wizard account at my blendtec com 2 Edit the secured profile selecting the option to turn off the secure blender mode or create a new profile with the secure blender mode turned off 3 Import the profile to a USB dri...

Page 39: ...s of pulse time and every 20 seconds of pulse time thereafter Diagnostic Error Log You can review the diagnostic errors that have been logged on the blender 1 Press and hold buttons 2 and 4 for 1 second to enter the menu 2 Use button 1 to scroll through the menu and then button 5 to select Diagnostic Counts 3 Use button 1 to scroll and see the number of errors in each category 4 Press pulse button...

Page 40: ...ounts and press button 5 to select You will be asked if you want to export counts to the ICBUCNTS CSV file 4 Press button 5 again to confirm and start the export process or pulse button to cancel and return to the previous menu 5 After the export process is finished remove the USB drive from the blender ...

Page 41: ...39 ENGLISH ...

Page 42: ...tion adds a burst of speed and power Add 10 Function The Add 10 icon allows users to add 10 second intervals to blend cycles providing completely customized blends It also acts as a stand alone 10 second cycle Chef Series Profile Configuration Changing profile configurations on the Chef Series blenders can be done within the first 10 seconds after the blender is plugged in The blender profile is c...

Page 43: ...41 HARDENED METAL DRIVE SOCKET MOTOR MOTOR BASE BLADE ASSEMBLY EASY CLEAN JAR TOP COVER TOUCH PAD CHEF 775 ENGLISH ...

Page 44: ...t enter the code for the desired mode Multipurpose 1 profile Small Medium Large Multipurpose 2 profile Medium Large Pulse Multipurpose 3 profile Large Pulse Small 3 When the code is entered successfully the blender will store the new mode and then return to the idle screen Multipurpose 1 best for blended coffee and pour over ice smoothies Multipurpose 2 best for whole fruit and frozen fruit smooth...

Page 45: ...43 HARDENED METAL DRIVE SOCKET MOTOR BLADE ASSEMBLY BASE COVER TOUCH PAD EASY CLEAN JAR EZ 600 ENGLISH ...

Page 46: ...ng blend cycle You can also Pulse to quickly stir a blend before serving For greater flexibility the Chef 600 offers two different pulse settings Low Pulse Use for chopping or mixing fragile ingredients High Pulse Use for blending and pureeing To use the Pulse function Press the desired Pulse button Low or High The blender will run at the Pulse setting s speed while the button is depressed When th...

Page 47: ...45 HARDENED METAL DRIVE SOCKET MOTOR BLADE ASSEMBLY BASE COVER TOUCH PAD EASY CLEAN JAR CHEF 600 ENGLISH ...

Page 48: ...amp rag A mild all purpose nonabrasive cleaner may be used The drive socket can be cleaned using a cotton swab or toothpick For Stealth blender models the sound enclosure can also be removed for cleaning when necessary Open the sound enclosure lid and use both hands to pull outward on the lid at the pivot joints This step will flex the plastic enough for it to spread and clear its mounting tabs Th...

Page 49: ...peratures If the blender does not work after 20 minutes or more of cooling time please call your Blendtec Service Agent Overload Error This indicates an overload on the motor 1 Clear the error message by pressing any button or turning the blender off and on again 2 Remove the jar and run the blender to determine whether the issue relates to the jar or the motor 3 With the jar removed check for blo...

Page 50: ...ing back on If this error is displayed immediately on start up or if it occurs regularly during normal use contact your Blendtec service center for assistance CHEF 775 Overtemp Error This indicates that the motor is overheating The blender has been disabled until the unit cools to operating temperatures If the icon does not disappear after 20 minutes or more of cooling time please call your Blendt...

Page 51: ...tor Remove the jar from the motor base and run the motor If it is excessively noisy contact your Blendtec service center for evaluation 2 Jar After checking the motor place the jar back on the motor with about 16 oz 475 ml of water Run the motor for a few seconds using the pulse button If you have more than one jar test a different jar to determine whether the sound is different If a jar is excess...

Page 52: ...al number model number and proof of purchase from an authorized dealer at the time of the claim In addition the serial number label on the unit must remain intact and unaltered or the warranty is void The following items are not included the blender warranty coverage Normal maintenance adjustments and cleaning as outlined in this manual Repairs due to unauthorized service or modifications to the b...

Page 53: ...airs are made by individuals other than Blendtec qualified service agents Many issues can be resolved simply and quickly over the phone If the problem cannot be resolved over the phone your unit may require replacement If your machine is under warranty Blendtec will repair or replace the blender at no cost Cosmetic damage and abuse are not included If your machine is out of warranty and you wish t...

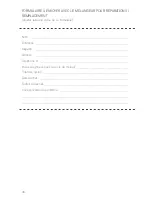
Page 54: ...H BLENDER FOR REPAIRS REPLACEMENT Please make a copy of this form Name Company Store Address Phone Serial found on the underside of the motor base Cycle Count Purchase Date Place of Purchase An explanation of the problem ...

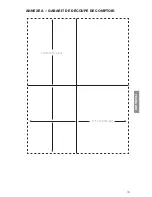
Page 55: ...53 5 7 8 14 9 cm 4 3 8 11 1 cm APPENDIX A COUNTERTOP HOLE TEMPLATE ENGLISH ...

Page 56: ...54 ...

Page 57: ...55 FRANÇAIS OWNER S MANUAL AND USER GUIDE GUIDE DE L UTILISATEUR ET DU PROPRIÉTAIRE GUIDE DE L UTILISATEUR ET DU PROPRIÉTAIRE SÉRIE COMMERCIAL ...

Page 58: ...E MÉLANGEUR 59 SECTION 4 INSTALLATION ET APERÇU D UTILISATION 60 4 1 STEALTH 895NBSMC 60 4 2 STEALTH 875MC ET STEALTH 885MC 71 4 3 CONNOISSEUR 825MC 81 4 4 CHEF 775MC 86 4 5 EZ 600MC 88 4 6 CHEF 600MC 90 SECTION 5 ENTRETIEN ET NETTOYAGE 92 SECTION 6 DÉPANNAGE 92 SECTION 7 GARANTIE 96 ANNEXE A GABARIT DE DÉCOUPE DE COMPTOIR 99 ...

Page 59: ...ipient est sur le socle du moteur NE JAMAIS toucher la lame avec vos doigts qu elle soit ou non sur le socle du moteur NE JAMAIS placer le récipient du mélangeur sur le socle du moteur lorsque celui est en marche NE PAS balancer ou enlever le récipient du mélangeur lorsque celui ci est en marche Ces précautions préviendront les blessures et ou les dommages au mélangeur 1 3 NE JAMAIS UTILISER LE MÉ...

Page 60: ...ur ou lors du nettoyage D ALIMENTATION DOIT ÊTRE PROTÉGÉ PAR UN DISJONCTEUR OU UN FUSIBLE SÉPARÉ VOIR LE MODÈLE POUR LES SPÉCIFICATIONS 1 11 NE JAMAIS ESSAYER DE RÉPARER LE BLOC D ALIMENTATION Ne jamais enlever le couvercle du moteur du mélangeur Le moteur du mélangeur ne contient pas de pièces ajustables ou qui peuvent être réparées par l utilisateur Un représentant au service qualifié doit faire...

Page 61: ...vec Blendtec pour obtenir de l aide de série du moteur peut être trouvé sous le socle du moteur _____________________ Date d achat _________________________________________________________ Acheté de ___________________________________________________________ 2 3 ENREGISTRER VOTRE MÉLANGEUR Enregistrer en ligne à www blendtec com registration can french SECTION 3 APPRENDRE À CONNAÎTRE VOTRE MÉLANGE...

Page 62: ...4 1 STEALTH 895NBSMC 4 1 1 Installation Mélangeur Stealth Installation sur le comptoir Choisir un endroit situé près d une prise de courant Tenir compte de la proximité des ingrédients et des clients ainsi que de l espace disponible Placer le mélangeur sur le comptoir dans un endroit où les ouvertures d admission d air latérales et l échappement arrière ne sont pas obstrués Vérifier qu il y a suff...

Page 63: ... D INSONORISATION Figure 1 Dimensions du Stealth Figure 2 Composants du Stealth ASSEMBLAGE DES LAMES DOUILLE EN MÉTAL DURCI ET MOTEUR RÉCIPIENT FACILE À NETTOYER STEALTHMC 62 cm 24 po 10 4 cm 4 po 23 cm 9 po 21 6 cm 8 po ...

Page 64: ... 3 po entre le bas du moteur et la tablette Les armoires ne doivent pas être fermées l air doit circuler librement de l extérieur des armoires Les sacs les tasses et autres articles en plastique doivent être rangés à au moins 7 6 cm 3 po du bas du moteur Découper une ouverture de 11 1 cm 4 po de largeur sur 14 9 cm 5 po de longueur dans le comptoir voir le gabarit à l annexe A S assurer que les cô...

Page 65: ...ir des résultats constants avec minimum de formation d essais et d erreur Vous pouvez sélectionner un des profils et cycles suivants Profil Défaut Button 1 Nitro 20 sec Button 2 Nitro 30 sec Button 3 P margarita Capp frap Small Margarita Ice Cappuccino Button 4 Smoothie moyen 4 Medium Smoothie 4 Button 5 Grand smoothie 4 Large Smoothie 4 Button 6 Granité Milkshake moyen Granita Medium Milkshake Pr...

Page 66: ...des dans ce mode Sélectionner la fonction Pulser pour ajouter un éclat de vitesse et de puissance NOTE La glissière tactile capacitive à 11 vitesses n est pas disponible sur le modèle Stealth 885 4 1 5 Programmation avancée et diagnostiques Utiliser le mode de programmation pour Sélectionner un profil Changer les numéros des cycles préprogrammés Vérifier le nombre de cycles faits Vérifier le journ...

Page 67: ...thie moyen 4 Medium Smoothie 4 21 Grand smoothie 1 Large Smoothie 1 22 Grand smoothie 2 Large Smoothie 2 23 Grand smoothie 3 Large Smoothie 3 24 Grand smoothie 4 Large Smoothie 4 25 Grand smoothie 5 Large Smoothie 5 26 Grand smoothie 6 Large Smoothie 6 27 Smoothie ultra épais 1 Ultrathick Smoothie 1 28 Smoothie ultra épais 2 Ultrathick Smoothie 2 29 Smoothie ultra épais 3 Ultrathick Smoothie 3 30 ...

Page 68: ... défilement pour sélectionner la catégorie des profils standards ou personnalisés 4 Après avoir sélectionné la catégorie des profils standards ou personnalisés vous pouvez faire défiler les profils dans la catégorie et sélectionner le profil désiré 5 Activer en tant que profil par défaut Make this the active profile apparaîtra sur l écran Appuyer le bouton Sélectionner pour confirmer ou Annuler Qu...

Page 69: ...initivement dans un profil vous pouvez exporter le profil révisé vers une clé USB et ensuite importer le profil sur le mélangeur Ou vous pouvez modifier n importe quel numéro avec le Blend Wizard my blendtec com et ensuite exporter le profil révisé vers le mélangeur 4 1 8 Le Blend Wizard En plus d utiliser des profils et des cycles préprogrammés vous pouvez utiliser le Blend Wizard pour créer des ...

Page 70: ...ter profil actif et Appuyer Sélectionner Note Si la clé USB vers laquelle le fichier est exporté contient déjà un fichier sth prof bpf l écran LED affichera la question Exporter le profil dans le fichier STH PROF BPF Export profile to the sth prof bpf file Appuyer le bouton Sélectionner encore une fois pour débuter le processus d exportation Appuyer le bouton Annuler Quitter pour retourner au menu...

Page 71: ...urseur modèle Stealth 875 seulement La fonctionnalité de Verrouillage du curseur permet de désactiver la glissière sur la surface de contrôle Lorsque cette fonction est activée seulement les profils sur le mélangeur peuvent être utilisés pour opérer le mélangeur Pour activer et désactiver cette fonctionnalité compléter les étapes suivantes 1 Appuyer et maintenir enfoncé le bouton Annuler Quitter p...

Page 72: ... statistiques du mélangeur Exporter les statistiques du mélangeur total des cycles erreurs réglages et versions du micro logiciel est une façon de sauvegarder l information de diagnostique que le service aux clients et les experts en réparation de Blendtec utiliseront si un problème se produit avec votre mélangeur Pour exporter les statistiques du mélangeur vers une clé USB compléter les étapes su...

Page 73: ...bstruer les ouvertures d admission d air du moteur Lors de l installation de plusieurs mélangeurs laisser un écart de 35 6 à 40 6 cm de 14 à 16 po entre le centre des ouvertures Lors de l installation d un boîtier d insonorisation laisser un dégagement d au moins 14 cm 5 po entre le boîtier et le mur et d au moins 66 cm 26 po entre le comptoir et les armoires supérieures S assurer que les armoires...

Page 74: ...INSONORISATION Figure 1 Dimensions du Stealth Figure 2 Composants du Stealth ASSEMBLAGE DES LAMES DOUILLE EN MÉTAL DURCI ET MOTEUR RÉCIPIENT FACILE À NETTOYER STEALTHMC 62 cm 24 po 10 4 cm 4 po 23 cm 9 po 21 6 cm 8 po ...

Page 75: ...e Annuler Quitter pour arrêter un cycle de mélange ou une operation manuelle avant que le temps programmé soit complété Si vous avez activé la fonctionalité Interrompre le cycle appuyer sur le cycle de mélange selectioné précédement pour interrompre le cycle Pour reprendre le cycle mis en pause appuyer sur le button de cycle de mélange précédent encore 4 2 3 Stealth 885MC Guide de démarrage rapide...

Page 76: ...ner un profil Changer les numéros des cycles préprogrammés Vérifier le nombre de cycles faits Vérifier le journal d erreurs diagnostiques Utiliser un profil sur mesure conçu via le Blend WizardMC l outil de programmation en ligne de Blendtec Pour entrer le mode programmation 1 Toucher et maintenir enfoncer le bouton Annuler Quitter pendant 3 secondes 2 Utiliser la flèche de défilement et sélection...

Page 77: ...moothie 2 19 Smoothie moyen 3 Medium Smoothie 3 20 Smoothie moyen 4 Medium Smoothie 4 21 Grand smoothie 1 Large Smoothie 1 22 Grand smoothie 2 Large Smoothie 2 23 Grand smoothie 3 Large Smoothie 3 24 Grand smoothie 4 Large Smoothie 4 25 Grand smoothie 5 Large Smoothie 5 26 Grand smoothie 6 Large Smoothie 6 27 Smoothie ultra épais 1 Ultrathick Smoothie 1 28 Smoothie ultra épais 2 Ultrathick Smoothi...

Page 78: ... 4 2 6 Sélectionner le profil désiré 1 Appuyer et maintenir le bouton Annuler Quitter pendant 3 secondes 2 Sélectionner les profils à partir du menu en touchant le bouton Sélectionner 3 Utiliser le bouton de défilement pour sélectionner la catégorie des profils standards ou personnalisés 4 Après avoir sélectionné la catégorie des profils standards ou personnalisés vous pouvez faire défiler les pro...

Page 79: ...u de commande Télécharger un nouveau profil sur votre mélangeur réinitialisera les profils et réactivera tous les boutons de cycle Désactiver les boutons de cycles définitivement Pour désactiver les boutons de cycles définitivement dans un profil vous pouvez exporter le profil révisé vers une clé USB et ensuite importer le profil sur le mélangeur Ou vous pouvez modifier n importe quel numéro avec ...

Page 80: ... sur l écran Si le mélangeur est en mode programmation aller au menu principal et sélectionner Lecteur USB 4 Utiliser le bouton de défilement pour trouver Exporter profil actif et Appuyer Sélectionner Note Si la clé USB vers laquelle le fichier est exporté contient déjà un fichier sth prof bpf l écran LED affichera la question Exporter le profil dans le fichier STH PROF BPF Export profile to the s...

Page 81: ...rompu Si la fonctionnalité Interrompre le cycle est désactivée il suffit d appuyer sur n importe quel bouton désactivé pour arrêter le cycle 5 Appuyer le bouton Annuler Quitter pour retourner au menu précédent Verrouillage du curseur modèle Stealth 875 seulement La fonctionnalité de Verrouillage du curseur permet de désactiver la glissière sur la surface de contrôle Lorsque cette fonction est acti...

Page 82: ... combien d erreurs se sont produites dans chaque catégorie 4 Appuyer le bouton Annuler Quitter pour retourner au menu précédent Exporter les statistiques du mélangeur Exporter les statistiques du mélangeur total des cycles erreurs réglages et versions du micro logiciel est une façon de sauvegarder l information de diagnostique que le service aux clients et les experts en réparation de Blendtec uti...

Page 83: ...r ne doit pas dépasser 1 9 cm po Si le comptoir est plus épais il pourrait obstruer les ouvertures d admission d air du moteur Lors de l installation de plusieurs mélangeurs laisser un écart de 35 6 à 40 6 cm de 14 à 16 po entre le centre des ouvertures Lors de l installation d un boîtier d insonorisation laisser un dégagement d au moins 14 cm 5 po entre le boîtier et le mur et d au moins 66 cm 26...

Page 84: ...ISATION ASSEMBLAGE DES LAMES DOUILLE EN METAL DURCI ET MOTEUR SOCLE DU MOTEUR RÉCIPIENT FACILE À NETTOYER CONNOISSEUR 825MC Figure 4 Dimensions Connoisseur 825 46 8 cm 18 po 57 2 cm 22 po 23 6 cm 9 po 23 7 cm 9 po 6 6 cm 2 po ...

Page 85: ...u mélangeur 2 Soulever le couvercle du boîtier d insonorisation 3 Placer le récipient du mélangeur sur le socle du moteur vous assurant que le récipient est posé complétement sur le socle et que le couvercle est solidement posé sur le récipient 4 Fermer le couvercle du boîtier d insonorisation 5 Sur la surface tactile Appuyer le nombre pour le cycle de mélange désiré ou l icône Pulser 6 Pousser n ...

Page 86: ...oothie 4 Large Smoothie 4 Bouton 6 Pulser Pulse Lorsque vous mettez en marche le mélangeur pour la première fois ce sera le profil par défaut Cycles préprogrammés Pour une liste complète des profils ou cycles préprogrammés et pour des instructions sur la façon de programmer et changer les profils ou cycles veuillez visiter blendtec com Fonction Pulser Le bouton Pulser est utilisé pour hacher éminc...

Page 87: ...85 FRANÇAIS ...

Page 88: ...ers la gauche pour la diminuer Sélectionner la fonction Pulser pour ajouter un éclat de vitesse et de puissance Fonctionnalité 10 L icône 10 permet à l utilisateur d ajouter des intervalles de 10 secondes aux cycles offrant des mélanges complétement personnalisés Il agit également comme un cycle indépendant de 10 secondes Configuration de profil Série Chef Changer les configurations du profil sur ...

Page 89: ...87 FRANÇAIS DOUILLE D ENTRAÎNEMENT EN MÉTAL DURCI ET MOTEUR SOCLE DU MOTEUR ASSEMBLAGE DES LAMES RÉCIPIENT FACILE À NETTOYER COUVERCLE ET PANNEAU TACTILE CHEF 775MC ...

Page 90: ...e repos où il affiche le total des cycles entrer le code pour le mode désiré Profil multi usage 1 Petit Moyen Grand Profil multi usage 2 Moyen Grand Pulser Profil multi usage 3 Grand Pulser Petit 3 Lorsque le code est entré avec succès le mélangeur gardera en mémoire le nouveau mode puis retournera à l écran en repos Profil multi usage 1 idéal pour cafés frappés et smoothies glacés Profil multi us...

Page 91: ...89 FRANÇAIS DOUILLE D ENTRAÎNEMENT EN MÉTAL DURCI ET MOTEUR ASSEMBLAGE DES LAMES RÉCIPIENT FACILE À NETTOYER COUVERCLE DU SOCLE ET PANNEAU TACTILE EZ 600MC ...

Page 92: ... avant de le servir Le modèle Chef 600 offre une plus grande flexibilité grâce à ses deux intensités de pulsation Pulsation faible Sert à hacher ou à mélanger des aliments fragiles Pulsation élevée Sert à mélanger ou à réduire en purée Utilisation du cycle de pulsation Appuyer sur le bouton de pulsation désirée faible ou élevée Le mélangeur fonctionne à l intensité sélectionnée jusqu à ce que le b...

Page 93: ...91 FRANÇAIS DOUILLE D ENTRAÎNEMENT EN MÉTAL DURCI ET MOTEUR ASSEMBLAGE DES LAMES RÉCIPIENT FACILE À NETTOYER COUVERCLE DU SOCLE ET PANNEAU TACTILE CHEF 600MC ...

Page 94: ...on avec un linge humide propre Un nettoyant doux tout usage non abrasif peut être utilisé La douille d entraînement peut être nettoyée avec une tige de coton ouaté ou un cure dent Pour le modèle Stealth le boîtier d insonorisation peut aussi être enlevé pour le nettoyage lorsque nécessaire Ouvrir le couvercle du boîtier d insonorisation et utiliser les deux mains pour tirer vers l extérieur le cou...

Page 95: ...eprésentant Blendtec Erreur Overload surcharge Overload Error Ce message indique une surcharge du moteur 1 Effacer le message d erreur en Appuyer n importe quel bouton ou en éteignant et allumant le mélangeur 2 Enlever le récipient et faire fonctionner le mélangeur pour déterminer si le problème est lié au récipient ou au moteur 3 Une fois que le récipient est enlevé vérifier s il y a des blocages...

Page 96: ...habituellement causé par des fluctuations ou des pointes de l électricité entrante Ce message peut être effacé en éteignant le mélangeur pendant 10 secondes en utilisant l interrupteur et en le rallumant Si cette erreur s affiche immédiatement au démarrage ou si elle se produit régulièrement durant une utilisation normale contacter votre représentant Blendtec pour de l assistance CHEF 775MC Erreur...

Page 97: ...excessivement durs ou épais Si la condition surcharge se reproduit contacter votre représentant Blendtec 6 3 CHANGEMENTS DANS LE NIVEAU DE BRUIT Si le niveau de bruit du mélangeur augmente déterminer si le son vient du moteur ou du récipient 1 Moteur du mélangeur Enlever le récipient du socle du moteur et faire fonctionner le moteur Si le bruit est excessivement élevé veuillez contactez un représe...

Page 98: ...us proche équivalent Afin que Blendtec honore votre garantie vous devrez fournir le numéro de série le numéro de modèle et une preuve d achat chez un détaillant autorisé au moment de la réclamation De plus l étiquette du numéro de série apposée sur le produit doit être intacte et inaltérée sans quoi la garantie sera annulée Les éléments suivants ne sont pas inclus dans la couverture de garantie de...

Page 99: ...ualifié de Blendtec clients internationaux pour diagnostiquer le problème Veuillez avoir le numéro de série du mélangeur prêt et soyez préparé à décrire le problème Ne tentez pas de faire vos propres réparations La garantie sera annulée si des réparations sont faites par des individus autres qu un représentant au service qualifié de Blendtec Beaucoup de problèmes peuvent être résolus simplement et...

Page 100: ...ANGEUR POUR RÉPARATIONS REMPLACEMENT Veuillez faire une copie de ce formulaire Nom Entreprise Magasin Adresse Téléphone de série trouvé sous le socle du moteur Total des cycles Date d achat Endroit de l achat Une explication du problème ...

Page 101: ...99 FRANÇAIS ANNEXE A GABARIT DE DÉCOUPE DE COMPTOIR 14 9 cm 5 po 11 1 cm 4 po ...

Page 102: ...100 ...

Page 103: ...101 SPANISH COMMERCIAL SERIES SERIE COMERCIAL MANUAL DEL PROPIETARIO Y GUÍA DEL USUARIO ...

Page 104: ...NFORMACIÓN GENERAL DE INSTALACIÓN Y FUNCIONAMIENTO 106 4 1 STEALTH 895NBS 106 4 2 STEALTH 875 Y STEALTH 885 118 4 3 CONNOISSEUR 825 130 4 4 CHEF 775 140 4 5 EZ 600 142 4 6 CHEF 600 144 SECCIÓN 5 CUIDADO Y LIMPIEZA 146 SECCIÓN 6 RESOLUCIÓN DE PROBLEMAS 146 SECCIÓN 7 GARANTÍA 150 APÉNDICE A PLANTILLA DE AGUJERO EN LA ENCIMERA 153 ...

Page 105: ...do la jarra de la licuadora esté en la base del motor NUNCA toque las cuchillas con los dedos independientemente de que esté la jarra o no en la base del motor NUNCA coloque la jarra en el acoplamiento si el motor está en funcionamiento NO sacuda o retire la jarra mientras esté en funcionamiento Estas precauciones evitarán lesiones personales o daños a la licuadora 1 3 NUNCA UTILICE LA LICUADORA S...

Page 106: ...IFERENTE VÉASE EL MODELO PARA CONSULTAR LAS ESPECIFICACIONES 1 11 NUNCA INTENTE REPARAR LA UNIDAD DE POTENCIA Nunca quite la cubierta del motor de la licuadora El motor de la licuadora no contiene partes que puedan ser ajustadas automáticamente o reparadas por el usuario Un agente de servicio cualificado debe hacer todos los ajustes de servicio Quitar la cubierta o intentar realizar ajustes de ser...

Page 107: ...den servicio o para hacer preguntas Número de serie del motor ubicado en la parte inferior de la base del motor __________________________________________________________ Fecha de compra ____________________________________________ Comprado en _______________________________________________ 2 3 REGISTRO DE SU LICUADORA Regístrela en línea en www blendtec com registration spanish SECCIÓN 3 CONOZCA ...

Page 108: ...NBS 4 1 1 Instalación Instalación sobre mostrador de la Stealth 875 Seleccione un lugar que esté cerca de un tomacorriente Considere también la proximidad a los ingredientes y a los clientes así como el espacio de mostrador disponible Coloque la licuadora sobre el mostrador en un lugar donde los orificios de entrada de aire en los laterales y el escape en la parte trasera de la licuadora no estén ...

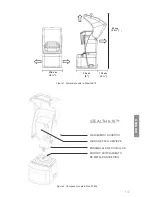
Page 109: ... ACÚSTICO Figura 1 Dimensiones de la Stealth 875 Figura 2 Componentes de la Stealth 875 ENSAMBLAJE DE CUCHILLAS MOTOR Y ACOPLAMIENTO DE METAL ENDURECIDO JARRA DE FÁCIL LIMPIEZA STEALTH 875 62 cm 24 21 6 cm 8 23 cm 9 10 4 cm 4 ...

Page 110: ... espacio mínimo de 7 6 cm 3 entre la parte inferior del motor y el estante inferior Los armarios no deben cerrarse deben permitir que el aire fluya libremente desde el exterior hacia el interior del espacio del armario Las bolsas de plástico vasos entre otros no deben almacenarse a menos de 7 6 cm 3 desde la parte inferior del motor Corte un agujero en la encimera de 11 1 cm 4 de ancho y 14 9 cm 5...

Page 111: ...licuadora Stealth 875 viene con varios perfiles de licuadora predeterminados para ayudar a los usuarios a conseguir licuados consistentes con un mínimo de formación ensayo y error Puede seleccionar entre los siguientes perfiles y ciclos de licuado Perfil multiusos Botón 1 Small Milkshake Malteada pequeña Botón 2 Granita Medium Milkshake Granita Malteada mediana Botón 3 Small Margarita Ice Cappucci...

Page 112: ...ge Milkshake 3 Malteada grande 3 4 1 4 Control deslizante táctil capacitivo con 11 velocidades pulso Toque el botón de modo para cambiar de modo automático a modo de funcionamiento manual y el control deslizante táctil capacitivo de 11 velocidades El control deslizante táctil capacitivo proporciona un control de velocidad de precisión constante simplemente deslice el dedo por el control deslizante...

Page 113: ...oothie mediano 2 19 Smoothie mediano 3 20 Smoothie mediano 4 21 Smoothie grande 1 22 Smoothie grande 2 23 Smoothie grande 3 24 Smoothie grande 4 25 Smoothie grande 5 26 Smoothie grande 6 27 Smoothie ultra espeso 1 28 Smoothie ultra espeso 2 29 Smoothie ultra espeso 3 30 Smoothie ultra espeso 4 31 50 segundos a velocidad 1 32 50 segundos a velocidad 2 33 50 segundos a velocidad 3 34 50 segundos a v...

Page 114: ...nar al ciclo a continuación pulse Seleccionar Nota Después de asignar un ciclo a un botón de número notará que aparece un asterisco después del nombre de perfil cuando vuelva al modo de funcionamiento Cargar un nuevo perfil en la licuadora restablecerá los perfiles a los botones de ciclo predeterminados Cambiar de manera permanente los botones de los ciclos Para cambiar de forma permanente los bot...

Page 115: ...ior del lado derecho de la licuadora 2 Conecte la unidad flash USB en el puerto USB de la licuadora Nota Si la licuadora está en modo de funcionamiento manual o automático el menú de la unidad flash USB se carga automáticamente en la pantalla Si la licuadora está en modo de programación vaya al menú principal y seleccione USB Flash Drive Unidad flash USB 3 Seleccione Import Profile Importar perfil...

Page 116: ...está en modo de funcionamiento manual o automático el menú de la unidad flash USB se carga automáticamente en la pantalla Si la licuadora está en modo de programación vaya al menú principal y seleccione USB Flash Drive Unidad flash USB 4 Utilice el botón de desplazamiento para encontrar Export Active Profile Exportar perfil activo y pulse Seleccionar Nota Si la unidad flash USB al que el archivo e...

Page 117: ...oras Para seleccionar un nuevo tiempo de espera siga los siguientes pasos 1 Mantenga pulsado el botón de cancelar salir durante 3 segundos 2 Use el botón de desplazamiento y a continuación seleccione Settings Ajustes en el menú pulsando el botón de selección 3 Utilice el botón de selección para elegir Screen Standby Pantalla de espera 4 Utilice el botón de desplazamiento para encontrar el tiempo d...

Page 118: ...añol 4 1 10 Estadísticas de la licuadora Cuenta de ciclos de licuado Puede revisar el número total de ciclos realizados el número de ciclos realizados por cada número de la superficie de control el número de veces que el botón de pulso se ha utilizado y el número de veces que la barra de control deslizante se ha utilizado 1 Mantenga pulsado el botón de cancelar salir durante 3 segundos 2 Use el bo...

Page 119: ...ecte la unidad flash USB en el puerto USB de la licuadora Nota Si la licuadora está en modo de funcionamiento manual o automático el menú de la unidad flash USB se carga automáticamente en la pantalla Si la licuadora está en modo de programación vaya al menú principal y seleccione USB Flash Drive Unidad flash USB 3 Utilice el botón de desplazamiento para encontrar Export Counts Exportar cuenta y p...

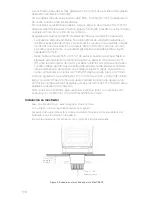
Page 120: ...1 para consultar las mediciones Enchufe la unidad a un tomacorriente con protección eléctrica adecuada Preparación para la instalación en mostrador de la Stealth 875 y Stealth 875 Nota Puede ubicar su Stealth 875 de Blendtec en el mismo espacio que la anterior licuadora Blendtec en el mostrador Sólo recuerde asegurarse de que haya el espacio apropiado para el aislamiento acústico véase la Figura 1...

Page 121: ...119 SPANISH AISLAMIENTO ACÚSTICO Figura 2 Componentes de la Stealth 875 ENSAMBLAJE DE CUCHILLAS MOTOR Y ACOPLAMIENTO DE METAL ENDURECIDO JARRA DE FÁCIL LIMPIEZA STEALTH 875 Y 885 ...

Page 122: ... menos 16 5 cm 6 de espacio desde la encimera hasta el siguiente estante inferior del armario dejando un espacio mínimo de 7 6 cm 3 entre la parte inferior del motor y el estante inferior Los armarios no deben cerrarse deben permitir que el aire fluya libremente desde el exterior hacia el interior del espacio del armario Las bolsas de plástico vasos entre otros no deben almacenarse a menos de 7 6 ...

Page 123: ...licuadora Stealth 875 viene con varios perfiles de licuadora predeterminados para ayudar a los usuarios a conseguir licuados consistentes con un mínimo de formación ensayo y error Puede seleccionar entre los siguientes perfiles y ciclos de licuado Perfil multiusos Botón 1 Small Milkshake Malteada pequeña Botón 2 Granita Medium Milkshake Granita Malteada mediana Botón 3 Small Margarita Ice Cappucci...

Page 124: ...ge Milkshake 3 Malteada grande 3 4 2 4 Control deslizante táctil capacitivo con 11 velocidades pulso Toque el botón de modo para cambiar de modo automático a modo de funcionamiento manual y el control deslizante táctil capacitivo de 11 velocidades El control deslizante táctil capacitivo proporciona un control de velocidad de precisión constante simplemente deslice el dedo por el control deslizante...

Page 125: ...oothie mediano 2 19 Smoothie mediano 3 20 Smoothie mediano 4 21 Smoothie grande 1 22 Smoothie grande 2 23 Smoothie grande 3 24 Smoothie grande 4 25 Smoothie grande 5 26 Smoothie grande 6 27 Smoothie ultra espeso 1 28 Smoothie ultra espeso 2 29 Smoothie ultra espeso 3 30 Smoothie ultra espeso 4 31 50 segundos a velocidad 1 32 50 segundos a velocidad 2 33 50 segundos a velocidad 3 34 50 segundos a v...

Page 126: ...nar al ciclo a continuación pulse Seleccionar Nota Después de asignar un ciclo a un botón de número notará que aparece un asterisco después del nombre de perfil cuando vuelva al modo de funcionamiento Cargar un nuevo perfil en la licuadora restablecerá los perfiles a los botones de ciclo predeterminados Cambiar de manera permanente los botones de los ciclos Para cambiar de forma permanente los bot...

Page 127: ...ior del lado derecho de la licuadora 2 Conecte la unidad flash USB en el puerto USB de la licuadora Nota Si la licuadora está en modo de funcionamiento manual o automático el menú de la unidad flash USB se carga automáticamente en la pantalla Si la licuadora está en modo de programación vaya al menú principal y seleccione USB Flash Drive Unidad flash USB 3 Seleccione Import Profile Importar perfil...

Page 128: ...está en modo de funcionamiento manual o automático el menú de la unidad flash USB se carga automáticamente en la pantalla Si la licuadora está en modo de programación vaya al menú principal y seleccione USB Flash Drive Unidad flash USB 4 Utilice el botón de desplazamiento para encontrar Export Active Profile Exportar perfil activo y pulse Seleccionar Nota Si la unidad flash USB al que el archivo e...

Page 129: ...oras Para seleccionar un nuevo tiempo de espera siga los siguientes pasos 1 Mantenga pulsado el botón de cancelar salir durante 3 segundos 2 Use el botón de desplazamiento y a continuación seleccione Settings Ajustes en el menú pulsando el botón de selección 3 Utilice el botón de selección para elegir Screen Standby Pantalla de espera 4 Utilice el botón de desplazamiento para encontrar el tiempo d...

Page 130: ...añol 4 2 10 Estadísticas de la licuadora Cuenta de ciclos de licuado Puede revisar el número total de ciclos realizados el número de ciclos realizados por cada número de la superficie de control el número de veces que el botón de pulso se ha utilizado y el número de veces que la barra de control deslizante se ha utilizado 1 Mantenga pulsado el botón de cancelar salir durante 3 segundos 2 Use el bo...

Page 131: ...ecte la unidad flash USB en el puerto USB de la licuadora Nota Si la licuadora está en modo de funcionamiento manual o automático el menú de la unidad flash USB se carga automáticamente en la pantalla Si la licuadora está en modo de programación vaya al menú principal y seleccione USB Flash Drive Unidad flash USB 3 Utilice el botón de desplazamiento para encontrar Export Counts Exportar cuenta y p...

Page 132: ...ras 4 y 5 La encimera no puede ser más gruesa que 1 9 cm 0 75 Una encimera más gruesa Obstruya la ventilación del motor Si instala más de una licuadora deje de 35 a 40 6 cm 14 a 16 de centro a centro Separación del mezclador Si instala un recinto acústico permita un espacio libre de al menos 5 14 cm Caja de sonido a la pared y 26 66 cm de la encimera a cualquier sobre el contador Gabinetes Asegúre...

Page 133: ...MIENTO ACÚSTICO ENSAMBLAJE DE CUCHILLAS MOTOR Y ACOPLAMIENTO DE METAL ENDURECIDO BASE DEL MOTOR JARRA DE FÁCIL LIMPIEZA CONNOISSEUR 825 DSIDE JAR Figura 4 Dimensiones de la Connoisseur 825 46 8 cm 18 23 6 cm 9 23 7 cm 9 ...

Page 134: ...r de encendido en la parte frontal de la licuadora 2 Levante la tapa de la caja acústica 3 Coloque la jarra de la licuadora en la base del motor asegurando que la jarra esté completa mente asentada Y la tapa del frasco está asegurada 4 Cierre la tapa de la caja acústica 5 En el touchpad pulse el número de ciclo de mezcla deseado o el icono de pulso 6 Presione cualquier botón de ciclo de mezcla 1 a...

Page 135: ...tton 6 Pulse Speed 7 When you turn the blender on for the first time this will be the default profile Smoothie Profile Button 1 Small Smoothie w Fresh Fruit Button 2 Medium Smoothie 4 Button 3 Granita Medium Milkshake Button 4 Medium Smoothie 3 Button 5 Large Smoothie 4 Button 6 Pulse Speed 7 Coffee Profile Button 1 Small Margarita Ice Cappuccino Button 2 Large Ice Cappuccino Button 3 Small Slushy...

Page 136: ...ipal se enumeran a continuación numeradas como En la licuadora 1 PROFILES 1 Standard Profiles 1 Smoothie 2 Coffee 3 Multipurpose 4 Milkshake 2 Custom Profiles 2 BLEND CYCLES 1 Standard Blend Cycles 1 Salsa 2 Batter 3 Whole Juice 4 Soup 5 Ice Cream 6 Small Margarita Ice Cappuccino 7 Large Ice Cappuccino 8 Ice Crush Milkshake 9 Small Slushy Milkshake 10 Small Milkshake 11 Granita Medium Milkshake 12...

Page 137: ... de perfil estándar o personalizado puede despla zarse por Los perfiles de la categoría utilizando el botón 1 y seleccione el perfil deseado con el botón 5 5 Hacer que el perfil activo Aparecerá en la pantalla Presione el botón 5 Para confirmar o pulsar el botón para cancelar y volver al menú anterior 4 3 6 CAMBIO DE LOS BOTONES DEL CICLO PROGRAMADO Botones Temporalmente Cambiar Ciclo Para cambiar...

Page 138: ...ando regresa al modo de operación El botón desac tivado tampoco aparecerá en el panel de control Al cargar un nuevo perfil en su mez cladora los perfiles se restablecerán y Los botones de ciclo de nuevo Desactivar ciclo permanentemente botones Para cambiar permanentemente los botones de ciclo de un perfil puede exportar los Perfil a una unidad USB e importar el perfil en la licuadora O tu puedes D...

Page 139: ... seguro desactivado 3 Importe el perfil a una unidad USB y a continuación siga las instrucciones Archivo a la licuadora Exportar y transferir perfiles Para exportar perfiles y transferirlos al Asistente de mezcla complete la siguientes pasos 1 Asegúrese de que el perfil que desea exportar es el perfil activo de la licuadora 2 Localice el puerto USB en la parte inferior de la licuadora 3 Conecte la...

Page 140: ...es y versiones de firmware Es una forma de guardar la información de diagnóstico que el servicio al cliente de Blendtec y Los expertos de la reparación utilizarán si surgen problemas con su licuadora Para exportar las estadísticas del mezclador a una unidad USB realice los pasos siguientes 1 Localice el puerto USB en la parte inferior de la licuadora 2 Conecte la unidad flash USB en el puerto USB ...

Page 141: ...139 SPANISH ...

Page 142: ...proporciona un control de velocidad de precisión constante simplemente deslice el dedo por el control deslizante para ajustar la velocidad de su licuadora La función de pulso da un impulso de velocidad y potencia Función 10 Añadir 10 El ícono 10 permite a los usuarios añadir intervalos de 10 segundos a sus ciclos de licuado También funciona como un ciclo independiente de 10 segundos Configuración ...

Page 143: ...1 SPANISH AWINGS WILDSIDE JAR MOTOR Y ACOPLAMIENTO DE METAL ENDURECIDO BASE DEL MOTOR ENSAMBLAJE DE CUCHILLAS JARRA DE FÁCIL LIMPIEZA CUBIERTA SUPERIOR Y PANEL TÁCTIL CHEF 775 SNOO Smoothie NSHA Malteada ...

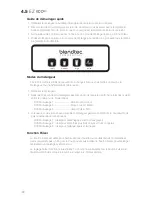
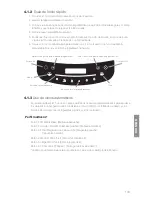
Page 144: ...uadora 2 En los 10 segundos en los que la licuadora está en modo de reposo donde se muestra la cuenta de ciclos introduzca el código para el modo deseado Perfil Coffee Café Pequeño Mediano Grande Perfil Smoothie Mediano Grande Pulso Perfil Milkshake Malteada Grande Pulso Pequeño 3 Cuando se introduce con éxito el código la licuadora almacena el nuevo modo y luego regresa a la pantalla de reposo Fu...

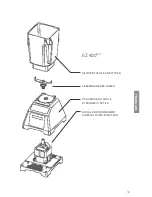
Page 145: ...143 SPANISH MOTOR Y ACOPLAMIENTO DE METAL ENDURECIDO ENSAMBLAJE DE CUCHILLAS JARRA DE FÁCIL LIMPIEZA CUBIERTA DE LA BASE Y PANEL TÁCTIL EZ 600 ...

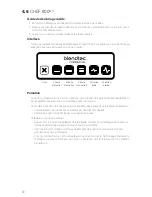
Page 146: ...o requieren de un largo ciclo de licuado También puede utilizar los botones de pulso para remover rápidamente un licuado antes de servirlo Para una mayor flexibilidad la licuadora Chef 600 le ofrece dos programas de pulso diferentes Pulso bajo se usa para cortar o mezclar ingredientes frágiles Pulso alto se usa para licuar y hacer purés Para utilizar la función de pulso Pulse el botón de pulso des...

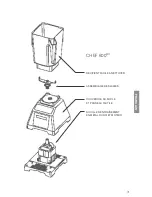
Page 147: ...145 SPANISH CHEF 600 MOTOR Y ACOPLAMIENTO DE METAL ENDURECIDO ENSAMBLAJE DE CUCHILLAS JARRA DE FÁCIL LIMPIEZA CUBIERTA DE LA BASE Y PANEL TÁCTIL ...

Page 148: ... de licuadora Stealth también se puede quitar el aislamiento acústico para su limpieza cuando sea necesario Abra la tapa del aislamiento acústico y use ambas manos para tirar hacia afuera la tapa en las juntas giratorias Este paso hará que el plástico se extienda lo suficiente para retirar sus lengüetas de montaje La base del aislamiento acústico se puede quitar de forma similar tirando hacia fuer...

Page 149: ...cuadora para determinar si el problema está relacionado con la jarra o el motor 3 Con la jarra retirada busque obstrucciones en el acoplamiento o su alrededor en la base del motor y el ensamblaje de cuchillas de la jarra 4 Coloque la jarra firmemente en la base del motor y toque el ícono de pulso para que la cuchilla licue la mezcla 5 Asegúrese de que la jarra no se haya llenado con ingredientes e...

Page 150: ...interruptor y a continuación encendiéndola de nuevo Si este error se visualiza inmediatamente al encenderla o si se produce regularmente durante su uso normal comuníquese con su centro de servicio de Blendtec para obtener ayuda CHEF 775 Overtemp Error Error de sobrecalentamiento este mensaje indica el sobrecalentamiento del motor La licuadora ha sido desactivada mientras la unidad se enfría hasta ...

Page 151: ... ensamblaje de cuchillas de la jarra 4 Coloque la jarra firmemente en la base del motor y toque el botón de pulso para que la cuchilla licue la mezcla 5 Asegúrese de que la jarra no se haya llenado con ingredientes excesivamente duros o espesos Si vuelve a ocurrir una condición de sobrecarga comuníquese con su agente de servicio de Blendtec 6 3 CAMBIOS EN EL NIVEL DE RUIDO Si el nivel de ruido de ...

Page 152: ...trapo húmedo para eliminar cualquier líquido o acumulación de partículas Si eso no funciona desenchufe el cable de alimentación y vuelva a enchufarlo LAS INSTRUCCIONES QUE APARECEN EN ESTE MANUAL NO PRETENDEN ABARCAR TODAS LAS POSIBLES CONDICIONES O SITUACIONES QUE PUDIERAN OCURRIR SE DEBE USAR UN BUEN CRITERIO CUANDO UTILICE ESTE O CUALQUIER OTRO APARATO SECCIÓN 7 GARANTÍA 7 1 DESCRIPCIÓN DE LA G...

Page 153: ...l motor lo que conducirá a una falla prematura Esta causa de falla se considera mal uso y no está cubierta por la garantía 7 1 2 País de compra La garantía se proporciona sólo para el país en el que el se compró el equipo a un representante de ventas autorizado El uso del equipo fuera del país de compra invalidará todas las garantías expresas o implícitas Si un cliente decide utilizar un centro de...

Page 154: ...tro o fuera del período de garantía incluya el formulario proveido abajo ESTA GARANTÍA ES EN LUGAR DE TODAS LAS DEMÁS GARANTÍAS DE CUALQUIER TIPO EXPRESAS O IMPLÍCITAS INCLUYENDO CUALQUIER GARANTÍA IMPLÍCITA O COMER CIALIZACIÓN O IDONEIDAD PARA UN PROPÓSITO PARTICULAR En ningún caso Blendtec será responsable de ningún daño especial indirecto accidental o consecuente Al expirar el período de garant...

Page 155: ...153 SPANISH APÉNDICE A PLANTILLA DE AGUJERO EN LA ENCIMERA 14 9 cm 5 11 1 cm 4 ...

Page 156: ...4 BLENDTEC INC 1206 SOUTH 1680 WEST OREM UTAH 84058 U S A 1 800 BLENDTEC BLENDTEC COM 2015 BLENDTEC INC ALL RIGHTS RESERVED OWN CN 268 A01 Manual Owners Commercial All Models US ENG CA FRE MX SPA Aug 2017 ...

Reviews: