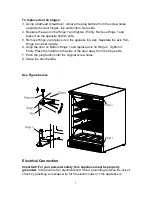
Blaze Outdoor Products BLZ-SSRF-50DH User Manual Download Page 10


If you want to use the Automatic Temperature (default) setting, do nothing 
further. The unit will automatically set the temperature in the compartment at 40


º

F (4

º

C). If you want to set other temperatures, see below.   

Temperature Setting 

Wine Storage Temperatures: While wines store best at temperatures around 56-
58ºF, your unit also allows you to store wine at drinking temperatures. Generally, 
RED WINE should be kept at 60-61ºF and WHITE WINE, which is usually served 
chilled, is best kept at 54-55ºF. Sparkling wines should be kept at about 46° F. 
For beer and soft drinks, choose the temperature setting that is most agreeable 
to you and your guests. 

To adjust the temperature, press the SET button, then use the UP/DOWN keys 
to navigate to the preferred temperature. The range of set temperatures is from 
36 to 64° F. For example, if you are storing red wine, you may want to set a 
temperature of 61

º

 F. When the correct temperature appears in the DISPLAY 

window of the control panel, press SET to confirm. The actual temperature inside 
the unit will now appear in the window. This temperature will vary depending on 
the number of bottles stored and how frequently the door is opened. 

Please note:

 The temperature sensor records the average temperature of the 

unit. Cold air falls and warmer air rises, and there will be a temperature variation 
from the bottom to the top of the unit. The temperature at the bottom of the unit 
will always be slightly colder. The controller only controls the average 
temperature of the unit. The temperature displayed by the electronic control 
panel is the instantaneous average temperature of the unit and there may be a 
variation of approximately 0 to 6 Fahrenheit degrees.   


When fully loaded with room temperature product, the BLZ-SSRF-50DH will 
operate continuously for as long as 24 hours to reduce the temperature inside 
the cabinet to the desired point. Under normal conditions, when the unit has been 
on for six hours, it will stop working for about thirty minutes to defrost 
automatically.   
 
The unit is designed to operate between 50°F (10

) and 100°F (38

). Higher 

ambient temperatures may reduce the unit’s ability to reach low temperatures. 
Best results are obtained at temperatures between 65°F and 80°F for built-in 
models and between 65°F and 90°F for freestanding models.   
 

Caution: 

Damages caused by ambient temperatures of 40°F (4

) or below are 

not covered by the warranty. 
To temporarily stop the cooling cycle, unplug the Refrigerator. To shut it down for 
longer periods of time, disconnect the plug and leave the door partially open. 

Summary of Contents for BLZ-SSRF-50DH

Page 1: ...Outdoor Refrigerator User Manual Be sure unit is standing upright 24 hours prior to plug in Model BLZ SSRF 50DH ...

Page 2: ...pounds which are known to the State of California to cause cancer and birth defects or other reproductive harm For more information go to www P65Warnings ca gov 1 All repairs disassembly and modifications should be performed only by qualified technicians Attempting to perform these yourself could result in fire malfunction or injury 2 Never splash water directly onto the product or wash it with wa...

Page 3: ...wire breakage possibly resulting in overheating and fire 12 Repair or replace any cord that is frayed or damaged Do not use a cord that shows cracks or abrasions along its length 1 This unit must be properly installed in accordance with the installation instructions along with all local codes before it is used See grounding instructions in the Installation section 2 This model can either be built ...

Page 4: ... any water that has collected in the pan Be sure the drain hole in the floor of the unit is clear and unobstructed 11 During long absences remove the unit s contents unplug the unit clean it and leave the door open slightly to avoid possible formation of condensation mold or odors Use a cover to protect the unit and prolong its lifespan 12 Leave disassembly and disposal of the unit to qualified ex...

Page 5: ...ation of Parts 4 Technical Specifications 5 Energy Saving Tips 5 Installation 5 7 Operating Your Refrigerator 8 10 Cleaning and Maintenance 11 Troubleshooting 11 12 Warranty 13 Location of Parts Shelves Door Light Fan Light switch Leveling legs Vents ...

Page 6: ...eep the door closed as much as possible especially in hot humid weather Cover open items to reduce moisture buildup inside the appliance Installation Remove the exterior and interior packaging Use a soft dry cloth to wipe down the outside of the refrigerator thoroughly Use a clean cloth dampened with lukewarm water to wipe down the inside of the refrigerator The unit should be located in a well ve...

Page 7: ...lation The door has four screw holes on each side allowing you to install the handle provided with the refrigerator Using a Phillips screwdriver remove the four screws pre installed on the side of the door Align the handle with the screw holes and attach with the four screws Tighten screws firmly but do not over tighten Reversing the Door Swing Tools needed Flathead screwdriver Phillips screwdrive...

Page 8: ...e the axis from Hinge 2 and set it aside 6 Align the door on Bottom Hinge 1 and replace axis on Hinge 2 Tighten it firmly Place the handle on the side of the door away from the hinge side 7 Push the plug buttons into the original screw holes 8 Swap the door handle See Figure below Electrical Connection Important For your personal safety this appliance must be properly grounded In the event of an e...

Page 9: ...ditions Operating Your Refrigerator IMPORTANT Do not plug in the Refrigerator for 24 hours after unit is set in place Failure to do so may result in the unit working improperly Compartment Design This Blaze Refrigerator has a capacity of 175 cans The unit has 3 adjustable chrome plated flat wire shelves to hold cans and bottles of beverages such as beer water and soft drinks The control panel also...

Page 10: ...ase note The temperature sensor records the average temperature of the unit Cold air falls and warmer air rises and there will be a temperature variation from the bottom to the top of the unit The temperature at the bottom of the unit will always be slightly colder The controller only controls the average temperature of the unit The temperature displayed by the electronic control panel is the inst...

Page 11: ...on the control panel In ALARM mode the unit will make a beeping sound and display an alarm message If the control panel displays any of the following messages EI HI or LI consult the Troubleshooting section of this manual Interior Light The interior light can be turned On or Off automatically with the opening or closing of the door The white light is the set color from the factory it also can be c...

Page 12: ...to a hole in the floor of the storage compartment and is channeled into a drain pan located at the back of the unit near the compressor Heat transferred from the compressor evaporates any water that has collected in the pan Be sure the drain hole in the floor of the unit is clear and unobstructed Extended Non Use VACATION HOLIDAY PROLONGED SHUTDOWN The following steps are recommended for periods o...

Page 13: ...ture Window displays EI This message is an ALARM MODE indication It indicates that thermostatic sensor has malfunctioned Contact your authorized service facility for sensor replacement Temperature Window displays LI This message is an ALARM MODE indication It indicates that the actual temperature is much lower than your set temperature Temperature Window displays HI This message is an ALARM MODE i...

Page 14: ... of the product use contrary to operating instructions or alteration by any unqualified person The warranty period is not extended by such repair or replacement Warranty claim procedure If you require parts for your refrigerator please contact your dealer for assistance ATTENTION International Customers Please consult your selling dealer or distributor for specifics pertaining to your product warr...

Reviews: