background image

We have taken tremendous pains at trying to understand the problems in system installation and design our products to
help, not hurt, the installation process.  Using our new 

MMT

(Multi Mount Tweeter) mounting system, we are able to quickly

and easily install the tweeter assembly in nearly every possible factory, and custom, location.  The key to the install is our
“cup mount” process where we first mount the tweeter to a cup via a small screw.  This is easily done outside the vehicle.
Then this tweeter assembly can be easily moved into place and the mating nut design can be screwed on, even with “blind”
installs such as door panels that are only partially removed.  

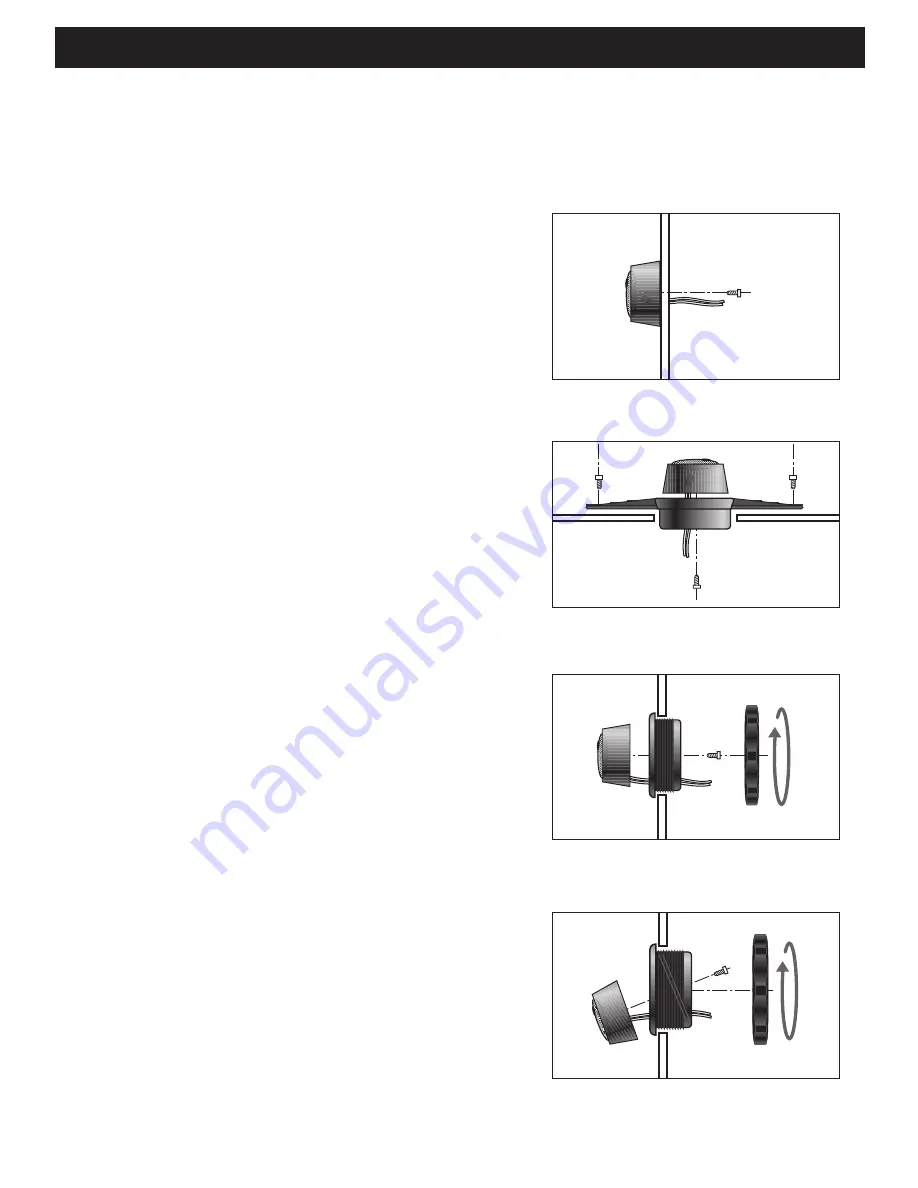
SURFACE MOUNT

This method is used in installations where room is not available behind
the tweeter to drill and recess a mounting cup.  Although not as visually
attractive as a flush cup, it performs well and is quick to install.

To make a surface mount, a hole is drilled for both the screw and signal
wires.  The screw is simply run through the surface material and into the
back of the tweeter.  A washer should be used to ensure the screw will
not pull through the surface over time.  

DASH MOUNT

Often, the user simply wants to mount the woofers in the door panels and
the tweeters in the dash which you can easily do with the universal dash kit.  

First, chose the mounting holes in the dash kit that will be used to mount
the adapter into the factory hole.  Then, mount the tweeter into the dash
adapter using the screw into the back of the tweeter.  Now, run the wires up
into the dash and connect to the tweeter pig-tail wire and simply screw the
dash adapter down into the factory hole with the factory screws. Pop the
grille back over the location and you are done. 

FLUSH MOUNT

This mount looks factory styled in nearly every vehicle if installed properly.
Although the opposite listener is slightly off-axis from the tweeter,
performance suffers very little due to the wide dispersion of the tweeter.  

To make this installation, first choose a location ensuring no electrical or
mechanical interference behind the tweeter.  Drill the proper sized hole in
the panel.  Mount the tweeter into the cup using the screw provided.
Snake the wires into the door panels and properly locate the crossover
boxes for ease of connection and control access but ensure they are not
in direct access to water or other exterior elements.  Finally, push the
tweeter through the hole, tighten the provided plastic nut onto the
threaded cup and you are done.

FLUSH-ANGLE MOUNT

This mount offers all the advantages of the flush mount above but it
angles the tweeter for better cross-car sound thus a better left/right
acoustical balance.  It is slightly deeper than the flush mount due to this
configuration so care must be taken to ensure no impact on inner door
surfaces.

The mounting process is identical otherwise to the flush mount system
above so follow the directions in the flush mount system as stated. 

T

WEETER INSTALLATION

– 

9

Surface Mount

Dash Opening Mount

Flush Mount

Angle-Flush Mount

Summary of Contents for Overdrive ODc 10

Page 1: ......

Page 2: ...Purchase Date Retailer Address City State Zip Telephone Installer Vehicle PURCHASE INFORMATION OTHER NOTES ...

Page 3: ... to paper This gives a much tighter midrange and bass response without distortions often found at high listening levels Below is a summary comparing conventional cones with the new technologies In addition to the Aluminum injected plastic cones is the MMT Multi Mount Tweeter program Such a tweeter design ensures that nearly every possible installation requiring a remote component tweeter is easily...

Page 4: ... and speaker wires are routed away from high current power lines for audio amplifiers and vehicle systems lines when possible This will help prevent noises from creeping into the audio system plus prevent potential damage to the vehicle wiring itself BE CARFUL WITH ALL CONNECTIONS When making connections make sure each connection is clean and properly secured Observe all polarity markings carefull...

Page 5: ...by improper installation on uneven surfaces This can occur when surfaces are heavily padded or carpeted and the screws are unevenly tightened or over tightened The results will be a damaged voice coil assembly due to knocking it off center When installing more than one speaker per amplifier channel be sure that the combined impedance values will not damage the amplifier should they be too low i e ...

Page 6: ...ividing network must be installed that keeps the low frequencies out of the midrange speakers Such a crossover network directs the higher and lower frequencies to their respective drivers Such a crossover can be passive simple coils and capacitors that limit the operating frequencies seen by their respective speakers A crossover can also be active where an electronic box must be installed in front...

Page 7: ...to by pass the crossover a crossover point of 4 kHz and 12 dB octave active filter should be used DO NOT use alternative passive units they may flip phase and overdrive the tweeter assemblies As for the vehicle speaker wiring MUST ALWAYS be isolated from the electrical system and chassis It should also be routed away from any factory computers and high current wiring to prevent stray noise pick up...

Page 8: ...install the crossover in a convenient location route and connect all wires mount the speaker install the grille and re install any panels or factory components DOOR MOUNTING Door locations are most often favored because of the tonal quality and imaging advantages they provide compared to the typical dash locations Unfortunately the woofer is forced into the very bottom of most doors because of spa...

Page 9: ... Then mount the tweeter into the dash adapter using the screw into the back of the tweeter Now run the wires up into the dash and connect to the tweeter pig tail wire and simply screw the dash adapter down into the factory hole with the factory screws Pop the grille back over the location and you are done FLUSH MOUNT This mount looks factory styled in nearly every vehicle if installed properly Alt...

Page 10: ...ofer thus lowering distortion increasing power handling and increasing the life of the speaker system But you must also supplement the low frequency part of the music below 100 Hz with some kind of subwoofer for an acoustically balanced audio system Although you can place your speakers into nearly any reasonable sized box the box technology dictates a sealed design because of inherent the Thiele S...

Page 11: ...writing by an officer of Robert Bosch Corporation THIS WARRANTY IS IN LIEU OF ALL OTHER WARRANTIES OR REPRESENTATIONS EXPRESS OR IMPLIED INCLUDING ANY WARRANTY IMPLIED BY LAW WHETHER FOR MERCHANTABILITY OR FITNESS FOR A PARTICULAR PURPOSE OR OTHERWISE AND SHALL BE EFFECTIVE ONLY FOR THE PERIOD THAT THIS EXPRESS WARRANTY IS EFFECTIVE In the event any provision or any part or portion of this warrant...

Page 12: ...o a Blaupunkt efetua melhoras nos seus produtos a fim de manter o melhor desempenho para o consumidor e os mais altos padrões de qualidade possíveis Por causa destes esforços as especificações e a aparência dos produtos ilustrados neste manual podem de vez em quando mudar no decorrer do período de duração do produto Con el propósito de ofrecer al usuario el máximo rendimiento y la mejor calidad po...

Page 13: ... or fax during standard business hours in a standard business work week If we cannot connect with the requester please re submit your request YOUR NAME COMPANY STREET CITY STATE ZIP TODAY S DATE DAYTIME AREA CODE PHONE DAYTIME AREA CODE FAX FAX OR MAIL TO Blaupunkt Technical Support 2800 S 25th Avenue Broadview Illinois 60153 FAX 708 450 8511 BLAUPUNKT FAX BACK TECHNICAL SUPPORT SHEET Please draw ...

Page 14: ... 2800 S 25th Avenue Broadview Illinois 60153 U S A http www blaupunkt com Copyright 1998 by the Robert Bosch Corporation No portion of this work may be reproduced in any form without the written consent of the Robert Bosch Corporation Printed in China 10 98 ...

Reviews: