Blaupunkt 23/50E-BR-2B-TCDUP-UK User Manual Download Page 11

IMPORTANT NOTE. Occasionally we may release new software/firmware 

upgrades/enhancements for this television. Please check the ‘firmware 

upgrade’ section of the website regularly.


13

13

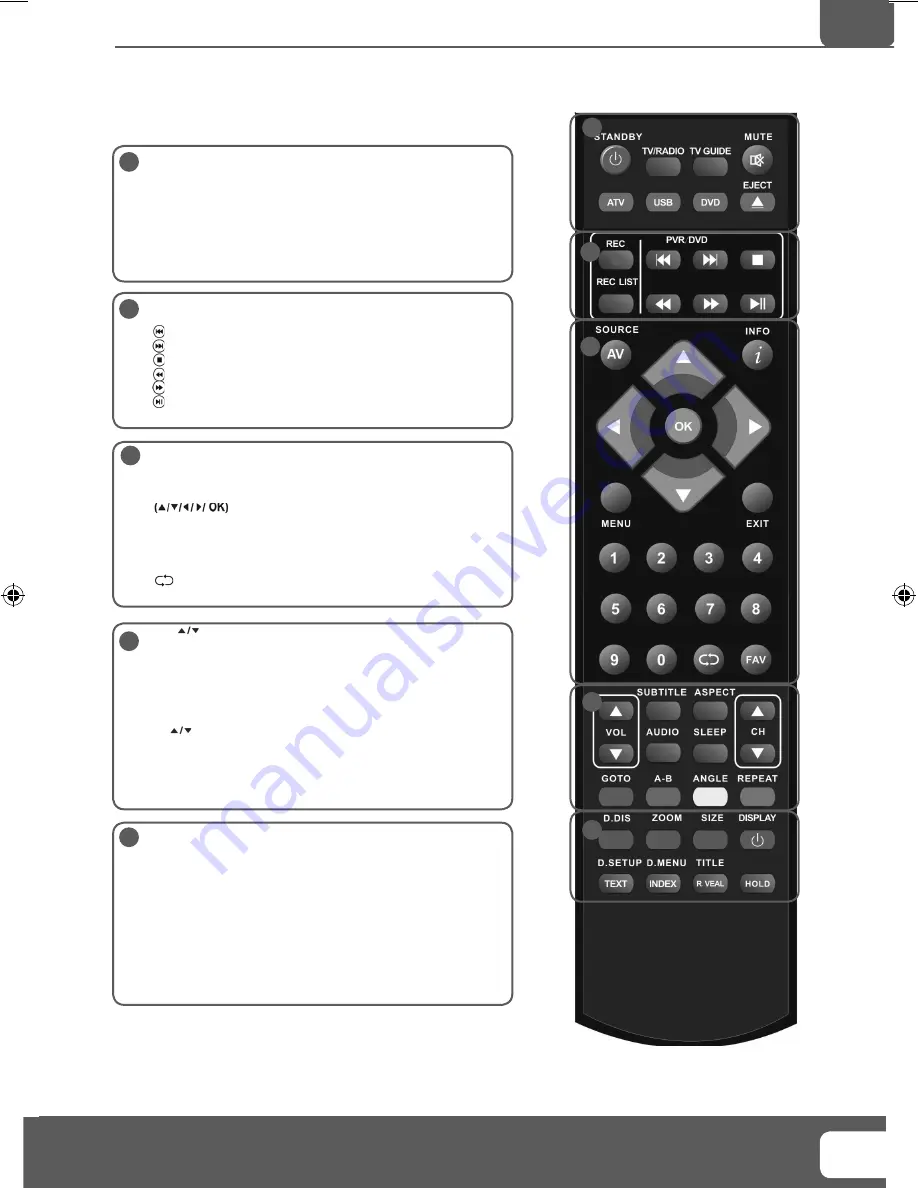
STANDBY - Switch on TV when in standby or vice versa
MUTE - Mute the sound or vice versa
TV/RADIO - Switch to Digital and switch between TV and radio 
in Digital mode
TV GUIDE - Opens the 7 Day TV Guide (Digital mode)
ATV - Switch to analogue TV source
USB - Switch to USB source
DVD - Switch to DVD source
EJECT - Eject disc in DVD mode

REC - To record what is currently on television 
REC LIST - Opens the list of what you have previously recorded

- To restart the current chapter
- To advance forward to the next chapter
- To stop the playback 
- To play in fast rewind mode
- To play in fast forward mode
- To play/pause (Pause live TV when USB Memory Stick is 
inserted)

SOURCE/AV - To display the input/source menu
INFO - Press once for now/next channel information
            Press twice for programme information about current  
            programme

 - Allows you to navigate the on-screen menus 

and adjust the system settings to your preference
MENU - To display OSD menu
EXIT - To exit all menus
NUMBER BUTTONS - 0 – 9 to select a TV channel directly. 

 - To return to the previous channel viewed

FAV - To display favourites menu

VOL 

 - To increase / decrease the sound level

SUBTITLE - To switch the dialogue at the bottom of the screen 
(on/off)
ASPECT - To switch the screen between the different picture 
formats
AUDIO - To change the audio language (if available)
SLEEP - Press repeatedly to cycle through the sleep options
CH 

 To increase or decrease the channel being watched

GOTO - DVD mode - To go to a specifi c chapter
A-B - DVD mode - Press once to set point, press a second time to 
return to point
ANGLE - DVD mode - Select different angle of DVD (if available)
REPEAT - DVD mode - To repeat playback

D.DIS - DVD mode - To display the current disc information
ZOOM - DVD mode - To zoom in 
SIZE - Teletext mode - To change the display size in Teletext 
mode
DISPLAY - To switch off the screen when listening to radio
DVD SETUP/TEXT - DVD mode - To display the DVD setup menu
Teletext mode - To enter Teletext
D.MENU/INDEX - DVD mode - To display the DVD disc menu
Teletext mode - To display the index page
TITLE/REVEAL - DVD mode - To display the DVD title menu
Teletext mode - To reveal or hide the hidden words.
HOLD - Teletext mode - Hold current page which is displayed

1

1

2

3

4

5

4

5

2

3

REMOTE CONTROL

Remote Control

Manual - Eternity - X23-50E-BB-FTCDUP-UK.indd   Sec1:13

Manual - Eternity - X23-50E-BB-FTCDUP-UK.indd   Sec1:13

6/10/2010   10:31:07 AM

6/10/2010   10:31:07 AM

Summary of Contents for 23/50E-BR-2B-TCDUP-UK

Page 1: ...23 50E BR 2B TCDUP UK HD Ready LED TV with Freeview DVD USB PVR Model No User Guide...

Page 2: ...ement Never use the television if it is damaged in any way Always place the television on a at level surface avoiding anywhere which may be subject to strong vibration Ensure the television is not pla...

Page 3: ...less likely to cause ageing of the screen Time Displays Teletext Do not view a stationary page for long period of time TV DVD Menus e g Listings of DVD disk content Pause Mode Do not leave the TV in p...

Page 4: ...Helpline No UK 0871 2000 463 ROI 01443 3940 Web Support www skymediauk co uk 6...

Page 5: ...t Up 11 TV Buttons and Input Source Menu 12 Remote Control 13 Connections 14 15 TV Menu Operation 16 21 Picture Menu 16 Sound Menu 17 Channel Menu 18 Feature Menu 19 Setup Menu 20 DVD Menu 21 PC Opera...

Page 6: ...f you are unable to package it correctly The safest way to package your item in the event of warranty service repair is in it s original box packaging WHAT IS INCLUDED IN THE BOX Accessories Included...

Page 7: ...ching the Stand 1 To remove the base press close and rotate 45 degrees 2 Remove the 4 screws highlighted IMPORTANT Before drilling any holes in the wall ensure you are not drilling where there could b...

Page 8: ...Helpline No UK 0871 2000 463 ROI 01443 3940 Web Support www skymediauk co uk 10...

Page 9: ...Getting Started Initial Set Up Fig A Fig B 4 Insert the batteries supplied into the Remote control and press the Standby button to power on the TV Tip If the TV nds some but not all of the Digital ch...

Page 10: ...ire 3 Press OK B Using the buttons on the Television 1 Press SOURCE 2 Scroll up down using CH CH buttons to the input source you require 3 Press Vol to change input source to the one selected TV Butto...

Page 11: ...SD menu EXIT To exit all menus NUMBER BUTTONS 0 9 to select a TV channel directly To return to the previous channel viewed FAV To display favourites menu VOL To increase decrease the sound level SUBTI...

Page 12: ...nput VIDEO Video input COAX Audio Out Digital Coax output CI CARD IN Common Interface Card Input SCART SCART input VGA PC Audio In 3 5mm PC audio input VGA PC VGA PC input HDMI HDMI input USB USB port...

Page 13: ...o and enables you to enjoy digital quality video and audio with minimal loss of quality TVs Input Source should be set to HDMI Option 2 via Component cable If you are supplied with a cable from the de...

Page 14: ...commended settings when playing game consoles Brightness Increase or decrease the brightness of the picture Contrast Switch the balance between black and white Sharpness Increase or decrease the sharp...

Page 15: ...ic Emphasises music over voices Theatre Provides live and full sound for movies Standard Default settings Digital Output This is the digital COAX Audio output Choose from the following options Off Off...

Page 16: ...ton Channel Manager Allows you to lock channels delete channels add remove channel skip move channel position and rename channels Favourite Manager Add and remove favourites Up to 4 favourite lists ar...

Page 17: ...l Default Source You can set the default start up source so when the television is turned on it goes to this source i e Digital SCART HDMI etc Default Channel You can set the default start up channel...

Page 18: ...ure is the correct proportion but zoomed in to ll the screen Displays the 14 9 picture in the correct proportion As a result side bars are shown on the screen Fills the screen so no black lines Displa...

Page 19: ...ormat often used on old lm 4 3 LB Traditional picture which has been adapted for widescreen 16 9 Widescreen picture format Default This option allows you reset all DVD settings to factory settings Ton...

Page 20: ...Helpline No UK 0871 2000 463 ROI 01443 3940 Web Support www skymediauk co uk 22...

Page 21: ...the television move the slider 6 Left click on the drop down for Screen refresh rate and select 60 Hertz if you experience picture noise or ickering select 50 hertz or 70 hertz 7 Click on Apply then c...

Page 22: ...utomatically con gure the television to be used as a computer monitor Horizontal Position Changes the horizontal position of the picture Vertical Position Changes the vertical position of the picture...

Page 23: ...a Byte Per Second If you wish to use a USB portable hard drive larger than 32GB please refer to the FAQ section at the rear of this user guide Setting up the USB Memory Stick 1 Insert the USB Memory S...

Page 24: ...GREEN View a previous day by pressing YELLOW View the next day by pressing BLUE 3 Press EXIT to exit the 7 day TV Guide Playing Back Recorded Content To view all your recordings press REC LIST You ca...

Page 25: ...ious different types of content that you have saved on your USB Memory Stick On switching to USB source the above menu screen will appear The content will be divided into Movies Music Photos and Recor...

Page 26: ......

Page 27: ...V via HDMI but I am not receiving any pictures or sound on my Console 1 Ensure the TVs source is on HDMI 2 Check your settings on your PS3 are as per the PS3 instruction manual Game Consoles I have co...

Page 28: ...o p m o C x 1 o e d i V x 1 T R A C S x 1 s t u p n I o e d i V o e d i V r o f d e r a h s A C R r i a p x 1 t u p n i o i d u a C P r o f k c a j m m 5 3 x 1 s t u p n I d n u o S YPbPr component au...

Page 29: ...e 20 First Time Installation 20 Frequently Asked Questions 29 Getting Started 11 Hearing Impaired 19 Horizontal Position PC 24 Language 19 Manual Search 18 Noise Reduction 16 On Screen Display Timer 2...

Page 30: ...X23 MAN 0040...

Reviews: