


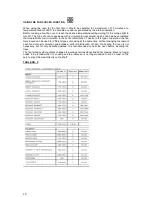


23
aeration device/exhaust hood or electric fan (Fig. 4 and Fig.5). Intensive and continuous
use of the appliance may require additional aeration, for example by opening a window, or
more efficient aeration by increasing the power of the mechanical exhauster, if installed.
USING BURNERS
A diagram is etched on the control panel above each knob which indicates which burner
corresponds to that knob. The burners can be ignited in different ways depending on the type of
appliance and its specific characteristics.
•
Manual lighting (it is always possible even when the power is cut off):
Turn the
knob anticlockwise that corresponds to the burner selected, setting it to the
MAXIMUM position at the etched star (large flame Fig.14) and hold a lit match to
the burner.
•
Electric ignition:
Turn the knob counterclockwise that corresponds to the burner
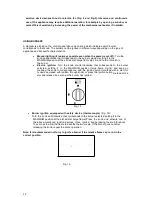
selected, setting it to the MAXIMUM position (large flame Fig.14) and keep on
pressing the knob in correspondence with the ignition symbol marked with a star (for
cookers equipped with ignition through knob) or press the ignition button marked with a
star and release it as soon as the burner has ignited.
Fig. 14
•
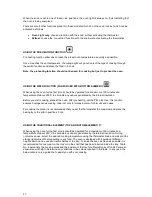
Burner ignition equipped with safety device (thermocouple)
(Fig. 15)
:
Turn the knob anticlockwise that corresponds to the burner selected, setting it to the
MAXIMUM position at the etched star (large flame) Press the knob and activate one of
the above-mentioned ignition devices. Once ignited, keep pressing the knob for about
10 seconds to allow the flame to heat the thermocouple. If the burner goes out after
releasing the knob, repeat the entire operation.
Note: It is recommended not to try to ignite a burner if the relative flame cap is not in the
correct position.
Fig. 15


