20
April 2017 • Blackmagic Special Report
Data Wrangling from URSA Mini 4.6K to DaVinci Resolve
Buying a Blackmagic URSA Mini 4.6K Camera is like having a production and post production studio in a convenient box. The full DaVinci Resolve Studio
is included, complete with dongle and software. What better way to be a Renaissance Filmmaker: DP, DIT, Editor, Colorist, Archivist and Deliverables
Deliverer?
There are many different ways for work to flow. This is just one example to follow when your URSA Mini 4.6K CFast 2.0 Card is full. We were shooting
4K CinemaDNG RAW, 2.39:1 widescreen, 4608 x 1920 at 23.98 fps. That filled up a 64 GB CFAst 2.0 Card in about 4.5 minutes.
1. Remove the CFast Card from the camera.
2. Insert it into a card reader (like Lexar’s CFast 2.0 Thunderbolt/USB 3.0) and connect to your computer. Start or open a Project in DaVinci Resolve.
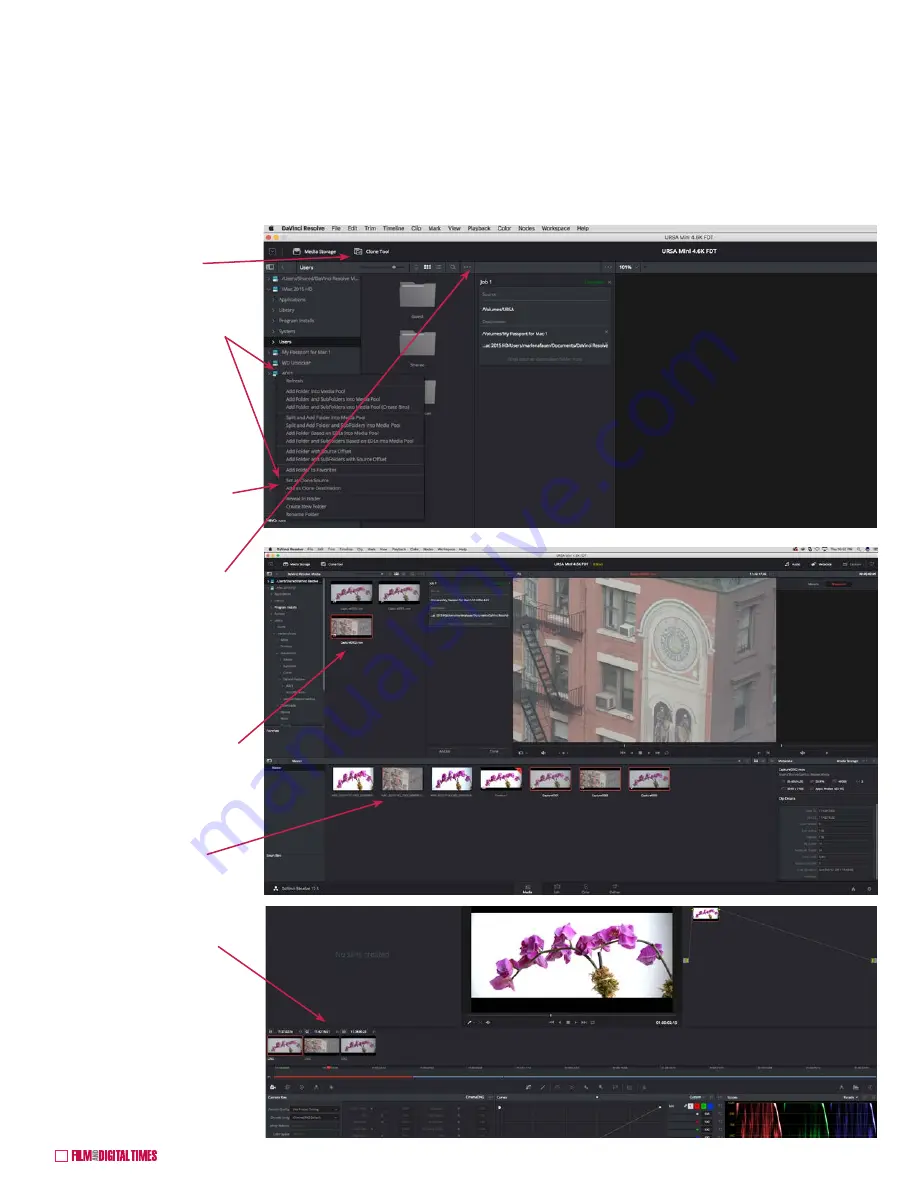
First step: Clone your CFast Card.
3. Click on the CLONE tool.
4. At the left side of Resolve’s
Media Storage Browser, right
click the CFast Card icon (A001)
and SET AS CLONE SOURCE.
5. Next, you’ll simultaneously
clone the CFast Card onto your
computer and an external
backup drive. In the Media
Storage Browser, right click
the DAVINCI RESOLVE folder
on your computer and click on
ADD AS CLONE DESTINATION.
Do the same thing for your
external drive.
6. Click the Clone Tool Panel’s
option menu and PRESERVE
FOLDER NAME. The nice thing
about this is that, unlike copying
from the desktop, the entire
volume and file structure is
preserved. So a root-level volume
named A001 stays that way.
7. Now, clone the SD card that you
diligently used to simultaneously
record an edit-ready Quicktime
proxy backup. Use the same
procedure of SETTING A CLONE
SOURCE and ADDING AS
DESTINATION two locations.
8. Review both the “Camera
Original Digital Negative”
CinemaDNG RAW and the
proxy by dragging the clips into
Resolve’s MEDIA POOL.
9. Go to “Page 3” — COLOR — in
Resolve for grading.
For a well-written and comprehen-
sive guide to working with Resolve,
get Paul Saccone’s “The Definitive
Guide to Editing with DaVinci
Resolve 12.5.”
Download software updates and
the “DaVinci Resolve 12 Reference
Manual” from
blackmagicdesign.com


