background image

Page 3

Rev. 061818

DiscountRamps.com 

 1-888-651-3431

Assembly

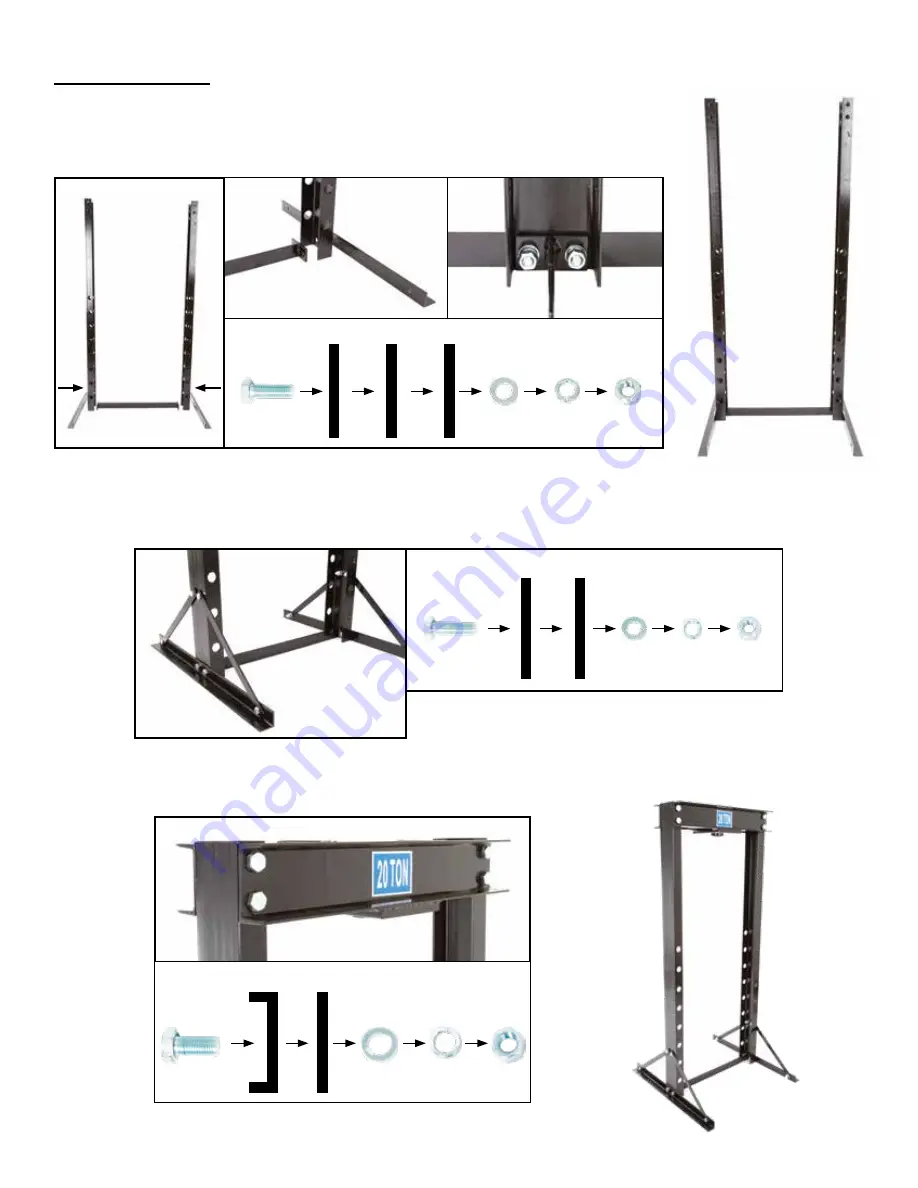
Step 1.

 Connect the two frame sides (A), base supports (B), and spread-

er bar (N) using the M12x35 bolts (S), washers (T), lock washers (U), 

and nuts (V). Secure tightly with 19mm wrenches.

Step 2.

 Attach the side braces (J) to the base supports (B) and frame sides (A) using the M10x35 

bolts (O), washers (P), lock washers (Q), and nuts (R). Secure tightly with 17mm wrenches.

Step 3.

 Attach the jack ring/header (C) to the frame sides (A) using the M16x35 bolts (W), washers 

(X), lock washers (Y), and nuts (Z). Secure tightly with 25mm wrenches.

(A)

(B)

(N)

(S)

(O)

(W)

(C)

(A)

(X)

(Y)

(Z)

(J) (A or B)

(P)

(Q)

(R)

(1a)

(1b)

(1c)

(1d)

(2a)

(3a)

(3b)

(3c)

(2b)

(1e)

(T)

(U)

(V)

Summary of Contents for BD-PRESS-20H

Page 1: ...r loose fitting clothing when operating Remove ties watches rings and other loose jewelry and contain long hair Do not use the press when tired or under the influence of alcohol drugs or any intoxicating medi cation Do not allow untrained persons to operate the press If you detect anything that may indicate imminent structural failure stop using the press immediate ly and inspect it thoroughly Onl...

Page 2: ...2 H Hydraulic Jack 1 I Jack Handle 1 J Side Brace 4 K Spring 2 L M8x70 Hook Bolt 2 M M8 Nut 2 Part Description Quantity N Spreader Bar 1 O M10x35 Bolt 8 P M10 Washer 8 Q M10 Lock Washer 8 R M10 Nut 8 S M12x35 Bolt 4 T M12 Washer 4 U M12 Lock Washer 4 V M12 Nut 4 W M16x35 Bolt 8 X M16 Washer 8 Y M16 Lock Washer 8 Z M16 Nut 8 14mm wrench 17mm wrench 19mm wrench 25mm wrench A B C D E F G H I J K L M ...

Page 3: ...ith 19mm wrenches Step 2 Attach the side braces J to the base supports B and frame sides A using the M10x35 bolts O washers P lock washers Q and nuts R Secure tightly with 17mm wrenches Step 3 Attach the jack ring header C to the frame sides A using the M16x35 bolts W washers X lock washers Y and nuts Z Secure tightly with 25mm wrenches A B N S O W C A X Y Z J A or B P Q R 1a 1b 1c 1d 2a 3a 3b 3c ...

Page 4: ...sired height Set the press table E on the pins Step 5 Hook the springs on the bars on the underside of the jack ring header C Insert the two M8x70 hook bolts L into the jack plate D Attach the M8 nuts M to the hook bolts Thread them just enough so that they will support the jack plate Hook the jack plate assembly onto the springs 4a 5a 5b 5c 4b 4c ...

Page 5: ... plate D Tighten the nuts on the hook bolts so that the hydraulic jack is secured in place Step 7 The jack handle I fits into a holder on the hydraulic jack The pump handle can be used to open or close the release valve on the hydraulic jack Step 8 Optional heel blocks are included and may be used on the press table 6 7a 7b 8 ...

Page 6: ...s responsible for labor charges If the product does not meet specifica tions as depicted in the advertisement the Authorized Dealer will refund the full purchase price of the product Questions regarding the warranty on a specific product and warranty claims should be directed to the Authorized Dealer with whom the purchase transaction was made WARRANTY LIMITATIONS The above warranty does not apply...

Reviews: