724-746-5500 | blackbox.com
724-746-5500 | blackbox.com
724-746-5500 | blackbox.com
HDMI Splitter 4K User’s Manual
HDMI Splitter 4K User’s Manual
HDMI Splitter 4K User’s Manual
Page 3
Page 2
Page 4
2. Overview
2.1 Introduction
The 1 x 4 HDMI Splitter 4K distributes HDMI video out to four
displays. It supports up to 4K (UHD) resolutions (3840 x 2160).
Advanced EDID functionality enables the splitter to read and/or
copy EDID information automatically or manually to compatible
screens. The splitter can also be daisychained to support additional
displays.
2.2 Features
• Duplicates one video input to multiple HDMI outputs.
• Unique EDID Copy function provides maximum display
compatibility.
• Learns Video EDID for system integration.
• Automatic power-save for when signal input is lost.
• Cascaded operation for increased signal outputs.
• Provides crisp clear video images.
• Supports EDID and HDCP, and is Blu-ray ready for high definition
display.
• Supports HDMI display resolutions of up to UXGA (1600 x 1200),
WUXGA (1920 x 1200), Full HD 1080p (1920 x 1080), UHD
(3840 x 2160).
• Includes LED indicators for signal activity monitoring.
• Enables accurate and reliable reproduction of digital video signals
without attenuation and distortion.
• Installs in seconds.
2.3 What’s Included
• 1 x 4 HDMI Splitter 4K
• Power adapter with necessary AC cord or plug-in power adapter
• This user’s manual
• (1) set of foot pads
Optional:
• Locking HDMI Cables
2.4 Hardware Description
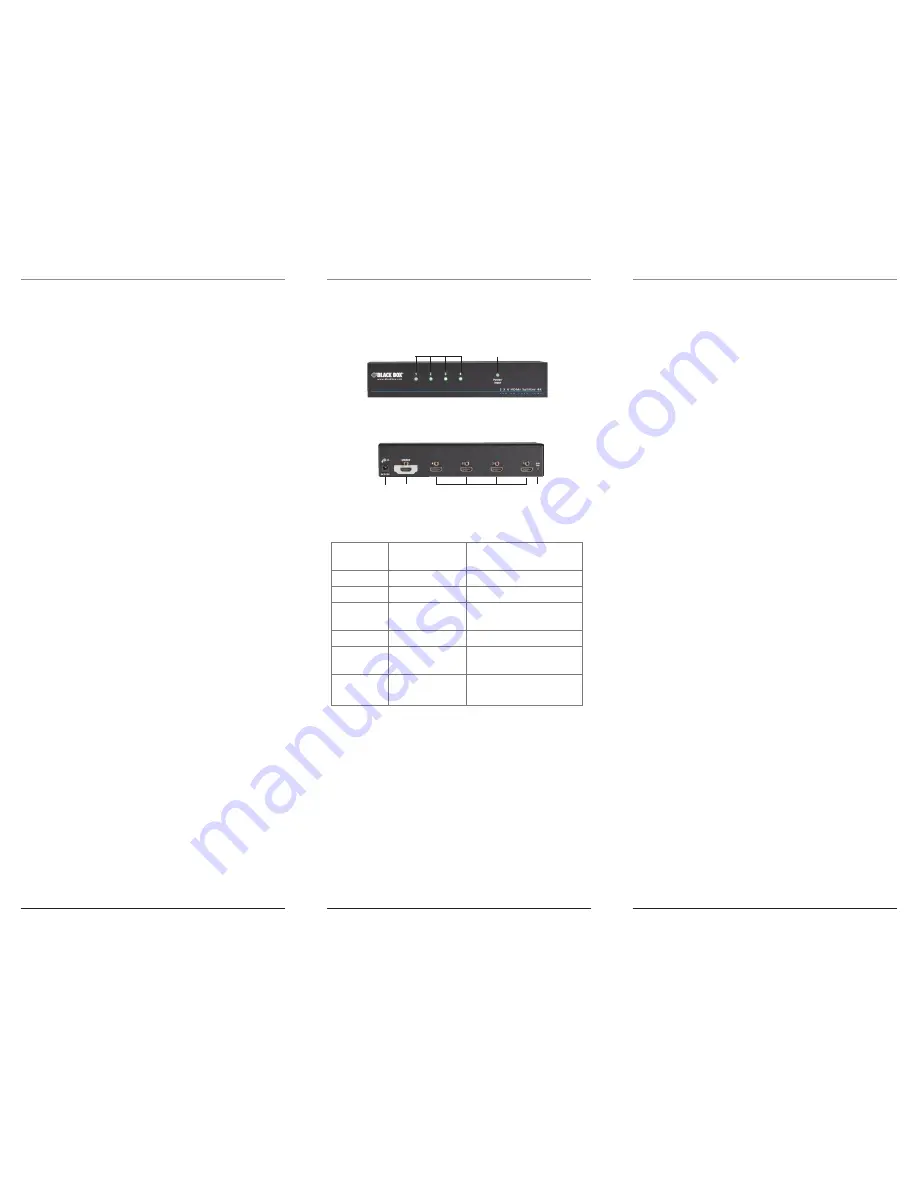
1 2
Figure 2-1. Top panel.
3 4
5 6
Figure 2-2. Back panel.
Table 2-1. Components on the splitter.
No. in Fig.
2-1 and 2-2
Component
Description
1
LED indicators
(4) Video Output LEDs
2
LED indicator
(1) Power Input Status LED
3
Power supply
connector
Apply power from the
power supply to the unit
4
Video input port
Connects to a video source
5
(4) Video output
ports
Connect to monitors
6
EDID COPY
Button
Copy the monitor’s EDID
(See EDID Configuration)
NOTE: The splitter is not 4K compatible when using Intel
®
HD 4400
based services.
3. Installation
3.1 Installing the Splitter
• Before installation, power off all devices that will be connected
to this system.
• Make sure that all devices you will connect are properly grounded.
• Place cables away from fluorescent lights, air conditioners, and
machines that are likely to generate electrical noise.
You will need one HDMI male-to-male cable to connect a video
source to the video splitter’s input port. Connect multiple monitors
or TVs to the video splitter’s output ports.
Turn on your video source only after you’ve made all the
connections.
NOTES:
1. The splitter unit is HDCP compliant and required to use
an HDCP compliant display when it is connecting to the HDCP
video source.
2. Each output port on the splitter must apply the same connection
pattern when a DVI-to-HDMI (or HDMI-to-DVI) adapter is used
for HDMI (or DVI) signal conversion between the splitter and the
HDMI (or DVI) display. Mixed (HDMI and DVI) output
connections may cause signal degradation.
3.2 EDID Configuration
Incorrect EDID communication between the display monitor and
the PC graphics card or insufficient EDID data programmed by
display manufacturers may cause problems. The splitter provides
many ways to read EDID information from the attached video
display and then provides it at all times to the attached video
source. If no new EDID information is available from a display,
the splitter automatically uses a default profile.
To efficiently achieve EDID communication when the video source
is booting up, configure the EDID on the splitter before operation.
3.2.1 EDID Copy
Step 1
. Connect the monitor (EDID compliant) to the video output
Port 1 on the splitter and power on the monitor.
Step 2
. Press the “EDID COPY” button, then release it RIGHT
AFTER the LED flashes GREEN (about 3 seconds).
Step 3
. The LED returns to normal status indicating that EDID copy
is completed.
Otherwise, if the Status LED flashes RED, it means that:
a. The monitor is not properly connected.
b. The monitor is not powered on.
c. EDID data of the monitor is not applicable.
3.2.2 EDID Factory Default Setting
T
o set the EDID copy to factory default:
Step 1
. Press the “EDID COPY” button, then release it RIGHT
AFTER the
Status LED
flashes PALE BLUE twice (about 9 seconds).
Step 2
. The
Status LED r
eturns to normal status indicating that
EDID copy is completed.


