background image

51

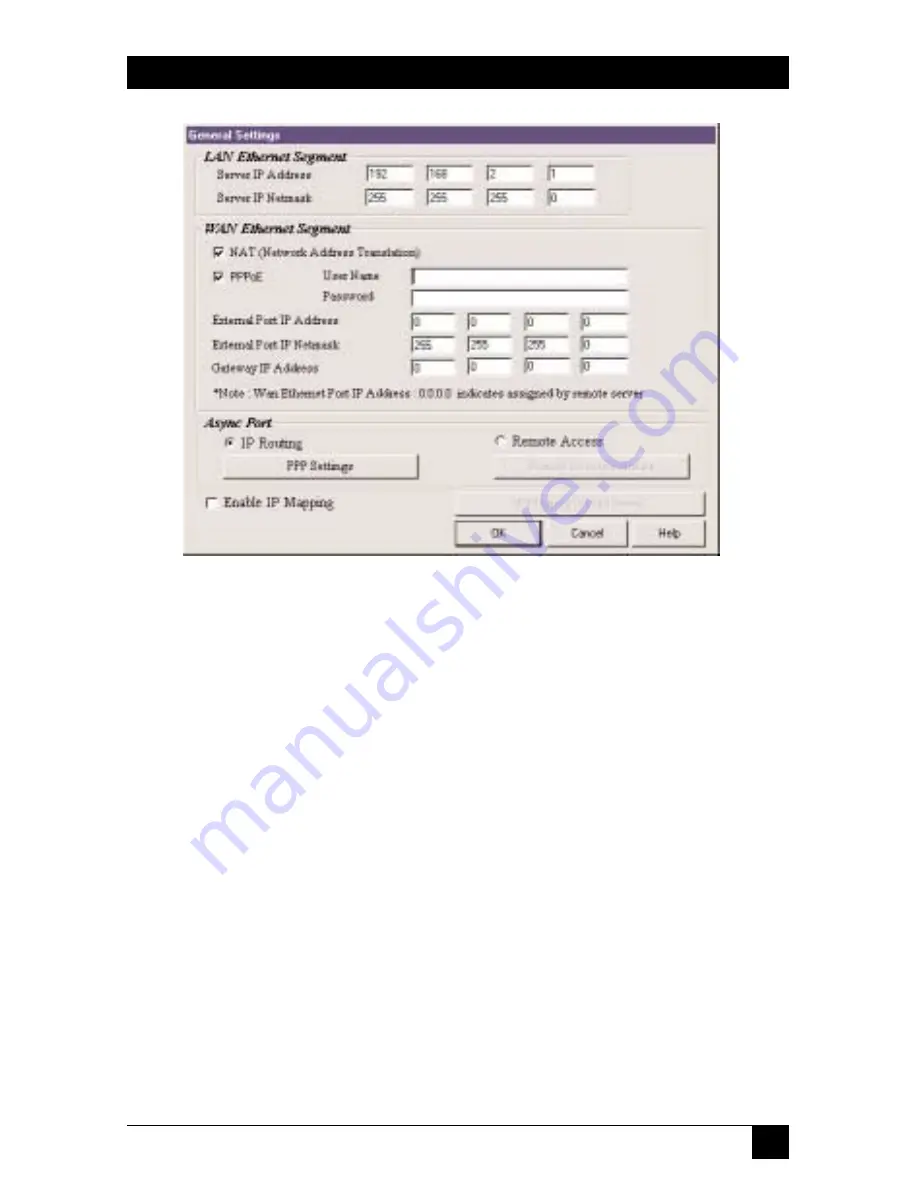
Figure 6-2. General Settings screen.

6.1.1 LAN E

THERNET

S

EGMENT

Server IP Address:

This IP address is the internal LAN IP address of the Router.

The address entered into the Setup Wizard is displayed here (for example,
192.168.2.1).

Server IP Netmask:

The Router subnet mask generally can be left at the default

value of 255.255.255.0.

6.1.2 WAN E

THERNET

S

EGMENT

Select NAT (Network Address Translation) to provide firewall protection and
enable all local LAN users to share one IP address to access the Internet. If the
NAT box is not checked, the WAN Ethernet is configured as a router to route
network traffic between the LAN Ethernet segment and the WAN Ethernet
segment. The External Port IP Addresses are provided by your ISP or remote
system administrator.

PPPoE:

If your ISP uses Point-to-Point Protocol over Ethernet for authentication

purposes, select the PPPoE box and enter your ISP account User Name and
Password in the fields provided.

CHAPTER 6: Broadband Manager

Summary of Contents for LRB500A

Page 1: ...1000 Park Drive Lawrence PA 15055 1018 724 746 5500 Fax 724 746 0746 Copyright 2001 Black Box Corporation All rights reserved ...

Page 2: ... 5500 FREE technical support 24 hours a day 7 days a week Call 724 746 5500 or fax 724 746 0746 Mailing address Black Box Corporation 1000 Park Drive Lawrence PA 15055 1018 Web site www blackbox com E mail info blackbox com AUGUST 2001 LRB500A Net Access Broadband Router w 4 Port Switch Users Manual ...

Page 3: ......

Page 4: ...couraged to try to correct the interference by one of the following measures Reorient or relocate the receiving antenna Increase the separation between the equipment and receiver Connect the equipment into an outlet on a circuit different from that to which the receiver is connected Consult an experienced radio TV technician for help Caution Changes or modifications not expressly approved by the p...

Page 5: ... fabricante 7 El aparato eléctrico debe ser montado a la pared o al techo sólo como sea recomendado por el fabricante 8 Servicio El usuario no debe intentar dar servicio al equipo eléctrico más allá a lo descrito en las instrucciones de operación Todo otro servicio deberá ser referido a personal de servicio calificado 9 El aparato eléctrico debe ser situado de tal manera que su posición no interfi...

Page 6: ...r una antena externa deberá ser localizada lejos de las lineas de energia 16 El cable de corriente deberá ser desconectado del cuando el equipo no sea usado por un largo periodo de tiempo 17 Cuidado debe ser tomado de tal manera que objectos liquidos no sean derramados sobre la cubierta u orificios de ventilación 18 Servicio por personal calificado deberá ser provisto cuando A El cable de poder o ...

Page 7: ...etWare are registered trademarks of Novell Incorporated Microsoft Windows and Windows NT are registered trademarks of Microsoft Corporation UL is a registered trademark of Underwriters Laboratories Incorporated Unix is a registered trademark of UNIX System Laboratories Inc Xerox is a registered trademark of Xerox Corporation Any other trademarks mentioned in this manual are acknowledged to be the ...

Page 8: ... Installation and Configuration 20 4 1 Software Installation 20 4 2 Using the Setup Wizard 21 4 3 Testing Your Connection 36 5 Telnet 38 5 1 Starting a Telnet Session 38 5 2 Using the Telnet Server Menu 39 6 Broadband Manager 49 6 1 General Settings 50 6 1 1 LAN Ethernet Segment 51 6 1 2 WAN Ethernet Segment 51 6 1 3 Async Port 52 6 2 Port Settings 62 6 2 1 Edit Login for Remote Access 63 6 2 2 Mo...

Page 9: ...1 Setting Up Remote Access Clients 95 8 2 Accessing a Windows NT Server 96 8 2 1 Adding the Dial Up Adapter NT Server Connection 96 8 2 2 Adding TCP IP NT Server Connection 97 8 2 3 Adding Client for Microsoft Network NT Server Connection 97 8 2 4 Adding File and Print Sharing for Microsoft Networks NT Server Connection 97 8 2 5 Set Your Primary Network Logon NT Server Connection 98 8 2 6 Set Up P...

Page 10: ...ding File and Print Sharing for Microsoft Networks Novell NT Server Connection 106 8 4 5 Adding IPX SPX Novell NT Server Connection 106 8 4 6 Adding Client for NetWare Networks Novell NT Server Connection 107 8 4 7 Set Your Primary Network Logon Novell NT Server Connection 107 8 4 8 Set Up Properties of Components Novell NT Server Connection 107 8 4 9 Make Your New Connection NT Novell Server Conn...

Page 11: ...he Find Computer Command 116 9 3 Using LMHosts 116 10 Troubleshooting 118 10 1 Problems Solutions 118 10 2 Calling Black Box 122 10 3 Shipping and Packaging 123 Appendix A Tools for Your Router 124 A 1 Broadband Monitor 124 A 2 PING 124 A 3 WINIPCFG and IPCONFIG 124 A 4 TRACERT 125 Appendix B Cabling Diagrams 126 B 1 WAN LAN Cables 126 B 2 Serial Cable 127 Appendix C Glossary 128 ...

Page 12: ... MSCHAP NAT Firewall RADIUS and Callback for remote access Network TCP IP IPX DHCP PPP PPPoE Routing Static RIP1 VPN IPSec PPTP pass through Filtering Protocol port number URL address and IP address Processor 40 MHz 32 bit RISC Memory RAM 4 MB Flash ROM 512 KB Operating Temperature 32 to 120 F 0 to 50 C Humidity 25 to 85 noncondensing Approvals FCC Part 15 Class B Power 5 VDC 1000 mA Size 4 9 H x ...

Page 13: ...connect users not on a LAN It ensures high speed transmission and can serve as a completely dedicated full duplex backbone The Router gives you network security It uses the NAT protocol to provide security from hackers attempting to access the office LAN without the extra cost of a firewall It implements firewall and gateway security for LAN based resources The Router also supports Internet access...

Page 14: ... LAN Link Act Lights when the LAN client is correctly connected to the 10BASE T Ethernet LAN 10 100 Lights when the LAN client correctly establishes a 100 Mbps connection FDX COL A steady on light indicates a successful LAN connection A flickering light indicates a potential network connection problem Serial Data Blinks when the serial async port is receiving or transmitting data DCD Lights when t...

Page 15: ...nk Lights when a successful connection to the 10BASE T WAN is established RXD Lights when the LAN port is receiving data TXD Lights when the LAN port is transmitting data Power PWR Lights when power is being supplied to the router 2 2 Back Panel Figure 2 2 Back panel 10 100 BT LAN Uplink Normal 1 2 3 4 ASYNC Reset 10 BT WAN 5VDC Power ...

Page 16: ...nal Reset The reset button is used to reset the router to factory defaults 10 100 BT LAN The four 10 100 ports are used to connect the router to LAN client workstations If the Router is set to use the Uplink feature the number 1 LAN port is inactive as a LAN port Uplink Normal Slide the switch to the Uplink position to use the number 1 LAN 10 100 port to expand your network by connecting a network...

Page 17: ...nect a LAN to the Internet via DSL or a cable modem Kernal outgoing TCP IP connection sharing a single Internet IP address or using multiple IP mapping Virtual Server allowing incoming specific TCP IP service request redirect to an internal server Static Routing Routing table setting to Internal Local Gateways Firewall External Fixed External Port IP or DHCP client Dynamic IP assigned Internal Dev...

Page 18: ...ng a single shared external IP address Kernal NAT outgoing TCP IP connection sharing single External Port IP or using multiple IP Mapping Virtual Server allow incoming specific TCP IP service request redirect to internal server Firewall External Fixed External Port IP and mask DNS IP Gateway IP or DHCP client Dynamic IP for the device DNS and Gateway assigned Internal Device Fixed IP DHCP Server N...

Page 19: ...2 5 Connect local site one external IP address 253 internal IP addresses Net Access Broadband Router Internet Cable modem Workstation IP Address 192 168 0 106 Workstation IP Address 192 168 0 105 Workstation IP Address 192 168 0 104 Workstation IP Address 192 168 0 103 ...

Page 20: ...oid using a telephone other than a cordless type during an electrical storm There may be a remote risk of electrical shock from lightning 6 Do not use the telephone to report a gas leak in the vicinity of the leak 7 To reduce the risk of fire use only No 26 AWG or larger telecommunications line cord 3 2 What the Package Includes The Router package contains the following items Net Access Broadband ...

Page 21: ...DN TAs and the router 2 Connect the Ethernet port of each PC or network device to one of the 4 LAN ports if you are using the uplink option port number 1 cannot be used to connect to a PC 3 If you are using an analog modem connect it to the serial async port 4 If you are using the uplink option to connect to another network segment slide the uplink normal switch into the uplink position Connect th...

Page 22: ...power port on the back of the router Plug the power supply into an AC power outlet as shown on the previous page 7 Power on your DSL modem or cable 8 If you are using an analog modem or ISDN TA power on the device 9 Press and hold the Router s Reset button for 3 seconds to restore the default settings You are ready to configure software for your Router and network PCs ...

Page 23: ...al in operation TCP IP installed and configured on each workstation accessing the Internet 4 1 Software Installation The software installation process involves installing the Broadband Manager Utilities including Broadband Manager Setup Wizard Broadband Manager and Broadband Monitor A description of each component follows BROADBAND MANAGER SETUP WIZARD The Broadband Manager Setup Wizard provides a...

Page 24: ...work and is powered on After installing the software you may return to the Broadband Manager Setup Wizard at any time by clicking Start Programs Broadband Manager Broadband Wizard Before running the Setup Wizard we strongly recommend that you exit all Windows programs 1 Insert the Broadband Manager System CD into your computer s CD ROM drive The Broadband Manager System CD screen appears NOTE If A...

Page 25: ...22 NET ACCESS BROADBAND ROUTER W 4 PORT SWITCH USERS MANUAL 4 When the software installation completes the Setup Wizard dialog box appears Figure 4 1 Setup Wizard dialog box Click OK ...

Page 26: ...st dialog box Select the device you wish to configure from the Device Name list Record the values presented in the Device Information panel for later reference Device IP Address ______________________ Device MAC Address ____________________ Device Firmware Version _________________ Click Next NOTE If a message indicates the device is not found or you do not see the device you are attempting to con...

Page 27: ...You must enter the last octet only If you wish you can change the network name of your Router If your ISP requires your device to have a name you may use the value entered in this field Click Next to continue The device will search the network to ensure that the IP address is valid This may take several seconds NOTE If your ISP provided you with an IP address do not enter that address in this fiel...

Page 28: ...This option is most often used when the Router is connected to a DSL or cable modem or when the IP segment of the server needs firewall protection Select IP Routing NAT Disabled to allow the Router to function as a router between IP segments This option is ideal for organizations that need to segment workgroups Select Enable PPPoE to use the Router with a time base rather than fixed cost DSL modem...

Page 29: ...he WAN Ethernet IP Address In the External IP Netmask box enter the Netmask of the WAN Ethernet IP Segment for Class C networks the Netmask is generally set to 255 255 255 0 In the External Gateway IP Address box enter the IP address of the Gateway to the destination network NOTE If your ISP uses dynamic IP addressing DHCP leave the External IP address and the External Gateway IP address at the de...

Page 30: ...er is connected to the network locally Select IP Routing NAT Enabled to allow all users in the two IP segments LAN and WAN Ethernet to share one IP address to the Internet You may also select this option to use the serial async port for dial backup in the event the DSL or cable modem becomes unavailable Select IP Routing NAT Disabled to connect other IP segments through the serial async port NOTE ...

Page 31: ... of 64 users A USE LOCAL CLIENT LIST Use Local Client List allows you to create an authentication database consisting of user names passwords and dial in options for each remote user You must provide the following information for each client Figure 4 7 Use Local Client List screen User Name Enter the User Name to authenticate the remote dial in user Password Enter the Password to authenticate the ...

Page 32: ...er for the user After the PPP negotiation the device will disconnect then callback the telephone number you enter in the callback telephone number field This option is best used for clients requiring callback security while dialing in from the same location each time Variable Callback Select this option for remote users that travel or dial in from various locations and need callback security This ...

Page 33: ...Access Server IP Address Enter the IP address of the RADIUS Access Server RADIUS Access Accounting Server IP Address Enter the IP address of the RADIUS Accounting Server Secret Enter your Secret RADIUS code or password Secret Verification To confirm your Secret code re enter your code or password NOTE In most cases the RADIUS Access Server and the RADIUS Accounting Server are the same server so th...

Page 34: ...emote server Telephone Number Enter the phone number used to dial your remote server ISP NOTE If you must dial a number to get an outside line for example 9 or 0 enter the required number plus a w wait or a comma in the Telephone box for example 9w555 2323 or 9 5552323 Each comma provides a 3 4 second delay User Name Enter the User Name for your remote server or ISP account Password Enter the Pass...

Page 35: ... PORT SWITCH USERS MANUAL 10 The Setup Wizard DNS IP Address dialog box appears Figure 4 10 Setup Wizard DNS IP Address dialog box Enter your ISP s DNS Server IP address If you are not sure of the IP address contact your ISP Click Next ...

Page 36: ...efine your modem Manufacturer Model and the DTE baud rate or speed of communication between the Router s serial async port and your modem or ISDN TA Select your modem and baud rate as described on the following pages NOTE If you do not have a device attached to the serial async port use the default modem values and click Next 12 To select your modem in the Asynchronous port settings box click The ...

Page 37: ... analog modem and your modem is not included in the selection list Standard Modem will work in most cases If you are using an ISDN TA refer to the ISDN TA s User Guide for information on the initialization and hang up strings Use Broadband Manager to enter modem strings 14 The Setup Wizard Modem Setting dialog box re displays Use the Asynchronous port settings list to select the baud rate Select t...

Page 38: ...ck Next to complete the basic configuration 15 The Check List dialog box appears It summarizes your configuration selections Make sure that all values have been correctly entered If you find an incorrect setting click Back to return to the screen containing the error and correct it When complete use the Next button to return to the Check List dialog box Figure 4 13 Check List dialog box Click Fini...

Page 39: ...n you select Run Monitor the Broadband Monitor program loads 1 To test your current settings select Test Connection Select Connect Port 1 to test the WAN port Select Connect Port 2 to test the serial async port The monitor activity will appear in the display window Refer Chapter 7 for additional information about the monitoring capabilities of the Router 2 After successfully using the Test Connect...

Page 40: ...stallation and Configuration NOTE If a problem occurs while testing your connection or you need to configure more advanced options for your Router use Broadband Manager by selecting Programs Broadband Manager Broadband Manager ...

Page 41: ...w IP addresses are administered to configure IP addresses on your local and remote systems and to set up any necessary virtual server routing table and packet filtering options NOTE To successfully configure your router using Telnet TCP IP must be correctly configured on your computer The router and computer must also be located on the same subnet 5 1 Starting a Telnet Session 1 Start your telnet ...

Page 42: ... the Telnet Server Menu To use the menu type the letter corresponding to the parameter you d like to change Depending on the parameter you are changing you are presented with an open field into which you may type new information or you are presented with a list of options from which you may select a value Each menu item is described in the following pages ...

Page 43: ...selected Save and Restart Server b ROUTER SUBNET MASK Enter the subnet mask for your local network c ROUTER NAME Enter a network name for the Router If your ISP requires your device to have a name you may use the value entered in this field d ROUTER PASSWORD The default is no password If you choose to use a password ensure that you write the password down and keep it in a safe place If you forget ...

Page 44: ...ternet access a Internet Access If you use the WAN port for Internet Access you must configure the following options Figure 5 4 WAN Port options Enter the IP port information provided by your ISP or other external network administrator NOTE If your ISP uses dynamic IP addressing leave the External Port IP address and External Gateway IP address at the default values of 0 0 0 0 Set the External IP ...

Page 45: ...e WAN port to connect to another LAN you must configure the following Figure 5 5 LAN to LAN access Enter the IP and Netmask address of the network to which you are connecting g ASYNC PORT SETTINGS The async port may be used for IP Routing or Remote access For more information see Chapter 6 ...

Page 46: ...nnect to the remote system b User Name Enter the User Name that will be used for authentication on the remote system c Password Enter the Password associated with the User Name for the remote system d Idle Timeout Enter the amount of idle time allowed to pass before the connection times out The default value is 5 minutes e Serial Baud rate Use the list to select the appropriate baud rate of the mo...

Page 47: ...h Modem Dialup String Consult your modem or ISDN TA User Guide for this information i Modem Hangup String Consult your modem or ISDN TA User Guide for this information j Login Script Select Enable or Disable k Edit Login Script Refer to Chapter 6 for information on editing scripts l External IP Address Enter the IP address of the remote device to which you are connecting m NAT Function Select Enab...

Page 48: ...u may select to use only one protocol however if you are connecting to a NetWare server you must have IPX enabled c IPX SPX Frame Type The default value is Autodetect If you have problems with your network connection you may select Ethernet_II Ethernet_802 3 Ethernet 802 2 or Ethernet_snap d Authentication Method Select either None PAP or CHAP Refer to Chapter 6 for additional information e Edit U...

Page 49: ...e for information k Modem Hangup String Refer to your modem or ISDN TA User Guide for information l Edit Login Script Select this option to edit the login script executed when the client connects to the network Refer to Chapter 6 for additional information about creating and editing scripts RADIUS Server Select Enable to configure remote users to authenticate on a RADIUS Server RADIUS Access Serve...

Page 50: ...etwork via the Internet Refer to Chapter 6 for more information about enabling IP Mapping k ROUTING TABLE The Routing Table option lets you create a routing table so your Router will route IP packets to the proper network For more information refer to Section 6 4 l CLIENT FILTER SETTINGS The Filter Settings option allows you to define which packets are allowed to either pass through or be blocked ...

Page 51: ...or your settings will be lost when the device is powered off o DIAGNOSTIC The Diagnostic option performs basic testing of the Router displays information about your firmware and offers options for assigning the LAN and WAN MAC addresses as may be required by your ISP Figure 5 8 Diagnostic screen Type any key to return to the main menu p QUIT ...

Page 52: ...dband Manager 2 The Manager dialog box appears Figure 6 1 Manager dialog box 3 The Router automatically searches your network for devices available for configuration and displays them in the Available Devices list box NOTE Before using any of the Manager options you must select the device you are attempting to configure from the Available Devices list If you need to update the list click Refresh D...

Page 53: ... Settings and Filter Settings Additional information about all of these options is included in this chapter NOTE If the IP address of the device you are attempting to configure is not within the same subnet the Please Set the Device IP dialog box displays requesting you to input an IP address in the same subnet If an error message appears refer to Chapter 10 6 1 General Settings After selecting yo...

Page 54: ...ss Translation to provide firewall protection and enable all local LAN users to share one IP address to access the Internet If the NAT box is not checked the WAN Ethernet is configured as a router to route network traffic between the LAN Ethernet segment and the WAN Ethernet segment The External Port IP Addresses are provided by your ISP or remote system administrator PPPoE If your ISP uses Point ...

Page 55: ...ask gateway IP address or DNS IP address enter 0 0 0 0 as your External Port IP Address and the Gateway IP Address 6 1 3 ASYNC PORT The Async Port can be configured to provide either IP Routing or Remote Access IP Routing is used to connect your network to another router through the Serial async port Remote Access allows remote users to dial in to the device to access and share network resources a...

Page 56: ...cated by your ISP Password Enter the user account password to be authenticated by your ISP Password Verification Re enter the user account password for verification External Port IP Enter the fixed IP address provided by the remote site System Administrator If this address is automatically assigned by the remote site DHCP server enter 0 0 0 0 Assign Remote Site an IP Address Check the box if you w...

Page 57: ...n protocol to be used when a remote site is dialing in to your site You may select None No authentication needed PAP User Name and unencrypted Password are transmitted over the network CHAP DHCP sends a key which is used to encrypt the user name and password Encryption provides added protection from potential interception of authentication information NOTE If you select PAP or CHAP you must indica...

Page 58: ...st enter the callback telephone number the telephone number the device should call in the Tel Number field 2 Click OK to complete Remote Connection Authentication Settings When you select Allow Remote Dial in you must determine the method that remote users must use to be authenticated on your system If you choose the PAP or CHAP authentication protocol you must select Use Local Settings Use Local ...

Page 59: ...sword corresponding to the user name Passwords are limited to 16 characters Password Verification Verify the password by re entering the user password in the box provided Callback Type The callback feature provides an added level of security to your dial in system A remote client dials in to the network and then disconnects The Router then calls the client back The feature can be implemented using...

Page 60: ...sing RADIUS Authentication allows you to use the user information user name password IP address etc stored on a separate RADIUS server on the network NOTE A RADIUS Server Remote Authentication Dial In Service is an accounting and authentication system used by many large companies and Internet Service Providers ISPs After a client dials in to the network and enters their username and password the i...

Page 61: ... Server IP Address Enter the RADIUS Accounting Server IP Address NOTE In most cases the RADIUS Accounting Server and the Access server are the same device If this is true for your configuration enter the same IP address in both fields Secret Enter your Secret RADIUS code or password Secret Confirmed Re enter your Secret RADIUS code 5 Click OK when complete Remote Access Settings 1 From the General...

Page 62: ...Router DHCP feature will issue the remote site user an IP address automatically if the DHCP function is enabled If DHCP is disabled the device will automatically search for a DHCP server and request an IP address for the remote client Assign an IP address manually Enter an IP address for the remote client Network Protocols You must select the network protocols you would like to enable for the dial...

Page 63: ...llows you to use the user information user name password IP address etc stored on a separate RADIUS server on the network 3 Click OK when complete Enable IP Mapping IP Mapping is available only when NAT is enabled If NAT is enabled for a particular port that port is firewall protected The Enable IP Mapping function allows you to open a hole in your firewall to allow access to your LAN via the Inte...

Page 64: ...be using for IP mapping Common TCP IP port numbers are listed below WWW Port 80 FTP Port 20 or 21 SMTP Port 25 POP3 Port 110 For more information on port numbers visit http www metadigm co uk If you would like to map all services for this external IP address to a computer on your LAN you can enter port number 0 This means that whenever anyone accesses your external IP address they will automatical...

Page 65: ...IP 16 895 1 3 to an internal IP address 192 168 2 22 a www server only the internal IP address in your local network can serve as the www server for the external IP address 6 2 Port Settings The Modem Settings options are used to configure the communication between your modem or ISDN TA and your Router serial port You must specify the baud rate modem and modem string settings for your device 1 To ...

Page 66: ... appear in the list provided the Standard Modem selection will work in most cases IMPORTANT If you are using an ISDN Terminal Adapter refer to the Async to Sync PPP string in the User Manual provided with the device to determine the correct initialization dialup and hang up strings NOTE Due to variations in ISP connections and phone line quality this theoretical maximum speed is not attainable You...

Page 67: ...t as the server side Send Welcome displays Welcome to remote site Send sends an Enter Carriage return line feed to the remote site Send Username prompts the remote site for a user name Retrieve 1 will wait for the remote site to enter the user name that will be used for PPP authentication Send Password prompts the user for a password Retrieve 2 will wait for the remote site to enter a password Ver...

Page 68: ...d SH FUNCTION Send ATZ Resets the Modem Send ATDT 888 1234 Dials the phone number 888 1234 Send JaneDoe Types JaneDoe at the ISP interface SH 1234 Types 1234 at the ISP interface but displays on the Broadband Monitor to hide the password Send Sends Enter carriage return plus line feed to the ISP Wait FUNCTION Wait 5 The Modem will wait for 5 seconds before moving the next line in the login script ...

Page 69: ... reply 10 Send 1 Selects option 1 PPP for this ISP 11 Go Starts PPP mode Example 2 Script for Unreliable ISP Redial until connected Login Script Meaning of Each Login Script Command 1 Send ATZ Resets modem 2 Send ATS0 1 Sends initial string ATS0 1 to modem 3 Send ATDT8881234 Dials phone number 888 1234 4 Wait CONNECT 2 Wait for ISP to send reply CONNECT If no CONNECT returns to line 2 to re dial 5...

Page 70: ...4 Send ATDT 8885678 Dials phone number 888 5678 ISP 2 15 Wait Connect 23 Waits for ISP to send reply CONNECT If no CONNECT goes to line 23 16 Wait username 23 Waits for ISP to send reply username If no response goes to line 23 17 Send Stephen Sends the username Stephen to ISP 18 Wait password Waits for the ISP to send password 19 SH 5678 Sends password 5678 to ISP 20 Wait Waits for ISP to send rep...

Page 71: ...mber of times to attempt to connect if connection cannot be established 1 From the main Manager dialog box click Port Settings 2 From the Async tab click Dial up Hang up Settings Individual Port Options Individual Port Options lets you set the idle timeout function for each serial port on the Router You can set the number of minutes you wish to allow a connection to stay idle before disconnection ...

Page 72: ...er to the Glossary in Appendix B for more information about the DHCP function 1 From the main Manager dialog box click LAN DHCP Server NOTE The LAN DHCP Server option indicates if DHCP is Enabled or Disabled By default the DHCP function is Enabled To Disable the function you must open the DHCP Configuration dialog box select Disabled and click OK 2 The DHCP Configuration dialog box appears Figure ...

Page 73: ...e range of addresses 2 Press Delete 6 3 2 IP ADDRESS MAPPING RESERVATION You can use the IP Address Mapping Reservation option to give a static IP address to particular computers on your network Each time a computer is powered on and connects to the network it will receive the same IP address Static IP addresses are frequently assigned to network resources such as printers servers hubs and routers...

Page 74: ...rget machine Part of this process involves analyzing a routing table to determine the best path Use the information below to create a routing table to connect your network to another network or to connect subnets within your network NOTE A routing table is required to use the LAN to LAN routing function of the Router 1 From the main Manager dialog box select Routing Settings 2 The Routing Settings...

Page 75: ...t Local Network if you are using a separate router If you are using the Router with the LAN to LAN function the Interface should be set as the WAN port that connects you to the other subnet Click Insert to save the information to the routing table To delete this information select it from the routing table and click Delete Default Gateway Default gateway is an IP address that all packets are route...

Page 76: ...to route to the 172 168 2 x network If you want the Router to route to 172 168 2 x you must add the following information to the routing table IP 172 168 2 0 Network 255 255 255 0 Gateway IP 192 168 5 254 Interface Ethernet Local Network WAN Ethernet 192 168 3 1 LAN Ethernet 192 168 5 1 WAN Ethernet 192 168 5 254 LAN Ethernet 172 168 2 254 PC 2 172 168 2 1 PC 1 192 168 3 9 RF500S 1 RF500S 2 Net Ac...

Page 77: ...way IP 192 168 5 1 Interface WAN Ethernet 6 5 Filter Settings You can use Filter Settings to choose which packets are allowed to enter the network and which packets will be blocked Filter Settings can be used to filter network services such as Mail WWW FTP Telnet and News 1 From the main Manager dialog box select your Router then Filter Settings 2 The Filter Settings dialog box appears Figure 6 14...

Page 78: ...be Blocked or allowed to Pass Netmask Enter the subnet mask for the packet TCP IP Service Port Enter the Socket Port you would like to block or allow to pass for example HTTP 80 Privilege Level Use the Privilege list box to select an appropriate level for this filter It is common to set many filter rules for a particular client At times the rules you have set may conflict with one another When a c...

Page 79: ...m which byte number In this field indicate the first byte in the packet the Router should read to determine if the byte pattern in Hex is one that should be filtered Exclude the PPP header Start from byte 0 of the network protocol Byte Pattern in Hex Enter the packet byte pattern that you would like the Router to recognize as a packet to be filtered Block Pass from the WAN to the LAN The maximum p...

Page 80: ...numbers for Mail WWW FTP Telnet and News If you would like to filter other services you must know the port number for the service 4 Click Edit to enter new service port numbers 5 Enter the TCP UDP Port Number and click Add NOTE Refer to Appendix C for a definition of Port 6 Click Privileged Clients 7 The Privileged Client Table dialog box appears CHAPTER 6 Broadband Manager ...

Page 81: ...ients You can enter the MAC address directly or you can use the MAC address search tool by entering the IP address of the computer then using the Search button to find the MAC address After completing the IP Address and MAC Node address click Add to include the information in the Node MAC address list Remote Clients Applies to Remote Access Port s Select Include WAN Async Clients as Privileged Cli...

Page 82: ...device still does not appear in the list refer to Chapter 10 6 7 Device Name and Password 1 From the main Manager dialog box click Device Name and Password You may use the default device name or use this dialog box to change the name or add a password for your device Figure 6 17 Device Name and Password screen Device Name This field displays the name of your network device To change the name simpl...

Page 83: ... it down and store it in a safe location If you have completely forgotten your password contact Black Box Technical Support for assistance Refer to Chapter 10 for more information about calling Technical Support 2 Click OK 6 8 Save Settings to File The Save Settings to File option allows you to save your settings to a file This option provides a method for backing up your system configuration so t...

Page 84: ...e Directory field displays the default path to the configuration files You may save a copy of the file to a different location by changing the path in the File Directory field 3 Press OK to save the settings to the file name specified in step 1 6 9 Load Settings The Load Settings option allows you to load either the default settings of your network device or to load settings previously saved to a ...

Page 85: ...ile from the Available Files table 5 Press OK to load and apply the settings to the Router 6 10 Upgrade Firmware WARNING Upgrade the firmware of your Router only under the advice and direction of Black Box Technical Support call 724 746 5500 Improperly upgrading the Router may disable the device The Upgrade Firmware options allow you to upgrade your Router firmware The Upgrade Firmware option upgr...

Page 86: ...ur firmware will display in the Firmware File Version field 4 Click Upgrade to upgrade your firmware 5 A message appears stating the upgrade has started 6 After several minutes an informational dialog box displays indicating the upgrade was successful 7 Click OK 8 From the main Manager dialog box click Save and Exit 9 Click Yes to restart the Router using the new firmware version 6 11 General Diag...

Page 87: ...84 NET ACCESS BROADBAND ROUTER W 4 PORT SWITCH USERS MANUAL Figure 6 21 General Diagnostic dialog box 3 Record the information if necessary and click OK to exit ...

Page 88: ...t Programs Broadband Manager Broadband Monitor 2 The Broadband Monitor dialog box appears Figure 7 1 Broadband Monitor dialog box NOTE If you receive a message stating Device is not found refer to Chapter 10 7 2 Refresh Device List Click Refresh Device List from the main Broadband Monitor dialog box to display a list of network devices in the Available Devices window CHAPTER 7 Broadband Monitor ...

Page 89: ...server ISP and establish a connection 1 From the main Broadband Monitor dialog box click Test Connection to begin testing 2 The Test Connection dialog box appears Figure 7 2 Test Connection dialog box 3 Select Connect Port 1 to test the WAN connection or Connect Port 2 to test the Async connection 4 The monitor display window displays the actions of the test 5 To terminate the connection refer to ...

Page 90: ... 3 Terminate Connection screen 3 Select Disconnect Port 1 or Disconnect Port 2 4 Click Terminate Connection 5 Click Exit to return to the Broadband Monitor dialog box 7 5 Save to File Click Save to a File to save a monitoring session to a file This feature can be used to create an event log to send to Black Box Technical Support for evaluation 1 From the main Broadband Monitor dialog box select Sa...

Page 91: ...e AUTOSAVE If you wish to automatically save the information displayed on the monitor to a database file enable the AutoSave function Options for this function include Overwrite database file This option saves the information collected by the monitor to a database file based on the time interval that you specify overwriting the last saved database file Append Database file This option saves the in...

Page 92: ...elevant monitor displays The IP Address Name option is used to assist the Network Administrator in determining which users are transmitting and receiving data without having to remember their specific IP addresses Each computer listed must have a fixed IP address for your network You may configure a fixed IP address on the individual computer or use the Router s DHCP server IP reservation system r...

Page 93: ...l TCP IP requests made by your network device You may select to view TCP IP sessions for the WAN Ethernet or the Async Port 1 The TCP IP tab is the default tab displayed in the Broadband Monitor dialog box If it is not displayed click the TCP IP tab NOTE The TCP IP session displays the history of the TCP IP session through the selected port The TCP IP information presented does not represent the c...

Page 94: ...field displays the total time that has elapsed since your Broadband was powered on Total Connection Time This field displays the total connection time for each port that has been logged on since the Router was powered on Current Connection This field displays the time that has elapsed since the current connection was established for the port TX Bytes This field displays the total number of bytes t...

Page 95: ...tor light is lit when the modem power is turned on Modem Ready The Network Device sends a pre initialization and initialization command to the modem or ISDN TA If this communication is successful the indicator light will be lit indicating your modem is ready to make a connection Modem Connected If the Network Device has detected that your modem has successfully dialed up a connection to a remote s...

Page 96: ...llowing information IP Address The IP address of the network device Name The Name as entered in the IP Address name option of the Main Broadband Monitor dialog box Tx Bytes Displays the number of bytes transmitted from the computer with this IP address Rx Bytes Displays the number of bytes received from the computer with this IP address Total Bytes Displays the total number of bytes received and t...

Page 97: ...94 NET ACCESS BROADBAND ROUTER W 4 PORT SWITCH USERS MANUAL 4 Use the Reset button to set the IP statistics to zero 5 To Exit Broadband Monitor close the window ...

Page 98: ...ned by a DHCP server such as the one built into your Router If you d like to manually configure the IP addresses on your workstation you will need to provide an IP address and subnet mask the local LAN IP address and subnet you want to assign to the individual computer a Gateway address the local LAN IP address of your Router and a DNS Server address the DNS IP address provided by your ISP WARNING...

Page 99: ... when you need to connect your PC workstation to a remote Windows NT Server 8 2 1 ADDING THE DIAL UP ADAPTER NT SERVER CONNECTION Windows 95 98 1 Click Start Settings Control Panel 2 Double click the Network icon to open the Network dialog box 3 Click Add the Select Network Component Type dialog box opens 4 Select Adapter then click Add The Select Network adapters dialog box opens 5 In the Manufac...

Page 100: ...ox Configuration tab click Add 2 Select Network Client and click Add 3 The Select Network Client dialog box displays In the Manufacturer s box select Microsoft In the Network Clients box select Client for Microsoft Networks 4 Click OK to add this Client and return to the Network dialog box 8 2 4 ADDING FILE AND PRINT SHARING FOR MICROSOFT NETWORKS NT SERVER CONNECTION Windows 95 98 1 In the Networ...

Page 101: ...e TCP IP Dial Up Adapter 2 Click Properties The TCP IP Properties dialog box opens with the IP Address tab selected 3 Make sure that Obtain an IP Address Automatically is selected It s the default 4 Click OK to close the TCP IP Properties dialog box Network Client Windows 95 98 1 In the Network dialog box Configuration tab select Client for Microsoft Networks 2 Click Properties The Client for Micr...

Page 102: ...rol Access to Shared resources using group select Share Level access control 3 Click OK twice to return to and then close the Network dialog box NOTE You must restart your system for the new settings to take effect Once your machine has restarted you may continue the configuration process 8 2 7 MAKE YOUR NEW CONNECTION NT SERVER CONNECTION Windows 95 98 1 Double click My Computer 2 Double click th...

Page 103: ...and TCP IP Note do not disturb any other items that are already checked 8 2 9 DIAL INTO YOUR NETWORK NT SERVER CONNECTION Windows 95 98 1 You are ready to dial into your network 2 Double click the new connection icon the Connect To dialog box opens 3 Enter the user name if necessary and password configured for you on the Router NOTE If your particular situation permits click to check Save password...

Page 104: ...enabling your workstation to gain access to a remote computer or network even if your computer is not on a network 1 Double click My Computer then double click Dial Up Networking The following screen is displayed 2 Click Install then follow the onscreen instructions to configure your connection 8 3 2 ADDING IPX SPX NOVELL SERVER CONNECTION Windows 95 98 1 In the Network dialog box Configuration ta...

Page 105: ...NT FOR NETWARE NETWORKS NOVELL SERVER CONNECTION Windows 95 98 1 In the Network dialog box Configuration tab click Add 2 Select Network Client and click Add 3 The Select Network Client dialog box opens In the Manufacturer s box select Microsoft In the Network Clients box select Client for NetWare Networks 4 Click OK to add this Client and return to the Network dialog box 8 3 4 SET UP PROPERTIES OF...

Page 106: ...figuration tab select Client for NetWare Networks as the Primary Network Logon 2 Click OK You are returned to the desktop 8 3 6 SET YOUR ACCESS CONTROL NOVELL SERVER CONNECTION Windows 95 98 1 In the Network dialog box select the Access Control tab 2 In the Control Access to shared resources using box select Share Level Access Control NOTE You must restart your system for the new settings to take ...

Page 107: ...ens Select PPP Windows 95 Windows NT 3 5 Internet 3 Click to check or enable only the following items Log on to network Enable software compression and TCP IP Note do not disturb any other items that are already checked 8 3 9 DIAL INTO YOUR NETWORK NOVELL SERVER CONNECTION Windows 95 98 1 You are ready to dial into your network 2 Double click the new connection icon the Connect To dialog box opens...

Page 108: ...lect Network adapters dialog box opens 5 Win95 98 only In the Manufacturers box select Microsoft In the Network Adapters box select Dial Up Adapter Note In Windows NT workstations there is no Manufacturers box 6 Click OK twice to return to and then close the Network dialog box 8 4 2 ADDING TCP IP NOVELL NT SERVER CONNECTION Windows 95 98 NT 1 In the Network dialog box Configuration tab click Add 2...

Page 109: ...98 1 In the Network dialog box Configuration tab click Add 2 Select Services and click Add 3 The Select Network Service dialog box displays In the Manufacturers box select Microsoft Select File and Printer sharing for Microsoft Networks Note Windows 98 has no Manufacturers box 4 Click OK twice to return to and then close the Network dialog box 8 4 5 ADDING IPX SPX NOVELL NT SERVER CONNECTION Windo...

Page 110: ...ORKS NOVELL NT SERVER CONNECTION Windows 95 98 1 In the Network dialog box Configuration tab click Add 2 Select Network Client and click Add 3 The Select Network Client dialog box displays In the Manufacturers box select Microsoft In the Network Clients box select Client for NetWare Networks 4 Click OK to add this Client and return to the Network dialog box 8 4 7 SET YOUR PRIMARY NETWORK LOGON NOV...

Page 111: ...operties dialog box opens 3 On the General tab select Log on to Windows NT domain 4 Click the Windows NT domain field then enter the name of your Windows NT domain as provided by your Network Administrator 5 Click OK to return to the Network dialog box 6 In the Network dialog box Configuration tab select Client for NetWare Networks 7 Click Properties 8 On the General tab in the Preferred server fi...

Page 112: ...elds provided 4 Click OK Set Your Access Control Windows 95 98 1 In the Network dialog box select the Access Control tab 2 In the Control Access to Shared resources using group select Share level access control 3 Click OK twice to return to and then close the Network dialog box NOTE You must restart your system for the new settings to take effect Once your machine has restarted you may continue th...

Page 113: ...ens Select PPP Windows 95 Windows NT 3 5 Internet 3 Click to check or enable only the following items Log on to network Enable software compression and TCP IP Note do not disturb any other items that are already checked 8 4 11 DIAL INTO YOUR NETWORK NT NOVELL SERVER CONNECTION Windows 95 98 1 You are ready to dial into your network 2 Double click the new connection icon the Connect To dialog box o...

Page 114: ... 6 Click OK twice to return to and then close the Network dialog box Windows NT Dial up Networking adds PPP and SLIP protocol support enabling your workstation to gain access to a remote computer or network even if your computer is not on a network 1 Double click My Computer then double click Dial Up Networking The following screen is displayed 2 Click Install then follow the onscreen instructions...

Page 115: ...sure that Obtain an IP Address Automatically is selected It s the default 4 Click OK to close the TCP IP Properties dialog box NOTE You must restart your machines to enable the new settings 8 5 4 MAKE YOUR NEW CONNECTION UNIX SERVER CONNECTION Windows 95 98 1 Double click My Computer 2 Double click the Dial Up Networking folder 3 Double click Make New Connection or Add New Connection Win98 4 Follo...

Page 116: ...You are ready to dial into your network 2 Double click the new connection icon the Connect To dialog box opens 3 Enter the user name if necessary and password configured for you on the Router NOTE If your particular situation permits click the Save password box 4 Click Connect 5 After connecting to the Router you can access the same services and resources as if you were connected to the network lo...

Page 117: ...114 NET ACCESS BROADBAND ROUTER W 4 PORT SWITCH USERS MANUAL 4 Click Next then follow the onscreen instructions to configure your connection ...

Page 118: ...se the Identification tab of the Network Dialog box to define a workgroup name 1 Select Start Settings Control Panel 2 Click Network 3 Click File and Printer Sharing 4 To enable file sharing select I want to be able to give others access to my files 5 If you haven t already done so ensure that this computer has a fixed IP address on your local network Refer to Chapter 8 for information on configur...

Page 119: ... address and host name into your LMHosts file you may enter the computer s host name rather than the IP address in the Named field refer to Section 9 3 NOTE If the computer you are attempting to access is on a remote LAN you may need to press Find Now more than once while you wait for your network device to establish a dial up connection to your remote LAN 9 3 Using LMHosts IMPORTANT Each computer...

Page 120: ...pied to each computer the user will be able to enter the name of the computer they want to access on the LAN without having to remember the IP address When using Find Computer you may enter either an IP address or the computer s host name if you have entered the name and IP address in your LMHosts lookup table NOTE Since the computers you ll add to the LMHosts file are generally servers only compu...

Page 121: ...Once you determine that you are able to ping the computer try to ping another computer in the same segment of your network If this ping is successful your computer is properly connected to the network Solution 4 Remove the TCP IP Dial up Adapter from your computer For instructions see the Problem listed below Solution 5 Make sure your network device is properly connected to your Ethernet hub by pr...

Page 122: ...tly set up for this computer Solution 3 Make sure that the Web browser is properly configured to connect to the Internet via the LAN Problem The Router is connected to the Cable DSL but has problems accessing the Internet Solution 1 Make sure the workstation has TCP IP properly configured Solution 2 Attempt to ping the IP address of the Router Solution 3 Use Broadband Monitor to see if the WAN Eth...

Page 123: ...p file Problem I configured my Router but I can t get it to communicate with my modem Solution Check your initialization string If you are using an ISDN TA and your ISDN TA was not listed as a choice in Setup Wizard refer to the ISDN TA User Guide for the appropriate initialization string After ensuring that the initialization string is correct use the on line help in Broadband Monitor Problem My ...

Page 124: ...ISP as you attempt to make a connection for example a busy signal Problem After installing my Router my modem connection seems to be slower Solution The Router should have no effect on the modem speed However if more than one client is using the same modem through the Router the speed will be reduced Run Broadband Monitor to view the number of concurrent client connections to your ISP Problem Whil...

Page 125: ...nputted is either not valid on your network or is in conflict with another IP address Solution The manager has detected that the IP address of the Router you are configuring is in conflict with another device Power off the conflicting device and configure the Router using a different Ethernet LAN IP address 10 2 Calling Black Box If you determine that your Router is malfunctioning do not attempt t...

Page 126: ...Package it carefully We recommend that you use the original container If you are shipping the Router for repair make sure you include everything that came in the original package Before you ship contact Black Box to get a Return Authorization RA number CHAPTER 10 Troubleshooting ...

Page 127: ... utility sends a packet to the specified address and then waits for a reply PING is used primarily to troubleshoot Internet connections but it can be used to test the connection between any devices using the TCP IP protocol A 3 WINIPCFG and IPCONFIG There are two tools which are helpful in finding a computer s IP configuration MAC address and default gateway WINIPCFG FOR WINDOWS 95 98 1 Select Sta...

Page 128: ... attempts to cross a hop The information provided by this utility assists you to locate the specific site of a failed PING You can run TRACERT at the DOS prompt for example c tracert www yahoo com The utility will provide information about the route and number of hops required to reach the destination IP address associated with the network address or URL APPENDIX A Tools for Your Router ...

Page 129: ...USERS MANUAL Appendix B Cabling Diagrams B 1 WAN LAN Cables Figure B 1 WAN LAN connectors Table B 1 Pinning Pin Circuit Signal Name 1 TD Data Transmit Positive 2 TD Data Transmit Negative 3 RD Data Receive Positive 6 RD Data Receive Negative 1 2 3 4 ...

Page 130: ...127 B 2 Serial Cable Figure B 2 Serial connector Figure B 3 Pinning Male DB 25 8 3 2 20 7 6 4 5 Male 8 pin Mini DIN To LRB500A To Modem 1 2 3 4 5 6 7 8 Serial 1 2 3 4 5 6 7 8 APPENDIX B Cabling Diagrams ...

Page 131: ...network to automatically extract IP information from the Router Why is it called Dynamic Each time a network client turns on their computer your Router DHCP server will automatically give them an IP address from the IP address pool configured in the DHCP Configuration dialog box in Broadband Manager It s called Dynamic because the address that is issued could be different each time a computer conn...

Page 132: ...e Internet is a global network open to all IP Internet Protocol The Internet Protocol is the network layer for the TCP IP Protocol Suite It is a connectionless best effort packet switching protocol IP Addresses A computer on the Internet is identified by an IP Address A computer s IP address is like a telephone number It identifies one address or in this case one computing device Every computer or...

Page 133: ...col that allows for the bridging or bundling of two ISDN or analog channels for faster connections N NAT Technology NAT is short for Network Address Translation NAT is an Internet standard that enables a local area network to use one set of IP addresses for internal traffic and a second set of IP addresses for external traffic The Router provides the necessary IP address translations NAT is someti...

Page 134: ...ansmitted over a packet switching network A packet contains the destination address of the message as well as the data In IP networks packets are often called datagrams Port Number The term port can mean the connector on your computer or it can be thought of as a server number Every service that travels over phone lines and modems has a standard port number For example the World Wide Web service u...

Page 135: ...ubnetting enables the network administrator to further divide the host part of the address into two or more subnets T TCP IP Transmission Control Protocol Internet Protocol A suite of communication protocols used to connect hosts on the Internet Every computer that wants to communicate with another computer on the Internet must use the TCP IP protocol to transmit and route data packets The format ...

Page 136: ...133 U UDP User Datagram Protocol An Internet Standard transport layer protocol It is a connectionless protocol that adds a level of reliability and multiplexing to IP APPENDIX C Glossary ...

Reviews: