background image

USER GUIDE

7

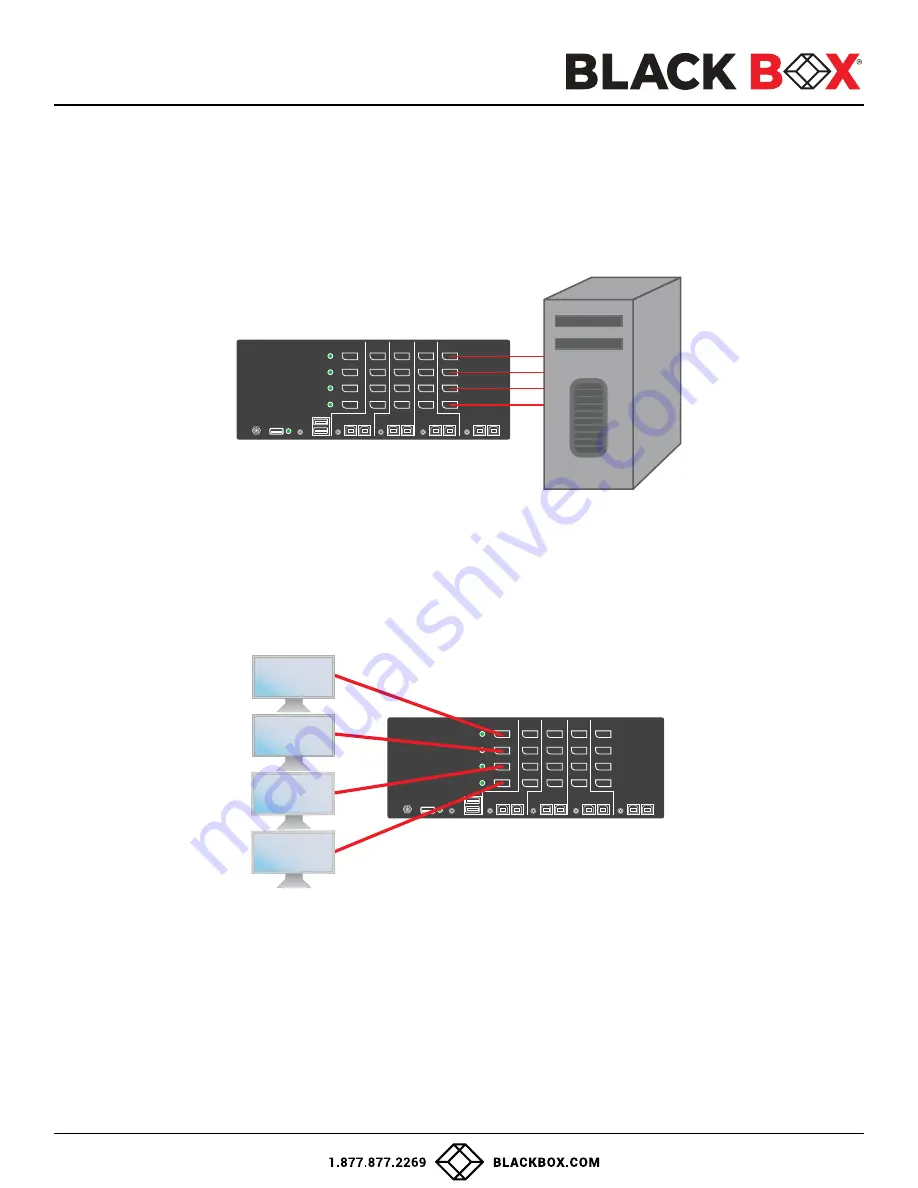
INSTALLATION (Continued)

Multi-Head Units:

1. 

Ensure that power is turned off or disconnected from the unit and the computers.

2. 

Use DisplayPort™cables to connect the DisplayPort output ports of each computer to the corresponding DP IN ports 
of the unit. For example, if using KVS4-4004VX the four DisplayPort ports of one computer must all be connected to 

one channel.

The DP IN connectors that belong to the same channel are arranged vertically.

3.  Use a USB cable (Type-A to Type-B) to connect a USB port on each computer to the respective USB ports of the unit.
4.  Optionally connect a stereo audio cable (3.5mm on both ends) to connect the audio output of the computer to 


the AUDIO IN ports of the unit.

5.  Connect the monitors to the DP OUT console ports of the unit using DP cables.

The DP ports on one row will be switched to the DP OUT of the same row.

6.  Connect a USB keyboard and mouse in the two USB console ports.
7.  Optionally connect stereo speakers to the AUDIO OUT port of the unit.
8.  Optionally connect CAC (smart card reader) to the CAC port in the user console interface.
9.  Power on the Secure KVM Switch by connecting a 12VDC power supply to the power connector, and then turn on all 

the computers.


Note:

 The computer connected to port 1 will always be selected by default after power up.

Figure 1-4: 

KVS4-4004VX

Figure 1-5: 

KVS4-4004VX

SDPN-4Q-P

PC Workstation

CONSOLE

DP OUT

DP

IN-4

IN-3

IN-2

IN-1

DP

DP

DP

DP OUT

DP

DP

DP

DP

DP OUT

DP

DP

DP

DP

DP OUT

DP

CAC

K/M

K/M

Audio

12VDC

DP

DP

DP

Audio

CAC

K/M

Audio

CAC

K/M

Audio

CAC

K/M

Audio

CAC

CONSOLE

DP OUT

DP

IN-4

IN-3

IN-2

IN-1

DP

DP

DP

DP OUT

DP

DP

DP

DP

DP OUT

DP

DP

DP

DP

DP OUT

DP

CAC

K/M

K/M

Audio

12VDC

DP

DP

DP

Audio

CAC

K/M

Audio

CAC

K/M

Audio

CAC

K/M

Audio

CAC

SDPN-4Q-P

Summary of Contents for KVS4-1002V

Page 1: ...ort DH Secure Pro DP KVM w audio and CAC KVS4 4004VX 4 Port QH Secure Pro DP KVM w audio and CAC KVS4 1008V 8 Port SH Secure Pro DP KVM w audio NO CAC KVS4 1008VX 8 Port SH Secure Pro DP KVM w audio a...

Page 2: ...R INSTALLATION CAC INSTALLATION COMMON ACCESS CARD SMART CARD READER CAC PORT CONFIGURATION AUDITING Dumping the Event Log via User Menu Options RESET Restore Factory Default LED s BEHAVIOR SYSTEM OPE...

Page 3: ...Signal Type USB 1 1 and 1 0 Keyboard and Mouse only USB 2 0 for CAC connection Only in models with CAC Type B KVS4 1002V KVS4 2002V 2 USB Type B KVS4 2002VX KVS4 1004V KVS4 2004V 4 USB Type B KVS4 200...

Page 4: ...onality TAMPER EVIDENT SEAL The enclosure of the unit is protected with a tamper evident seal to provide a visual evidence if the unit has been opened PROTECTED FIRMWARE The controller of the unit has...

Page 5: ...ithout internal USB hub or composite device functions unless the connected device has at least one endpoint which is a keyboard or mouse HID class Display Display device e g monitor projector that use...

Page 6: ...ecure KVM Switch by connecting a 12VDC power supply to the power connector and then turn on all the computers Note The computer connected to port 1 will always be selected by default after power up No...

Page 7: ...using DP cables The DP ports on one row will be switched to the DP OUT of the same row 6 Connect a USB keyboard and mouse in the two USB console ports 7 Optionally connect stereo speakers to the AUDI...

Page 8: ...IN1 A DP IN2 A DP IN3 A DP IN4 A DP OUT A DP IN1 B DP IN2 B DP IN3 B DP IN4 B DP OUT B DP IN1 C DP IN2 C DP IN3 C DP IN4 C DP OUT C DP IN1 D DP IN2 D DP IN3 D DP IN4 D DP OUT D Figure 1 6 KVS4 4004VX...

Page 9: ...nt Tool to your PC from this link https www blackbox com NIAP3 documentation 8 Run the Administration and Security Management Tool executable file Initiate the session using the following steps in the...

Page 10: ...ts on a 4 host port Secure KVM Switch CAC connection to the computer requires a USB cable connection separate from the keyboard and mouse This allows the CAC to be connected independently from the key...

Page 11: ...stration and Security Management Tool Guidance for detailed information AUDITING Dumping the Event Log via User Menu Options RESET Restore Factory Defaults The following steps are intended for the sys...

Page 12: ...e Front Panel LEDs are flashing and the buzzer is beeping the Secure KVM Switch has been TAMPERED with and all functions are permanently disabled Please contact Black Box technical support at info bla...

Page 13: ...mputer Replace the keyboard Check if the mouse is properly connected to the unit Try connecting the USB on the computer to a different port Make sure that the mouse works when directly connected to th...

Page 14: ...Any replacement product could be new or like new provided that it has functionality at least equal to that of the product being replaced Black Box limited warranty is valid in any country where the co...

Page 15: ...errors in the product information or specifications set forth in this document and Black Box Corporation may revise this document at any time without notice TRADEMARKS Black Box and the Black Box log...

Reviews: