background image

9

CHAPTER 1: Quick Start Guide

1. Quick Start Guide

To

install

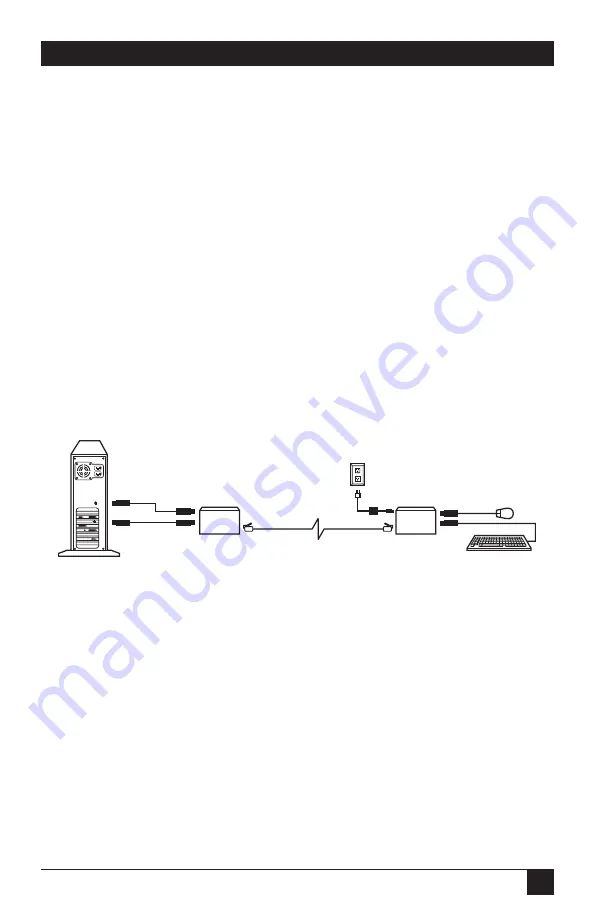
your ServSwitch™ Brand CAT5 PS/2 Micro Extender system, refer to the

illustration below. A basic installation with a CPU, a keyboard, and a mouse is
shown.

1. Use the included PS/2 extension cables to attach the CPU to the Local Unit.

2. Plug the remote keyboard and mouse directly into the Remote Unit.

3. Connect the Local and Remote Units with straight-pinned four-pair solid-core

CAT5 cable.

4. Power the Remote Unit with its included power supply.

For more information, or if your installation includes any KVM switches, refer to

Chapter 5

.

Remote keyboard

and mouse

Local CPU

Extender’s

Local Unit

CAT5
cable

Power

supply

Included

PS/2

extension

cables

Extender’s

Remote Unit

Summary of Contents for ACU1007A

Page 1: ... tech support 24 hours a day 7 days a week Call 724 746 5500 or fax 724 746 0746 Mailing address Black Box Corporation 1000 Park Dr Lawrence PA 15055 1018 World Wide Web www blackbox com E mail info blackbox com Copyright 2002 Black Box Corporation All rights reserved Customer Support Information ...

Page 2: ...y a broad line of robust solutions for all these applications Do you have just two PCs and need an economical alternative to keeping two monitors keyboards and mice on your desk Or do you need to share dozens of computers including a mix of IBM PC RS 6000 Apple Macintosh Sun Microsystems and SGI compatibles among multiple users with different access levels Does your switch have to sit solidly on a...

Page 3: ...T T is a registered trademark of AT T Pentium is a registered trademark of Intel Corporation IBM PC AT PS 2 and RS 6000 are registered trademarks and PC XT is a trademark of International Business Machines Corporation Microsoft IntelliMouse Windows Windows Me Windows NT and Windows XP are registered trademarks or trademarks of Microsoft Corporation in the United States and or other countries Sun M...

Page 4: ...hich case the user at his own expense will be required to take whatever measures may be necessary to correct the interference Changes or modifications not expressly approved by the party responsible for compliance could void the user s authority to operate the equipment Shielded PC equipment cables must be used with this equipment to maintain compliance with radio frequency energy emission regulat...

Page 5: ...ct complies with the following harmonized standards EN55022 1994 EN55024 1998 EN61000 3 2 1995 EN61000 3 3 1995 EN60950 2000 When you use this product in environments that have high levels of electromagnetic interference you might experience some slight disturbance in its operation If this occurs please refer to the Troubleshooting chapter of this manual or call technical support To maintain compl...

Page 6: ...debe ser montado a la pared o al techo sólo como sea recomendado por el fabricante 8 Servicio El usuario no debe intentar dar servicio al equipo eléctrico más allá a lo descrito en las instrucciones de operación Todo otro servicio deberá ser referido a personal de servicio calificado 9 El aparato eléctrico debe ser situado de tal manera que su posición no interfiera su uso La colocación del aparat...

Page 7: ...o de existir una antena externa deberá ser localizada lejos de las lineas de energia 16 El cable de corriente deberá ser desconectado del cuando el equipo no sea usado por un largo periodo de tiempo 17 Cuidado debe ser tomado de tal manera que objectos liquidos no sean derramados sobre la cubierta u orificios de ventilación 18 Servicio por personal calificado deberá ser provisto cuando A El cable ...

Page 8: ...e Unit 18 4 2 4 To Connect a ServSwitch Family KVM Switch to the Remote Unit 18 4 2 5 To Connect the Local Unit to the Remote Unit 20 5 Installation 21 5 1 Test Placing the Extender System Optional 21 5 2 Attaching Devices 21 5 2 1 Attaching a CPU to the Local Unit 22 5 2 2 Attaching a ServSwitch Family KVM Switch to the Local Unit 22 5 2 3 Attaching a Keyboard and Mouse to the Remote Unit 24 5 2 ...

Page 9: ...d Chapter Page 7 Troubleshooting 28 7 1 Common Problems 28 7 1 1 Keyboard 28 7 1 2 Mouse 29 7 1 3 Both Keyboard and Mouse 30 7 2 General Questions About the Extender 31 7 3 Calling Black Box 32 7 4 Shipping and Packaging 32 Appendix Cable Pinning Pairing 33 ...

Page 10: ...the CPU to the Local Unit 2 Plug the remote keyboard and mouse directly into the Remote Unit 3 Connect the Local and Remote Units with straight pinned four pair solid core CAT5 cable 4 Power the Remote Unit with its included power supply For more information or if your installation includes any KVM switches refer to Chapter 5 Remote keyboard and mouse Local CPU Extender s Local Unit CAT5 cable Pow...

Page 11: ...e 3 button Maximum Distance 5 m 16 ft from the Local Unit to the attached CPU or KVM switch 5 m 16 ft from the Remote Unit to the attached monitor keyboard and mouse or KVM switch 300 m 1000 ft between Local and Remote Units NOTE With high quality cables it might be possible to run farther than 5 m 15 ft from the Extender to attached equipment Connectors On Local Unit 2 Left side mounted 6 pin min...

Page 12: ...andards Input 100 to 240 VAC at 50 to 60 Hz from utility power mains outlet through detachable power cord and IEC 320 male inlet to external transformer Output 5 VDC regulated at up to 1 amp from transformer to Remote Unit Size Each Unit Height 1 2 5 cm feet protrude an additional 0 1 0 2 cm from bottom Width 4 3 10 9 cm Depth 3 2 8 1 cm additionally screws protrude less than 0 1 0 2 cm from both ...

Page 13: ...TP 4 pair cable All keyboard and mouse signals are fully buffered to ensure consistent remote operation of your PC The Extender operates automatically and works with all operating systems no software is required Just connect the Units as described in Chapter 5 and you re ready to work Because the Extender performs complete PS 2 keyboard and mouse emulation you can boot the PC without having a keyb...

Page 14: ... for use with versions of Windows starting with Windows 95 Although we don t recommend this you might also be able to use a PC AT type keyboard with 5 pin DIN connectors you ll need adapters to attach it and its native CPU to the Extender see the start of Section 4 2 Some older PC XT or PC AT type autosensing keyboards might not be compatible with the Extender If the keyboard you want to use is so...

Page 15: ...PC is consistently smooth and transparent Intelligent PS 2 keyboard and mouse emulation With this the PC boots and operates correctly under most circumstances and you can freely detach and reconnect the keyboard and mouse as necessary the Extender automatically initializes the keyboard and mouse as soon as it detects that you ve reattached them Microsoft IntelliMouse compatibility Use this and com...

Page 16: ...d everything you ll need except for your Unit interconnection cable Read Sections 4 2 1 4 2 3 and 4 2 5 carefully then skip ahead to Chapter 5 If you are using the Extender to get greater distance between a ServSwitch family KVM switch and a CPU or a keyboard mouse user station you might need additional non included cabling Read the relevant sections on the next few pages from Section 4 2 1 throug...

Page 17: ... will depend on what type of user ports the switch model has as detailed in the following three subsections 4 2 2 A Switches Whose User Ports Are a Set of Separate Interfaces The user ports of some ServSwitch family KVM switches are a set of separate interfaces Each user port consists of separate interfaces connectors for video keyboard and mouse communication At the time of this writing some of t...

Page 18: ... you ll need a three to one ServSwitch User Cable product code EHN054B for standard or EHN283 for coaxial plus the PS 2 extension cables included with the Extender Refer to Section 5 2 2 B for a description of how this cabling fits together 4 2 2 C ServSwitch Multi HD62 Composite User Ports The user ports on User Cards installed in the ServSwitch Multi are HD62 female connectors that function as c...

Page 19: ... CPU ports the switch model has as detailed in the following three subsections 4 2 4 A Switches Whose CPU Ports Are a Set of Separate Interfaces The CPU ports of some ServSwitch family KVM switches are a set of separate interfaces Each CPU port consists of separate interfaces connectors for video keyboard and mouse communication At the time of this writing some of the important ServSwitch family m...

Page 20: ... a Remote Unit you ll need a ServSwitch CPU Cable product code EHN051B for standard or EHN282 for coaxial 4 2 4 C Switches with Other Types of Composite CPU Ports The CPU ports of some ServSwitch family KVM switches are composite all in one interfaces that are not the same as those on the regular ServSwitch but the principle for connecting them is the same The CPU ports on CPU Cards installed in t...

Page 21: ...e of 4 wire twisted pair cabling do not connect the Extender to 10BASE T Ethernet devices or any other network equipment Doing so will virtually destroy the Extender s circuitry and could also damage the attached equipment The Extender is designed for use up to a maximum cable length of 300 m 1000 ft Although a single continuous length of interconnect cable is preferable it s possible to operate a...

Page 22: ...Local and Remote Units and the equipment you ll be attaching to them in your desired locations 5 2 Attaching Devices For instructions on making device connections refer to these subsections Section 5 2 1 for attaching a CPU to the Local Unit Section 5 2 2 for attaching a KVM switch to the Local Unit Section 5 2 3 for attaching a keyboard and mouse to the Remote Unit Section 5 2 4 for attaching a K...

Page 23: ... connectors see Section 5 2 2 A or single composite connectors see Section 5 2 2 B Refer to the listings in Section 4 2 2 for which ServSwitch family models are in which category 5 2 2 A Attaching a Switch with Multiple User Port Connectors Run the included PS 2 extension cables from one of the KVM switch s user ports to the Local Unit keyboard connector to keyboard connector mouse connector to mo...

Page 24: ... matching ends of the extension cables and User Cable together as shown in Figure 5 3 The User Cable s video strand won t be used Figure 5 3 Attaching a KVM switch with a single user port connector such as a regular ServSwitch top or ServSwitch Multi bottom to the Local Unit Included PS 2 extension cables Included PS 2 extension cables Regular ServSwitch KV3108SA R4 Local Unit Local Unit ServSwitc...

Page 25: ...rs see Section 5 2 4 A or single connectors see Section 5 2 4 B Refer to the listings in Section 4 2 4 for which switch models are in which category 5 2 4 A Attaching a Switch with Multiple CPU Port Connectors Run the included PS 2 extension cables or equivalent cables see Section 4 2 4 A from one of the KVM switch s CPU ports to the Remote Unit keyboard connector to keyboard connector mouse conne...

Page 26: ...to the Remote Unit s keyboard and mouse connectors The cable s video strand won t be used Figure 5 6 Attaching a KVM switch with a single CPU port connector such as a regular ServSwitch top or ServSwitch Multi bottom to the Remote Unit Remote Unit Remote Unit Regular ServSwitch KV3108SA R4 ServSwitch Multi EXP KV160A R2 ServSwitch CPU Cable EHN051B video strand not used ServSwitch Multi CPU Cable ...

Page 27: ...attached to the Remote Unit power it ON 3 Interconnect the Local and Remote Units by running CAT5 cable between their right side mounted modular jacks the ones labeled Interconnect Refer to the guidelines for this cable in Section 4 2 5 4 Power ON the PC CPU or KVM switch attached to the Local Unit s CPU port If the CPU or switch provides enough DC voltage on its keyboard port leads the Local Unit...

Page 28: ...g and replug the keyboard and mouse without disrupting the operation of the PC You can connect the Local Unit of one Extender system to the Remote Unit of a different Extender system effectively creating a keyboard and mouse switching matrix by swapping the systems interconnection cables We do not recommend that you do this if you feel that you need to please call Black Box for technical support f...

Page 29: ...ug the cable s in properly and cycle power to the Remote Unit 2 Check the interconnect cable between the Extender s Local and Remote Units Is it intact along its length and securely connected at both ends And is it wired correctly Compare its wiring with that shown in the Appendix 3 If the PC is a Pentium class machine see the entry for the My Pentium class PC problem in Section 7 1 3 4 Try a diff...

Page 30: ... it s loose or if you have the keyboard and mouse cables reversed plugged into each other s Extender ports plug the cable s in properly and cycle power to the Remote Unit 2 Make sure that the cable running from the keyboard port of the CPU or KVM switch to the Extender s Local Unit is intact and securely attached so that it provides power to the Local Unit 3 If the PC is a Pentium class machine se...

Page 31: ...g from the Extender to your PC That is plug the keyboard cable into the mouse port and the mouse cable into the keyboard port If this works here s why The BIOS installed in some PCs with Pentium family processors especially those with clock speeds of 300 MHz and up checks the PC s keyboard and mouse ports at boot time If it detects anything that leads it to suspect that the user has plugged the ke...

Page 32: ...designed to withstand high levels of interference while driving signals over UTP To further reduce the potential for interference consider taking these actions a Make sure that the Extender s Remote Unit any remote KVM switch and the local CPU or KVM switch are all connected to the same utility power mains phase b Make sure that the AC voltage across the utility power mains grounds at both the loc...

Page 33: ... of keyboard brand of mouse type and make of CAT5 cable etc any particular application that when used appears to create the problem or make it worse and the results of any testing you ve already done To solve some problems it might be necessary to upgrade the Extender s firmware If this turns out to be the case for your difficulty our technical support technicians will arrange for you to receive t...

Page 34: ... on the left and Pin 8 on the right and the wires should be arranged this way Pin Color Function Pair 1 White Orange TX Pair 2 2 Orange White RX Pair 2 3 White Green TX Pair 3 4 Blue White RX Pair 1 5 White Blue TX Pair 1 6 Green White RX Pair 3 7 White Brown TX Pair 4 8 Brown White RX Pair 4 NOTES The Extender has been tested with all major makes of CAT5 cable including Black Box Berk Tek Mohawk ...

Page 35: ...mages resulting from the use of the information contained herein They reserve the right to change the specifications functions or circuitry of the product without notice The manufacturer cannot accept liability for damage due to misuse of the product or due to other circumstances outside the manufacturer s control And the manufacturer will not be responsible for any loss damage or injury arising d...

Page 36: ...NOTES ...

Page 37: ...NOTES ...

Page 38: ...M5 FREE tech support 24 hours a day 7 days a week Call 724 746 5500 or fax 724 746 0746 Mailing address Black Box Corporation 1000 Park Dr Lawrence PA 15055 1018 World Wide Web www blackbox com E mail info blackbox com Copyright 2002 Black Box Corporation All rights reserved Customer Support Information ...

Reviews: