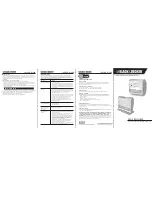


Thank you
for buying a Black & Decker paper shredder.
Black & Decker paper shredders
have become the benchmark for innovation, performance and quality to protect against
identity theft. We have taken great care in designing and engineering a product to meet
and exceed your needs.
To ensure years of safe, efficient performance, please read
these important product usage and safety instructions.
WARNING ICONS:
The icons on top of the shredder warn the user of the potential
dangers if the shredder is used improperly.
TO USE ON DESK OR FLOOR SURFACE:
1. Place bracket (face up) on flat surface.
2. The shredder should be positioned over the raised section of the mounting bracket. This
will fit inside the slot on the bottom of the shredder. (fig. 4)
3. Attach the shredder to the mounting bracket using the two thumb screws that were
provided with the unit. These thumb screws must be securely in place when the shredder
is in the standing mode. (fig. 5)
A socket-outlet should be near the equipment and be easily accessible. Connect the power
cord to any standard 120 volt AC outlet. The B&D Paper Shredder & Messaging Center uses a
break-away power cord for added safety.
Operation
HOW TO USE YOUR SHREDDER
1. Place the bin (3) inside the shredder and close the front door.
2. Rotate the safety shield (1) to the open position.
3. To empty bin, open the front door and remove the waste bin. Shreds should be emptied
into separate container. Always replace the waste bin before closing the front door.
To begin shredding, locate the power switch (5) on the unit and select the “Auto” mode.
The green LED light indicates the shredder is “On” and ready to use. Slide the safety
shield (1) up until it clicks into place and exposes the paper feed slot.
This shredder has a 4 position power switch:
REVERSE
In the unlikely event of a paper jam, the reverse setting can be used to
help clear the cutters of paper that has not passed through. Never
attempt to clear a jam by using the reverse function until after you have
emptied the bin.
OFF
This setting turns off all features of the shredder. For safety reasons, we
recommend that you leave the shredder in the “Off” position whenever
the shredder is unattended or not in use.
AUTO
This setting allows the shredder to be automatically started by inserting
paper into the shred opening. Always feed the paper in as straight as
possible. When the paper has passed through, the shredder will
automatically stop.
FORWARD
This setting allows the shredder to run continuously.
WARNING: Hazardous moving parts. Keep fingers and other body parts away.
WARNING: To reduce risk of fire, electrical shock or injury:
NEVER allow children to operate a paper shredder, even under adult supervision.
A paper shredder is
NOT
a toy.
DO NOT use flammable synthetic oil, petroleum-based products or aerosols of any kind
on or near product at any time.
DO NOT
operate any electrical product with a damaged cord.
AVOID getting jewelry, hair or loose clothing too close to feed slot as serious injury can occur.
DO NOT
handle plug or product with wet hands.
ALWAYS
keep children and pets away from the shredder.
ALWAYS
unplug shredder when not in use.
DO NOT
attempt to feed more sheets of paper than specified on the feeder.
DO NOT
attempt to shred materials other than paper or credit cards.
ALWAYS
empty the wastebasket prior to becoming full.
DO NOT
place shredder near heat or water source.
DO NOT
open shredder head to attempt repair: It could expose you to electric shock and
will void your warranty.
ALWAYS
secure your shredder to studs when mounting on the wall.
The socket-outlet shall be installed near the equipment and shall be easily accessible.
The Following Are Important Safety Instructions.
Read All Instructions Before Using.
W A R N I N G
KEEP OUT OF REACH OF CHILDREN
Customer Service
Black & Decker has a toll-free help line for customers living in the United States
and Canada if you have any questions regarding our product. Our customer service phone
number is
1-800-297-5028
or visit our website at
www.blackanddeckershredders.com
.
Setup
The Black & Decker® Paper Shredder & Messaging Center can be wall mounted or set up on
a desk or floor surface.
TO WALL MOUNT:
Your shredder must be securely attached to studs in your wall. It is recommended to hang
your shredder at a maximum height of 5-feet (152 cm).
1.
Before hanging the shredder, you must remove the screw knobs (8) from the mounting
bracket; these are only used in the floor standing mode. You must also move the sliding
locks (10) to the open position; these will be closed later.
2. Locate the wall studs using a stud finder.
3.
Attach the mounting bracket to the wall using the six enclosed mounting screws. (fig. 2)
4. Hang the shredder to the mounting bracket using the hooks on the front of the bracket.
Check to be sure that both hooks are securely in place.
5. Close the sliding locks on the sides of the mounting bracket; this will lock your shredder
in place. You must open both locks before you take your shredder off the wall. (fig. 3)
Product Information
Sheet capacity:
6 20 lb. pages in widths up to 8.5”.
One folded sheet of paper equates to 2 sheets of paper.
Credit card capacity:
1 at a time
Paper shred size: .18” x 1.4”
Voltage:
120
INDICATOR LIGHTS
To provide ease-of-use, your Black & Decker paper shredder has indicator lights as visual
cues to communicate any problems.
Never shred plastic (except credit cards), any hard materials, continuous forms,
newsprint, or anything with adhesives including labels and envelopes.
While this shredder
will shred staples, it is recommended that you remove them whenever possible to extend the life
of your shredder.
Only shred credit cards by feeding them vertically within the designated area.
Never feed more than one credit card at a time.
Bin Full -
When this light is on the shredder bin
is full and the shredder will not operate. Pull
open the door, remove the paper bin and empty.
Then replace the paper bin and close the door.
Overheat -
If the light below the thermometer
is illuminated, this means the shredder needs
to cool down. Simply turn off the shredder and
let cool for approximately 30 minutes.
Jam Proof -
This light will illuminate if there
is too much paper inserted into the shredder.
This function prevents overloading of the
shredder. If this light is on then you must
reduce the amount of material that you are
trying to shred in a single pass.
Door Open -
This light will illuminate if the
shredder door is ajar. Simply close the
shredder door with the bin in place and
continue to use the product.
figure 6
figure 2
figure 3
figure 4
figure 5
1
Front Door
2
Safety
Shield
4
Magnetic
Whiteboard
5
Mesh
ON/OFF/REV/FWD
Switch
5
6
7
8
Indicator Lights
(see “Product
Information” section)
Brake-away
Power Cord
Thumb Screw (x2)
9
Base Plate/
Mount Bracket
10
Sliding Lock
Bin (inside)
3
figure 1
®
®
®
®
SKU #BD-HS600
SKU #BD-HS600
SKU #BD-HS600
SKU #BD-HS600
NO
FASTENERS
NO
AEROSOL CANS
NOT
A TOY
NO LOOSE
CLOTHING
NO FINGERS
OR HANDS
NO
HAIR