background image

4

5

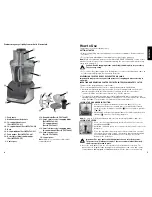
  1.  Food chute
  2.  Multifunctional feed chute
†  3.  12-cup workbowl cover  


  (Part # FP2700-01)

†  4.  12-cup workbowl (Part # FP2700-02)
  5.  Base
†  6.  4-cup workbowl (Part # FP2700-03)
†  7.  Food pusher (Part # FP2700-04)
†  8.  Reversible slicing/shredding disc  


  (Part # FP5050-05)

  9.  Center post

† 10. Dough blade (Part # FP2700-05)
† 11. Large stainless steel chopping blade  


  (Part# FP2700-06) 


  (12-cup workbowl)  


  (Part # FP2700-07)

† 12. Small stainless steel chopping blade  


  (4-cup workbowl) (Part # FP2700-08)

† 13. Skid-resistant feet  


  (Part # FP2700-09)

  14.  Control panel
Note: † indicates consumer replaceable/

removable parts

ENGLISH

How to Use

This product is for household use only.
GETTING STARTED
•  Remove all packing material, and any stickers from the product. Remove and save 

literature.

•  Please go to www.prodprotect.com/applica to register your warranty.
Note: Wash all removable parts as instructed in CARe ANd CleANINg section of this 

manual. (See directions for inserting and removing the center post with interlocking 

safety latch on page 5.) 

Caution: Handle chopping blades and slicing/shredding disc very carefully. 

They are very sharp.

•  Select a level dry countertop where the appliance is to be used allowing air space on 

all sides to provide proper ventilation for the motor.

ASSEMBLING YOUR FOOD PROCESSOR AFTER WASHING
Important: Always make sure your food processor is unplugged before starting to 

assemble.
INSERTING AND REMOVING CENTER POST WITH INTERLOCKING SAFETY LATCH
This part of the large wokbowl is removable.
1. Place the workbowl on a flat surface with the bowl turned upside down. 
2.  Hold the workbowl in place by the handle. grasp the opaque tabs on the  white 

based center post with interlocking safety latch and rotate the center post 

counterclockwise until the lower tabs are free. lift the post out.

3.  To return to its original position, invert the workbowl and place center post into 

opening in bottom of workbowl and press down until it rests flat against the bottom 

of the workbowl. Turn the tabs clockwise until tabs snap into place.

LOCKING THE WORKBOWL IN POSITION 

1. Attach center post to workbowl (as directed above). Place the 

workbowl on the base of the food processor with handle turned  

to the left of the locking mechanism (

) over the unlock symbol  

(

) (A).

2. Hold handle and rotate workbowl counterclockwise toward the lock 

signage (

) until it clicks firmly into place.  

Note: Be sure to lock the workbowl in place before attaching the blades and cover. 
LOCKING THE COVER

1. Place cover over workbowl with the small latch to the left of the 

workbowl handle (B).  

2. Hold food chute and rotate cover counterclockwise until cover locks 

into place.

3. Place the multifunctional feed chute into the food chute on top of 

the cover with the small single clear plastic arm facing the handle 

on the workbowl. Push down until the feed chute rests at the 

bottom of the food chute.  

Important: For your protection this appliance has an interlock system.   

The processor will not operate unless the cover and multifunctional feed 

chute is properly locked in place. 

4.  Insert the food pusher into the central tube of the wide mouth feed chute. The 

pusher is used to guide foods through the multifunctional feed chute and can be 

removed when adding liquid or additional foods while the processor is running.

Product may vary slightly from what is illustrated.

A

B

Summary of Contents for FP2700SC

Page 1: ... 231 9786 Accessories Parts USA 1 800 738 0245 For online customer service and to register your product go to www prodprotect com applica Service line à la clientèle Canada 1 800 231 9786 Accessoires Pièces Canada 1 800 738 0245 Pour accéder au service à la clientèle en ligne ou pour inscrire votre produit en ligne rendez vous à www prodprotect com applica ...

Page 2: ...d use The maximum rated wattage for this product was obtained with the dough blade Other recommended attachments may draw significantly less power or current SAVE THESE INSTRUCTIONS This product is for household use only POLARIZED PLUG 120V Models Only This appliance has a polarized plug one blade is wider than the other To reduce the risk of electric shock this plug is intended to fit into a pola...

Page 3: ...rkbowl in place by the handle Grasp the opaque tabs on the white based center post with interlocking safety latch and rotate the center post counterclockwise until the lower tabs are free Lift the post out 3 To return to its original position invert the workbowl and place center post into opening in bottom of workbowl and press down until it rests flat against the bottom of the workbowl Turn the t...

Page 4: ...the button and allow blades to stop revolving before removing cover Twist cover to remove 9 To unlock workbowl turn it clockwise and lift off base Note Remove workbowl from appliance before removing blade to prevent food from leaking through the center opening of the workbowl 10 Carefully remove chopping blade and empty workbowl 11 Unplug appliance when not in use HOW TO CHOP IN THE SMALL WORKBOWL...

Page 5: ...with the food 5 Place cover on workbowl and lock into place by rotating cover counterclockwise see Illustration B 6 Follow steps 6 through 10 for slicing and shredding in the large workbowl HELPFUL TIPS WHEN SLICING AND SHREDDING Before slicing round fruits and vegetables through the processor cut a thin slice from the bottom so food will be more stable Place food cut side down in feed chute Alway...

Page 6: ...ment Toujours utiliser le poussoir FRANÇAIS NEED HELP For service repair or any questions regarding your appliance call the appropriate 800 number on the cover of this book Please DO NOT return the product to the place of purchase Also please DO NOT mail product back to manufacturer nor bring it to a service center You may also want to consult the website listed on the cover of this manual Two Yea...

Page 7: ...les risques d enchevêtrement ou de trébuchement b Il existe des cordons d alimentation amovibles ou de rallonge plus longs et il faut s en servir avec prudence c L orsqu on utilise un cordon d alimentation amovible ou de rallonge plus long il faut s assurer que 1 la tension nominale du cordon d alimentation amovible ou de rallonge soit au moins égale à celle de l appareil et que 2 lorsque l appare...

Page 8: ... trémie à grand orifice Le poussoir sert à guider les aliments dans la trémie multifonctionnelle il peut être enlevé pour l ajout de liquides ou d autres aliments pendant que le robot culinaire fonctionne 5 Pour utiliser le grand entonnoir placer les aliments dans la grande ouverture de l entonnoir Placer la trémie multifonctionnelle le poussoir d aliments placé par dessus les aliments puis guider...

Page 9: ... Utiliser la lame de métal pour la pâte à pâtisserie et les mélanges renfermant moins de 500 ml 2 tasses de farine 2 Pousser la lame pétrisseuse le plus loin possible vers le bas de l axe d entraînement du bol Notez les mots ce côté vers le haut sur l attachement de lame 3 Verser tous les ingrédients secs dans le bol 4 Placer le couvercle sur le bol Ajouter la trémie multifonctionnelle et le pouss...

Page 10: ...Retirer le disque éminceur déchiqueteur avant d enlever le bol du robot culinaire Placer le disque par dessus le couvercle à l envers du bol Entretien et nettoyage Cet appareil ne contient aucune pièce réparable par l utilisateur Confier la réparation à un technicien qualifié Important Toujours appuyer sur le bouton P et débrancher le robot culinaire avant de le nettoyer NETTOYAGE Désassembler com...

Page 11: ... produit raisonnablement semblable nouveau ou réusiné Comment se prévaut on du service Conserver son reçu de caisse comme preuve de la date d achat Visiter notre site web au www prodprotect com applica ou composer sans frais le 1 800 231 9786 pour obtenir des renseignements généraux relatifs à la garantie On peut également communiquer avec le service des pièces et des accessoires au 1 800 738 0245...

Reviews: