background image

Baking

1. Place bake pan containing food to be cooked on the slide rack.
2. Turn the temperature control to the desired temperature setting.

a. If not using the bake timer, turn the control (counterclockwise) to STAY ON and 

monitor the food.

b. If using the 60-minute bake timer, turn the timer to the desired number of minutes.

Note:

For best results, always preheat the oven for 5 minutes.

3. The heating elements will cycle on and off to maintain the temperature. To momentarily stop

cooking, open the oven door; the heating elements and the ON indicator light go out. Close the
door to resume cooking. To continue cooking, close the door. The heating elements and the
ON indicator light turn back on. Check food for doneness at minimum time.

4. When finished cooking, turn the temperature control to OFF.
5. If using the 60-Minute bake timer, you will hear a bell sound once it reaches the set time. The

ON indicator light goes out and the oven automatically shuts off. When finished cooking, turn
the temperature control to OFF.  If cooking is done before the bell sounds, turn the timer to 0
(OFF). The On indicator goes out. Turn the temperature control to OFF.

6. Using an oven mitt or pot holder, open the door and slide out the slide rack to remove the bake

pan.

Caution:

The oven is hot. Do not let your skin touch any surface.

Convection Cooking

To use for convection cooking press the convection switch to the ON position. Watch time
carefully as many foods will bake in less time in this mode. Turn switch to OFF after use.

Broiling

1. Insert the broil rack in the bake pan and place both on the slide rack.
2. Insert the slide rack in the top rack slot.
Note: The oven does not need to be preheated for broiling.
3. Turn the temperature control to BROIL and the 60-minute bake timer control counterclockwise

to STAY ON. Closely monitor the food.

a. If using the 60-minute bake timer, turn the timer to the desired number of minutes. 

You will hear a bell sound once it reaches the set time. The ON indicator light 
goes out and the oven automatically shuts off. When finished broiling, turn the 
temperature control to OFF. 

b. If broiling is done before the bell sounds, turn the timer to 0 (OFF). The ON 

indicator goes out. Turn the temperature control to OFF.

4. To momentarily stop broiling, open the oven door, the heating elements and the ON indicator

light go out. Close the door to resume broiling. The heating elements and the ON indicator turn
back on. Check food for doneness at minimum cooking time.

5. When finished broiling, using an oven mitt or pot holder, slide out slide rack to remove bake

pan.

Caution:

The oven is hot. Do not let your skin touch any surface.

6. Be sure when broiling is finished to turn the temperature control to OFF and 

60-minute bake timer to 0 (OFF).

Care and Cleaning

This product contains no user serviceable parts. Refer service to qualified service personnel.
1. Turn off unit, unplug from wall outlet and let it cool before cleaning.
2. Clean the glass door with a nylon pad and sudsy water. Do not use a spray glass cleaner.
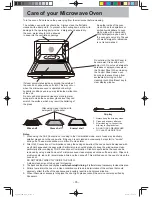
3. To remove slide rack, open the door, pull the rack forward and out. Wash in warm, sudsy water

or in a dishwasher. 
To remove stubborn spots, use a polyester or nylon pad.
To replace the slide rack, open the door completely, slide into the rail and close the door.

4. Wash the bake pan, broil rack and pizza pan in warm, sudsy water or in the dishwasher. To

minimize scratching, use a polyester or nylon pad.

Note:

Bake pan is not nonstick. 

5. To remove the crumb tray, grasp the handle at the front of the oven and pull it out. Dispose of

crumbs and wash the tray in warm, sudsy water. Remove stubborn spots with a nylon mesh pad.
Be sure to dry thoroughly before inserting the tray back into the oven.

Interior  

1. Unplug the oven and let it cool, then wipe with a soapy sponge or nylon pad after each use.
2. Do not use a chemical oven cleaner. Do not use any abrasive cleansers or scouring pads. Dry

with paper towel or soft cloth.

Exterior

Let the oven cool completely before cleaning any outer surface. Wipe with a damp cloth or sponge
and dry with paper towel or soft cloth.

Cooking Containers

Metal, ovenproof glass or ceramic bakeware without glass lids can be used in your oven.
Follow manufacturer’s instructions. Be sure the top edge of the container is at least 
1" (2.54 cm) away from the upper heating elements.

6

5

CTO6200Pub1000001592  1/31/05  4:21 PM  Page 6

Summary of Contents for Dining-In CTO6200 Series

Page 1: ...dá Accessoires Pièces É U Canada PLEASE READ AND SAVE THIS USE AND CARE BOOK POR FAVOR LEA ESTE INSTRUCTIVO ANTES DE USAR EL PRODUCTO VEUILLEZ LIRE ET CONSERVER CE GUIDE D ENTRETIEN ET D UTILISATION Dining In Convection Countertop Oven Broiler Horno asador de convección para el mostrador Four à convection rôtissoire de comptoir CTO6200Pub1000001592 1 31 05 4 21 PM Page 1 ...

Page 2: ...ring pads Pieces can break off the pad and touch electrical parts resulting in a risk of electric shock Extreme caution should be used when using containers constructed of other than metal or glass Do not store any material other than manufacturer s recommended accessories in this oven when not in use Do not place any of the following materials in the oven paper cardboard plastic wrap and the like...

Page 3: ...ots with 4 rack positions Upper slot use rack positions 1 and 3 Lower slot use rack positions 2 and 4 Toasting 1 Insert the slide rack in the bottom rack slot with the curved end toward the back of the oven It is not necessary to preheat the oven for toasting 2 Set the toast shade selector as desired For best results select the medium setting for your first cycle then adjust lighter or darker to s...

Page 4: ...ntrol to OFF b If broiling is done before the bell sounds turn the timer to 0 OFF The ON indicator goes out Turn the temperature control to OFF 4 To momentarily stop broiling open the oven door the heating elements and the ON indicator light go out Close the door to resume broiling The heating elements and the ON indicator turn back on Check food for doneness at minimum cooking time 5 When finishe...

Page 5: ...almohadillas de fibras metálicas para limpiar el aparato Las fibras metálicas podrían entrar en contacto con los componentes eléctricos del aparato produciendo el riesgo de un choque eléctrico INSTRUCCIONES IMPORTANTES DE SEGURIDAD CONSERVE ESTAS INSTRUCCIONES ENCHUFE POLARIZADO Este artefacto posee un enchufe polarizado un contacto es más ancho que el otro Para reducir los riesgos de choque eléct...

Page 6: ...o 2 Parte inferior hacia arriba 3 Parte superior hacia abajo 4 Parte superior hacia arriba Posiciones de la parrilla corrediza El horno tostador tiene 2 ranuras y 4 posiciones para la parrilla Ranura superior utilizar las posiciones 1 y 3 Ranura inferior utilizar las posiciones 2 y 4 Para tostar 1 Instale la parrilla corrediza en la ranura inferior con el extremo curvo hacia la parte trasera del h...

Page 7: ...e el control hacia la izquierda a la posición STAY ON permanecer encendido b Si utiliza el minutero del horno gire y ajuste el control al tiempo de cocción deseado Nota A fin de optimizar los resultados de cocción siempre precaliente el horno durante 5 minutos 3 Los elementos calefactores funcionan de manera intermitente a fin de mantener la temperatura Para interrumpir momentáneamente el ciclo de...

Page 8: ...l appareil avec des tampons métalliques abrasifs Ces derniers peuvent s effriter et entrer en contact avec les composants électriques de l appareil ce qui présente un risque de secousses électriques FICHE POLARISÉE Le produit est muni d une fiche polarisée une lame plus large que l autre Ce genre de fiche n entre que d une façon dans une prise polarisée afin de minimiser les risques de secousses é...

Page 9: ...deux autres positions 1 Bas vers le bas 2 Bas vers le haut 3 Haut vers le bas 4 Haut vers le haut Positions de la grille coulissante Le grille pain a 2 fentes avec 4 positions de grille Fente supérieure pour les positions 1 et 3 Fente inférieure pour les positions 2 et 4 Grillage 1 Placer la grille coulissante dans la fente inférieure l extrémité courbée vers l arrière du four Il n est pas nécessa...

Page 10: ...tion d arrêt OFF 4 Pour interrompre le cycle de rôtissage ouvrir la porte du four les éléments et le témoin s éteignent Refermer la porte pour reprendre le rôtissage Les éléments et le témoin se rallument Vérifier la cuisson des aliments au bout de la durée minimale de cuisson 5 À la fin du cycle de rôtissage utiliser une mitaine ou une poignée isolante pour faire glisser la grille coulissante et ...

Page 11: ...servicio Conserve el recibo original de compra Por favor llame al número del centro de servicio autorizado Esta garantía no cubre Los productos que han sido utilizados en condiciones distintas a las normales Los daños ocasionados por el mal uso el abuso o negligencia Los productos que han sido alterados de alguna manera Los daños ocasionados por el uso comercial del producto Los productos utilizad...

Page 12: ... Colombia Tel 57 1 610 1604 533 4680 Costa Rica Aplicaciones Electromecanicas S A Calle 26 Bis y Ave 3 San Jose Costa Rica Tel 506 257 5716 223 0136 Ecuador Castelcorp Km 2 1 2 Avenida Juan T Marengo junto Dicentro Guayaquil Ecuador Tel 5934 224 7878 224 1767 El Salvador Sedeblack Calle A San Antonio Abad y Av Lisboa Edif Lisboa Local 21 San Salvador El Salvador Tel 503 274 1179 274 0279 Guatemala...

Page 13: ... No 1000001592 00 RV00 Made in People s Republic of China Printed in People s Republic of China Importado por Applica de México S de R L de C V Blvd Manuel Avila Camacho 2900 Int 902 Los Pirules Tlalnepantla Edo Mex C P 54040 México Teléfono 55 1106 1400 Del interior marque sin costo 01 800 714 2499 Fabricado en la República Popular de China Impreso en la República Popular de China Fabriqué en Rép...

Reviews: