background image

5

ENGLISH

Assembly

Warning!

 Before assembly, make sure that the tool is 

switched off and unplugged.

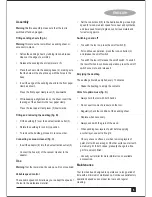
Fitting sanding sheets (fig. A)

Warning!

 Never use the tool without a sanding sheet or 

accessory in place.

•  Soften the sanding sheet by rubbing its non-abrasive 

side over the edge of a worktop.

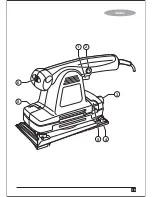
•  Release the sanding sheet clamp levers (5).

•  Place the sheet onto the sanding base (4), making sure 

that the holes in the sheet line up with the holes in the 

base.

•  Insert the edge of the sanding sheet into the front paper 

clamp as shown.

•  Press the front paper clamp lever (5) downwards.

•  While keeping a slight tension on the sheet, insert the 

rear edge of the sheet into the rear paper clamp.

•  Press the rear paper clamp lever (5) downwards.

Fitting and removing the dustbag (fig. B)

•  Fit the dustbag (7) over the dust extraction outlet (3).

•  Rotate the dustbag to lock it into position.

•  To remove the dustbag, proceed in reverse order.

Connecting a vacuum cleaner (fig. C)

•  Insert the adaptor (8) into the dust extraction outlet (3).

•  Connect the hose (9) of the vacuum cleaner to the 

adaptor.

Use

Warning!

 Let the tool work at its own pace. Do not overload.

Variable speed control

The variable speed control allows you to adapt the speed of 

the tool to the workpiece material.

•  Set the control knob (6) to the desired setting. Use a high 

speed for wood, medium speed for veneer and synthetics 

and low speed for acrylic glass, non-ferrous metals and 

for removing paints.

Switching on and off

•  To switch the tool on, press the on/off switch (1).

•  For continuous operation, press the lock-on button (2) 

and release the on/off switch.

•  To switch the tool off, release the on/off switch. To switch 

the tool off when in continuous operation, press the on/off 

switch once more and release it.

Emptying the dustbag

The dustbag should be emptied every 10 minutes.

•  Shake the dustbag to empty the contents.

Hints for optimum use (fig. D)

•  Always hold the tool with both hands.

•  Do not exert too much pressure on the tool.

•  Regularly check the condition of the sanding sheet.

•  Replace when necessary.

•  Always sand with the grain of the wood.

•  When sanding new layers of paint before applying 

another layer, use extra fine grit.

•  On very uneven surfaces, or when removing layers of 

paint, start with a coarse grit. On other surfaces, start with 

a medium grit. In both cases, gradually change to a fine 

grit for a smooth finish.

•  Consult your retailer for more information on available 

accessories.

Maintenance

Your tool has been designed to operate over a long period of 

time with a minimum of maintenance. Continuous satisfactory 

operation depends upon proper tool care and regular 

cleaning.

Summary of Contents for BPRS3102 Pro Line

Page 1: ...BPRS3102 www blackanddecker ae ...

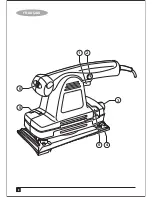
Page 2: ...ENGLISH 2 5 4 2 1 3 5 6 ...

Page 3: ...en operating a power tool outdoors use an extension cord suitable for outdoor use Use of a cord suitable for outdoor use reduces the risk of electric shock 3 Personal safety a Stay alert watch what you are doing and use common sense when operating a power tool Do not use a power tool while you are tired or under the influence of drugs alcohol or medication A moment of inattention while operating po...

Page 4: ... no earth wire is required Always check that the power supply corresponds to the voltage on the rating plate Warning If the power cord is damaged it must be replaced by the manufacturer authorized Black Decker Service Center or an equally qualified person in order to avoid damage or injury If the power cord is replaced by an equally qualified person but not authorized by Black Decker the warranty wi...

Page 5: ...he tool to the workpiece material Set the control knob 6 to the desired setting Use a high speed for wood medium speed for veneer and synthetics and low speed for acrylic glass non ferrous metals and for removing paints Switching on and off To switch the tool on press the on off switch 1 For continuous operation press the lock on button 2 and release the on off switch To switch the tool off releas...

Page 6: ...f your tool By using these accessories you will get the very best from your tool Service Black Decker offers a full network of company owned and authorized service locations All Black Decker Service Centers are staffed with trained personnel to provide customers with efficient and reliable power tool service Whether you need technical advice repair or genuine factory replacement parts contact the B...

Page 7: ... an outstanding guarantee This guarantee statement is in addition to and in no way prejudices your statutory rights The guarantee is valid within the territories of the Member States of the European Union and the European Free Trade Area If a Black Decker product becomes defective due to faulty materials workmanship or lack of conformity within 12 months from the date of purchase Black Decker guar...

Page 8: ...8 FRANÇAIS 5 4 2 1 3 5 6 ...

Page 9: ...e si les câbles sont endommagés ou emmêlés e Si vous utilisez l outil électroportatif à l extérieur utilisez une rallonge homologuée pour utilisation à l air libre L utilisation d une rallonge électrique homologuée pour les travaux à l extérieur réduit le risque de choc électrique 3 Sécurité personnelle a Restez vigilant surveillez ce que vous faites Faites preuve de bon sens quand vous utilisez u...

Page 10: ...diquée sur la plaque signalétique Attention Si le câble d alimentation est endommagé il doit être remplacé par le fabricant par un centre de réparation Black Decker agréé ou par un technicien qualifié de façon à éviter les dommages matériels et corporels En cas de remplacement du câble d alimentation par un technicien qualifié mais non agréé par Black Decker la garantie ne sera pas valable 7 Etiquet...

Page 11: ...e vitesse rapide pour le bois une vitesse moyenne pour le placage bois et les matières synthétiques et une vitesse faible pour le verre acrylique les métaux non ferreux et pour enlever la peinture Démarrage et arrêt Pour mettre l outil en marche appuyez sur l interrupteur de marche arrêt on off 1 Pour un fonctionnement continu appuyez sur le bouton de verrouillage 2 et relâchez l interrupteur marc...

Page 12: ...n utilisant ces accessoires votre outil vous donnera entière satisfaction Informations de service Black Decker offre un large réseau de centres de service appartenant à la société ou agréés Tous les centres Black Decker sont dotés de personnel qualifié pour assurer aux clients une qualité et une fiabilité de service dans la réparation de leurs outils électriques Que vous ayez besoin de conseil techn...

Page 13: ...pU com Please visit our website www blackanddecker co uk to register your new Black Decker product and to be kept up to date on new products and special offers Further information on the Black Decker brand and our range of products is available at www blackanddecker co uk Protection de l environnement Recyclage Cet appareil ne doit pas être jeté avec les déchets ménagers Si votre appareil Black De...

Page 14: ...Ée www 2helpU com ÊhεdE G Éæ bƒe á LGôe Lôj éàæe π é ùàd www blackanddecker co uk äÉéàæŸG çóMCG áaô Ÿh ôµjO ófBG ÓH øe ójó G äÉeƒ ŸG øe ójõŸG Y ƒ üë dh á UÉÿG Vhô dGh IQÉjR Lôj ÉæJÉéàæeh ôµjO ófBG ÓH áeÓY ƒM www blackanddecker co uk áÄ ÑdG ájɪM e èàæŸG Gòg AÉ dEG ΩóY Öéj π üØæe ªŒ á dõæŸG äÉØ îŸG ófBG ÓH RÉ L πjóÑJ Öéj fCÉH ΩÉjC G óMCG d ÚÑJ GPEG ü îàJ eGóîà S áLÉëH ó J hCG H UÉÿG ôµjO ªéà d èàæ...

Page 15: ...Oƒ G RÉ G øe áæµ IOÉØà SG ÈcCG ëà S äÉ ë ŸG òg áeóÿG äÉeƒ e Ióªà ŸG áeóÿG õcGôe øe á eÉc áµÑ T ôµjO ófBG ÓH ôaƒJ ófBG ÓÑd á HÉàdG áeóÿG õcGôe áaÉc º J ácöû d ácƒ ªŸG ádÉ ØdG áfÉ üdÉH AÓª dG ójhõàd ÚHQóe ɪY ôµjO EG áLÉëH âæc kAGƒ S á FÉHô µdG Iõ LCÓd ábƒKƒŸGh bƒÃ π üJG á UCG á jóH AGõLCG hCG ìÓ UEG hCG á æa IQÉ ûà SG d ÜôbC G ôµjO ófBG ÓH á æØdG äÉfÉ ÑdG 15 Arabic FÉHô µdGó G âdƒa240 220 9 H 5 H 3...

Page 16: ... ŸG VƒdG Y 6 ºµëàdG Ñ e V e á SƒàŸG áYöùdGh Ö ûÿG e á dÉ dG áYöùdG áYöùdGh á YÉæ üdG OGƒŸGh á bôdG á Ñ ûÿG äÉ Ñ dG ájójó G ÒZ OÉ ŸGh jôcC G êÉLR e á ØîæŸG AÓ dG ádGRE h π ûàdG É jEGh π ûàdG 1 É jE G π ûàdG ìÉàØe Y VG RÉ G π ûàd QôMh 2 â ÑãàdG QR Y VG π UGƒàŸG π ûà d É jE G π ûàdG ìÉàØe É jE G π ûàdG ìÉàØe QôM RÉ G π ûJ É jE π UGƒàŸG π ûàdG Vh AÉæKCG RÉ G π ûJ É jE QôMh iôNCG Iôe É jE G π ûàdG ìÉàØ...

Page 17: ...eÓ S Y ÉØ G á FÉHô µdG áeÓ ùdG áLÉM Éæg â ù d Gòd õ dG êhOõe RÉ G Gòg øe ëàdG kÉehO Y Öéj øµdh VQCG S EG ó G e á ù FôdG Ó SCÓd FÉHô µdG ó G á HÉ e æ üàdG áMƒd Y OƒLƒŸG FÉHô µdG Öé a ábÉ dG πHÉc J ádÉM ôjò áeóN õcôe hCG á æ üŸG ácöûdG á SGƒH dGóÑà SG ΩÉ d πgDƒe üî T hCG ôµjO ófBG ÓH øe óªà e πHÉc GóÑà SG ádÉM h áHÉ UE G hCG Qö dG Öæéàd dòH ófBG ÓH øe óªà e ÒZ æµd πgDƒe üî T á SGƒH ábÉ dG ɪ dG ùj ƒ...

Page 18: ...àŸG AGõLC G hCG IOÉ G GôWC G äÉeó ü d Vô àdG IQƒ N øe É Ø J hCG Ó SC G á FÉHô µdG ΩGóîà S G óæY áÑ SÉæŸG ójóªàdG äÓHÉc iƒ S Ωóîà ùJ áÑ SÉæŸG ójóªàdG äÓHÉc ΩGóîà SG CG PEG RÉ é d LQÉÿG á FÉHô µdG äÉeó ü d Vô àdG ôWÉfl øe Øîj AGƒLC G FÉHô µdG RÉ G π ûJ ÖæŒ Qò J GPEG h EG PEG îàŸG QÉ àdG øe ájÉbƒ d ìÉàØe Ωóîà SG áÑWôdG äÉeó ü d Vô àdG ô N øe π j ìÉàØŸG dP ΩGóîà SG á FÉHô µdG á üî ûdG áeÓ ùdG 3 RÉ G π...

Page 19: ...19 Arabic 5 4 2 1 3 5 6 ...

Page 20: ......

Page 21: ...WARRANTY REGISTRATION CARD YOUR NAME YOUR ADDRESS POSTCODE DATE OF PURCHASE DEALER S NAME ADDRESS PRODUCT MODEL NO BPRS3102 ù ß r F M u Ê d e d b Í U a A d ß r Ë M u Ê U z l ...

Page 22: ...74 44601338 Al Muftah Service Centre Al Wakrah Road P O Box 875 Doha Qatar Tel 974 44650880 44650110 44446868 Fax 974 44441415 44662599 SAUDI ARABIA Al Bahr Mohamed Ahmed Bin Afif Est P O Box 530 Yanbu Al Bahr Tel 966 4 3222626 3228867 Fax 966 4 3222210 Al Khobar Fawaz Ebrahim Al Zayani Trading Est P O Box 76026 Al Khobar 31952 Tel 966 3 8140914 Fax 966 3 8140824 MSS Al Mojil Supply Services P O Bo...

Page 23: ......

Page 24: ......
Reviews: