background image

25

ENSAMBLAJE

ADVERTENCIA:  Para su propia seguridad, no conecte la lijadora a la fuente de energia hasta que la

maquina haya sido ensamblada por completo y usted haya leido y entendido completamente el manual del
propietario. 

HERRAMIENTAS DE ENSAMBLAJE REQUERIDAS

1/8" Llave Inglesa Hexagonal (suministró) 

El Destornillador de Phillips 

6 Mm Llave Inglesa Hexagonal (suministró) 

la Llave Inglesa Ajustable

ESTIMACIÓN DEL TIEMPO DE ENSAMBLAJE

Menos de 1 hora

AJUSTANDO LA TENSION DE CORREA

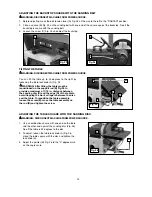
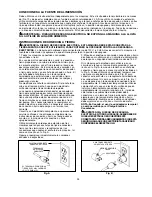
Su lijadora se envía de fábrica con la correa de marcha (A) Fig. 2 ensamblada a ambas poleas (B) y (C). Antes de
ensamblar la unidad de disco a la máquina, revise y ajuste la tensión de correa:

1.

Afloje el tornillo (D) Fig. 1 con la 6 Mm Llave Inglesa y mueva el brazo de lijado (E) a la posición vertical para
dejar expuesto el tornillo de tensionamiento de correa (F) Fig. 3 y la tuerca de cierre (G).

2.

Verifique que la correa (A) Fig. 1 esté debidamente tensionada al aplicar presión ligera sobre la correa en el
tramo central de las poleas.

AVISO: 

La correa (A) debe estar firme sin estar excesivamente apretada. La correa no require un tensionamiento

excesivo para funcionar debidamente. 
3. Para ajustar, afloje la tuerca de cierre (A) Fig. 3 y apriete o afloje el tornillo de ajuste (B) hasta conseguir la

tensión debida.

4. Apriete la tuerca de cierre (G) nuevamente.
5. Mueva el brazo de lijado a la posición horizontal.

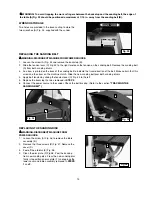
ENSAMBLAJE DEL PROTECTOR DE CORREA Y POLEA

1.

Ensamble el protector de correa y polea (A) Fig. 4 a la base de la máquina haciendo uso de los dos tornillos de
30 mm (1-3/16 pulg.) de largo (B).

ENSAMBLAJE DEL PLATO DEL DISCO DE LIJADO

1.

Enrosque el tornillo de fijación de 1/4 pulg. de largo (A) Fig. 5 hasta que vacíe el hoyo en el plato de sanding. 

2.

Asegurándose que la parte plana en el eje de marcha esté alineada con el tornillo de fijación (A) Fig. 6 en el
cubo del plato (B). Deslice el plato (B) sobre el eje (C) hasta que la superficie del plato y del eje estén casi
parejas. 

NOTA:

El eje no debe extenderse más allá de la superficie del plato. 

3.  Inserte la llave hexagonal (D) Fig. 7 hacia abajo a través de la ranura en el dorso del protector de correa y polea,

y apriete el tornillo de fijación contra la parte plana del eje.

ENSAMBLAJE DEL DISCO DE LIJADO

1.

Asegúrese que el plato del disco de lijado (A) Fig. 8 esté limpio.

2.

Quite el respaldo del disco de lijado, y oprima el disco (B) firmemente en su sitio completamente alrededor del
plato de lijado, como puede apreciarse en la  Fig. 8.

ENSAMBLAJE DE LA TAPA INFERIOR PARA EL DISCO DE LIJADO

Ensamble la tapa inferior (A) Fig. 9 al protector de correa y polea, utilizando los tres tornillos de cabeza móvil de 
12 mm (1/2 pulg.) (B).

ENSAMBLAJE DE LA MESA DE LA LIJADORA DE DISCO

1.

Enrosque el tornillo de cabeza hueca de 20 mm (13/16 pulg.) (A) Fig. 10 a mitad de camino dentro del agujero
roscado en la base de la lijadora, e inserte la vara (B) dentro del agujero como se ilustra aquí. La vara (B) debe
extenderse 5 pulgadas fuera de la base. Para sujetar la vara (B) en su sitio, se debe alinear la parte plana de la
vara (B) con el tornillo (A), apretándolo después.

2.

Deslice el conjunto de la mesa (C) Fig. 11 sobre la vara (B).

3.

Enrosque el tornillo de cabeza hueca de 20 mm (13/16 pulg.) (D) Fig. 11 dentro del agujero en el soporte de
apoyo de la mesa. Se debe alinear la parte plana de la vara (B) con el tornillo (A), apretándolo después.

ADVERTENCIA:  Para evitar atrapar ematerial o los dedos entre la mesa y el disco de lijado, el borde de la

mesa (E) Fig. 11 debe colocarse a un maximo de 1/16 de pulgada del disco de lijado (F). afloje el tornillo (D) y
ajuste la mesa correspondientemente.

Summary of Contents for BDSA100

Page 1: ...a an n n nd d d de e e er r r r Cat No BDSA100 Form No 90528398 OCT 07 Copyright 2007 Black Decker Printed in China CATALOG NO BDSA100 BEFORE RETURNING THIS PRODUCT FOR ANY REASON PLEASE CALL 1 800 544 6986 BEFORE YOU CALL HAVE THE FOLLOWING INFORMATIONAVAILABLE CATALOG No TYPE No AND DATE CODE IN MOST CASES ABLACK DECKER REPRESENTATIVE CAN RESOLVE THE PROBLEM OVER THE PHONE IF YOU HAVEASUGGESTION...

Page 2: ... of lead based paint is NOT RECOMMENDED due to the difficulty of controlling the contaminated dust The greatest danger of lead poisoning is to children and pregnant women Since it is difficult to identify whether or not a paint contains lead without a chemical analysis we recommend the following precautions when sanding any paint PERSONAL SAFETY No children or pregnant women should enter the work ...

Page 3: ...ENDED ACCESSORIES The use of accessories and attachments not recommended by Black Decker may cause damage to the machine or injury to the user 14 USE THE PROPER EXTENSION CORD Make sure your extension cord is in good condition When using an extension cord be sure to use one heavy enough to carry the current your product will draw An undersized cord will cause a drop in line voltage resulting in lo...

Page 4: ... belt and the table 13 SUPPORT THE WORKPIECE firmly with a miter gauge backstop or work table when sanding with a belt Hold the workpiece firmly Loss of control of the workpiece can result in injury 14 AVOID KICKBACK by sanding in accordance with the directional arrows Feed the workpiece against the downward rotation side of the disc or the forward rotation of the belt Loss of control of the workp...

Page 5: ... all local codes and ordinances Do not modify the plug provided if it will not fit the outlet have the proper outlet installed by a qualified electrician Improper connection of the equipment grounding conductor can result in risk of electric shock The conductor with insulation having an outer surface that is green with or without yellow stripes is the equipment grounding conductor If repair or rep...

Page 6: ...ou can mount the tilting table for use on either the belt or disc unit and can operate the belt in the horizontal position the vertical position or any position in between NOTICE The photo on the manual cover illustrates the current production model All other illustrations contained in the manual are representative only and may not depict the actual color labeling or accessories and are intended t...

Page 7: ... assembled and you read and understand the entire instruction manual ASSEMBLY TOOLS REQUIRED 1 8 in Hex Wrench Supplied Phillips Screwdriver 6 mm Hex Wrench Supplied Adjustable Wrench ASSEMBLY TIME ESTIMATE Less than one hour 1 2 3 4 8 7 10 6 5 9 11 12 13 1 Motor and Base 2 Disc Table 3 Belt and Pulley Guard 4 Disc Plate 5 Dust Chute 6 Support Rod 7 Lower Disc Guard 8 Sanding Disc 9 Backstop 10 Mi...

Page 8: ...nd adjust the belt tension 1 Loosen the screw D Fig 1 with the 6mm hex wrench and move the sanding arm E to the vertical position to expose belt tensioning screw F Fig 2 and locknut G D B E C A Fig 1 Fig 2 2 Check the belt tension by applying light pressure on the belt halfway between the two pulleys The belt has the correct tension when you can deflect it approximately 1 4 in NOTE The belt does n...

Page 9: ...d in the slot in the back of belt and pulley guard Note Do not allow the shaft to extend past the surface of the plate Fig 6 Fig 7 A B C A 1 Clean the sanding disc plate A Fig 8 2 Peel the backing from sanding disc and press the disc B firmly into position all the way around the sanding plate Fig 8 Install the lower cover A Fig 9 on the belt and pulley guard using the three M4 x 7 x 12mm sheet met...

Page 10: ...ioned a maximum of 1 16 in away from the sanding belt E A B A C B D E Fig 12 Fig 13 10 1 Thread an M8 x 1 25 x 20mm hex socket head screw A Fig 10 partially into the hole in the base of the sander Insert the rod B into the hole Align the flat of the rod B with the screw A Tighten the screw A 2 Slide the table assembly C Fig 11 on the rod B 3 Thread an M8 x 1 25 x 20mm hex socket head screw A Fig 1...

Page 11: ...e diagram in Fig 16 shows the size and center to center distance of the holes that you will need to drill in the mounting board NOTE For proper stability countersink the holes underneath the mounting board so that the screw heads are flush with bottom surface 4 Securely clamp the mounting board to a stand or workbench using 2 or more C clamps as shown in Fig 17 WARNING Secure the machine base to t...

Page 12: ...running the machine can be turned OFF but cannot be restarted without re inserting the switch toggle LOCKING THE SWITCH IN THE OFF POSITION Fig 19 TRACKING THE SANDING BELT Fig 20 CHANGING THE POSITION OF THE SANDING ARM You can use the sanding arm A in the horizontal position Fig 21 the vertical position Fig 22 or any angle in between Loosen the screw B position the arm A to the desired angle and...

Page 13: ... 26 move the table square with the disc and tighten the lock knob A 3 Adjust the pointer B Fig 26 to the 0 degree mark on the angle scale A Fig 23 Fig 24 B C TILTING THE TABLE WARNING DISCONNECT MACHINE FROM POWER SOURCE You can tilt the table up to 45 degrees to the right by loosening the table lock knob A Fig 25 WARNING After tilting the table must be repositioned on the support rod B Fig 25 to ...

Page 14: ... Fig 32 B A 2 To adjust loosen the three screws B Fig 29 that fasten the table to the table mounting bracket and trunnion Adjust the table accordingly then tighten the three screws B MITER GAUGE Use the miter gauge A Fig 30 on the disc table You can rotate the miter gauge body right or left for angle or miter sanding by loosening the lock knob B rotating the miter gauge body and tightening the loc...

Page 15: ...ndicate the travel direction of the belt Make certain that this arrow and the arrow on the machine match Slide the new sanding belt over both sanding drums 4 Apply belt tension by sliding the tension lever C Fig 35 to the left 5 Replace the backstop that was removed in STEP 2 6 Connect the power source to the sander Check the belt tracking Refer to the section TRACKING THE SANDING BELT Fig 34 A Fi...

Page 16: ...k or fingers between the backstop and the sanding belt the edge of the table should be positioned a maximum of 1 16 in away from the sanding belt SANDING INSIDE AND OUTSIDE CURVES Sanding inside curves with the sanding belt is illustrated in Fig 41 Sanding outside curves with the sanding disc is illustrated in Fig 42 WARNING Always sand on the left downward side of the sanding disc Fig 41 Sanding ...

Page 17: ...g belt WARNING Always sand on the left downward side of the sanding disc Fig 44 Sanding on the right upward side of the sanding disc could cause the workpiece to fly up suddenly which could be hazardous WARNING To avoid trapping the work or fingers between the backstop and the abrasive the edge of the table should be positioned a maximum of 1 16 in away from the abrasive Fig 43 Fig 44 TROUBLESHOOT...

Page 18: ...warrants this product for two years against any defects in material or workmanship The defective product will be replaced or repaired at no charge in either of two ways The first which will result in exchanges only is to return the product to the retailer from whom it was purchased provided that the store is a participating retailer Returns should be made within the time period of the retailer s p...

Page 19: ... ANTES DE DEVOLVER ESTE PRODUCTO POR CUALQUIER MOTIVO LLAME AL 55 5326 7100 ANTES DE LLAMAR TENGAELNÚMERO DE CATÁLOGO Y ELCÓDIGO DE FECHAPREPARADOS EN LAMAYORÍADE LOS CASOS UN REPRESENTANTE DE BLACK DECKER PUEDE RESOLVER ELPROBLEMAPOR TELÉFONO SI DESEAREALIZAR UNASUGERENCIAO COMENTARIO LLÁMENOS SU OPINIÓN ES FUNDAMENTALPARABLACK DECKER G GRACIAS RACIAS POR POR ELEGIR ELEGIR B BLACK LACK D DECKER E...

Page 20: ...base plomo debido a la dificultad para controlar el polvo contaminado El peligro mayor de envenenamiento por plomo es para los niños y las mujeres embarazadas Como es difícil identificar si una pintura contiene o no plomo sin realizar análisis químicos recomendamos tomar las siguientes precauciones al lijar cualquier pintura SEGURIDAD PERSONAL Ningún niño o mujer embarazada debe ingresar al área d...

Page 21: ...años a la máquina o lesiones al usuario 14 UTILICE EL CORDÓN DE EXTENSIÓN ADECUADO Asegúrese de que el cordón de extensión esté en buenas condiciones Cuando utilice un cordón de extensión asegúrese de utilizar un cordón que sea lo suficientemente pesado como para llevar la corriente que su producto tome Un cordón de tamaño insuficiente causará una caída de la tensión de la línea lo cual producirá ...

Page 22: ...ieza de trabajo Una pérdida de control de la pieza de trabajo es peligrosa 14 EVITE EL RETROCESO lijando de acuerdo con las flechas direccionales Haga avanzar la pieza de trabajo contra el lado de rotación hacia abajo del disco o contra el sentido de rotación hacia delante de la correa Una pérdida de control de la pieza de trabajo es peligrosa 14 EVITE EL RETROCESO lijando de acuerdo con las flech...

Page 23: ...de conexión a tierra que se parece al enchufe ilustrado en la Fig A Puede utilizarse un adaptador temporal que se parece al adaptador ilustrado en la Fig B para conectar este enchufe a un receptáculo coincidente de dos conductores tal como se muestra en la Fig B si no se dispone de un tomacorriente conectado a tierra apropiadamente El adaptador temporal debe utilizarse solamente hasta que un elect...

Page 24: ...ora del disco y viene equipado de 5 2 AMP motor de inducción la monofásico del hp 120Volt inclinando el vector ingletes galga tope 4 x 36 60 cierra fuertemente la correa que enarena y 6 60 cierran fuertemente el disco que enarena El vector de aluminio de inclinación se puede montar para el uso en la correa o la unidad de disco La correa funciona horizontal vertical y a cualquier ángulo mientras ta...

Page 25: ...íe el hoyo en el plato de sanding 2 Asegurándose que la parte plana en el eje de marcha esté alineada con el tornillo de fijación A Fig 6 en el cubo del plato B Deslice el plato B sobre el eje C hasta que la superficie del plato y del eje estén casi parejas NOTA El eje no debe extenderse más allá de la superficie del plato 3 Inserte la llave hexagonal D Fig 7 hacia abajo a través de la ranura en e...

Page 26: ... el resbaladero o la caminata en la superficie secundaria asegura la base de máquina a la superficie secundaria OPERACIÓN CONTROLES Y AJUSTES OPERACIONALES ARRANCANDO Y DETENIENDO LA LIJADORA 1 El interruptor A Fig 18 está localizado en la base de la lijadora Para ENCENDER la lijadora mueva el interruptor a la posición superior 2 Para APAGAR la lijadora mueva el interruptor a la posición inferior ...

Page 27: ...A RANURA DE LA ESCUADRA DE INGLETES DE MANERA PARA LELA AL DISCO DE LIJADO ADVERTENCIA DESCONECTE LA MÁQUINA DE LA FUENTE DE POTENCIA 1 Coloque y el cuadrado ajustable de la combinación sobre la mesa con la parte A Fig 27 en la ranura B del calibrador de mitra para verificar la distancia de la ranura al disco del sanding Verifique el otro lado del disco en la misma manera Fig 28 Las distancias deb...

Page 28: ...stra en Fig 41 Sanding fuera de curvas con el disco de lijado se ilustra en Fig 42 ADVERTENCIA Lije siempre sobre el lado isquierdo abajo del disco de lijado Fig 41 Puede hacer que el material se escape hacia arriba lo que puede resultar peligroso ADVERTENCIA Para evitar atrapar el material o los dedos entre la mesa y la correa de lijado el borde de la mesa debe colocarse a un maximo de 1 16 de pu...

Page 29: ...ante Las devoluciones deben realizarse conforme a la política de devolución del comercio generalmente entre 30 y 90 días posteriores a la venta Le pueden solicitar comprobante de compra Consulte en el comercio acerca de la política especial sobre devoluciones una vez excedido el plazo establecido La segunda opción es llevar o enviar el producto con flete pago a un Centro de mantenimiento propio o ...

Page 30: ...E D EMPLOI AVANT DE RETOURNER CE PRODUIT POUR QUELQUE RAISON QUE CE SOIT COMPOSER LE 1 800 544 6986 AVANT D APPELER AYEZ EN MAIN LE N DE CATALOGUE ET LE CODE DE DATE DANS LAPLUPART DES CAS UN REPRÉSENTANT DE BLACK DECKER PEUT RÉSOUDRE LE PROBLÈME PAR TÉLÉPHONE SI VOUSAVEZ UNE SUGGESTION OU UN COMMENTAIRE APPELEZ NOUS VOS IMPRESSIONS SONT CRUCIALES POUR BLACK DECKER M MERCI ERCI D D A AVOIR VOIR CH...

Page 31: ...u visage et du corps AVERTISSEMENT porter une protection auditive appropriée pour utiliser l appareil Dans certaines conditions et selon la durée d utilisation le bruit provoqué par ce produit peut contribuer à une perte auditive PONÇAGE DE LA PEINTURE AU PLOMB Le ponçage d une peinture au plomb N EST PAS RECOMMANDÉ en raison de la difficulté entourant le contrôle de la poussière contaminée Le dan...

Page 32: ...ovoquer des blessures 7 GARDER PROPRE LA ZONE DE TRAVAIL Les zones et établis encombrés sont souvent des causes d accidents 8 ÉLOIGNER LES ENFANTS ET LES VISITEURS L atelier représente un environnement potentiellement dangereux Les enfants et visiteurs peuvent être blessés 9 RÉDUIRE LE RISQUE DE DÉMARRAGE ACCIDENTEL S assurer que l interrupteur se trouve sur la position d arrêt avant de brancher l...

Page 33: ...nt inopinément la main pourrait percuter la surface abrasive Des blessures graves pourraient survenir 18 ÉTEINDRE LA MACHINE LA DÉBRANCHER et nettoyer la table l espace de travail avant de laisser la machine Verrouiller l interrupteur en position d arrêt afin d éviter toute utilisation non autorisée Il se peut que quelqu un démarre accidentellement la machine et se blesse 19 DES INFORMATIONS SUPPL...

Page 34: ...locale Ne pas modifier la fiche fournie si elle ne s insère pas dans la prise de courant faire installer une prise appropriée par un électricien professionnel Si le conducteur de mise à la terre d équipement n est pas correctement connecté ceci peut provoquer un choc électrique Le conducteur de mise à la terre d équipement est le conducteur avec isolation qui a une surface extérieure verte à rayur...

Page 35: ...ment élevé pour assurer le transport du courant de la machine Un cordon de calibre inférieur causera une chute de tension de ligne et donc une perte de puissance et une surchauffe La fig C montre le calibre correct à utiliser selon la longueur de la rallonge En cas de doute utiliser le calibre suivant le plus gros Plus le numéro de calibre est petit plus le cordon est lourd DESCRIPTION FONCTIONNEL...

Page 36: ...QUE SUPPORT D ABRASIF 1 Tourner la vis de calage à tête cylindrique à 6 pans creux de 1 4 20 x 1 4 po A fig 5 en sens antihoraire jusqu à ce qu elle sorte du trou B fig 5 de la plaque de ponçage 2 Aligner le côté plat de l arbre d entraînement avec la vis de calage A fig 6 dans le moyeu de la plaque B et installer la plaque support d abrasif B sur l arbre d entraînement Glisser la plaque B sur l a...

Page 37: ...li doit être fixé au plancher FONCTIONNEMENT COMMANDES ET RÉGLAGES OPÉRATIONNELS DÉMARRAGE ET ARRÊT DE LA PONCEUSE 1 L interrupteur marche arrêt on off A fig 18 est situé à l avant de la ponceuse Pour mettre la ponceuse sous tension déplacer l interrupteur vers le haut en position de marche 2 Pour l éteindre déplacer l interrupteur A vers le bas en position d arrêt AVERTISSEMENT S assurer que l in...

Page 38: ...ISQUE ABRASIF AVERTISSEMENT DÉBRANCHER LA MACHINE DE LA SOURCE D ALIMENTATION 1 Placer une équerre combinée ajustable sur la table avec une partie A fig 27 dans la fente de la jauge à onglet B pour vérifier la distance entre la fente et le disque abrasif Vérifier l autre côté du disque de la même manière fig 28 Les distances devraient être identiques 2 Pour effectuer le réglage desserrer les trois...

Page 39: ...VERTISSEMENT Pour éviter de coincer la pièce ou les doigts entre la butée antiretour et la bande abrasive positionner le bord de la table à un maximum de 1 6 mm 1 16 po de la bande abrasive PONÇAGE DE COURBES INTERNES ET EXTERNES Le ponçage de courbes internes à l aide de la bande abrasive est illustré à la figure 41 Le ponçage de courbes externes à l aide du disque abrasive est illustré à la figu...

Page 40: ... matière d outillage électrique ils sont donc en mesure d offrir à leur clientèle un service efficace et fiable Pour obtenir un conseil technique ou une pièce d origine ou pour faire réparer un outil on peut communiquer avec le centre Black Decker le plus près Pour obtenir le numéro de téléphone consulter les pages jaunes sous la rubrique Outils électriques ou composer le 1 800 544 6986 www blacka...

Reviews: