background image

ENGLISH

ENGLISH

4

5

6

2

FAUCET INSTALLATION

3

Thank you for purchasing this Price Pfister product.  All Price 
Pfister products are carefully engineered, and factory tested 
to provide long trouble-free use under normal conditions.  This 
product is easy to install using basic tools and our easy to follow 
illustrated instructions.  If you have any questions regarding this 
product, call 1-800-Pfaucet (1-800-732-8238).

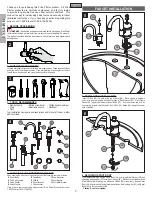
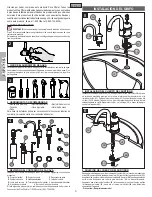
1  BEFORE PROCEEDING


WARNING:

 Read all the instructions completely before proceeding.  Price Pfister 

recommends calling a professional if you are uncertain about installing this product!
This product should be installed in accordance with all local and state plumbing and 
building codes.

2  SHUT OFF WATER SUPPLY

Locate water supply inlets and shut off the water supply valves.  These are usually found 
under the sink or near the water meter.  If you are replacing an existing faucet, remove 
the old faucet from the sink and clean the sink surface thoroughly.

3   TOOLS RECOMMENDED

• Plumber's putty 

• Slotted screwdriver 

• Phillips head screwdriver 

• Pliers 

• Adjustable wrench 

• Flashlight 


• Cloth

Your installation may require new supply lines and / or shut-off valves or other 
additional tools.

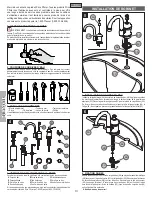
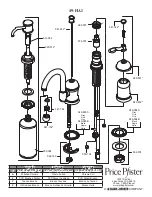
4  CHECKING THE CONTENTS OF THE BOX

Upon opening the box, check to ensure that all of the following items are included.

A

 Spout Body 

B

 Valve Body 

C

 Soap Dispenser

D

 Pop-Up Assembly 

E

 Lift Rod 

F

 Spout Gasket

G

 Valve Gasket 

H

 Spout Locknut 

J

 Spout Metal Washer

K

 Valve Washer 

L

 Valve Locknut

If any of these items are missing, please contact Price Pfister Consumer Service at 
1-800-Pfaucet (1-800-732-8238).

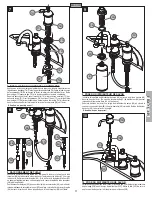
5  SPOUT BODY INSTALLATION

Insert Lift Rod (

5A

) into hole at the top of Spout (

5B

).  Place a bead of plumber’s 

putty in the groove along the bottom outer edge of Plastic Gasket (

5C

).  Place Plastic 

Gasket (

5C

) against the bottom of Spout Body (

5D

).  From above sink and with the 

spout facing forward, carefully install the Lift Rod (

5A

), Shank (

5E

) through the center 

hole of sink (

5F

).

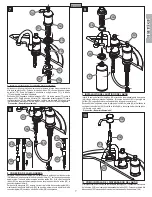
6  SECURING SPOUT BODY

From underneath sink, secure Spout Body (

6A

) by placing Metal Washer (

6B

) and 

threading Mounting Nut (

6C

) onto Spout Shank (

6D

).  Make sure that the bumps on 

Metal Washer (

6B

) are facing up.  Make sure Lift Rod (

6E

) moves freely.  Be sure Spout 

Body (

6A

) is centered and facing forward and tighten the Mounting Nut (

6C

) until Spout 

Body (

6A

) is firmly secured to sink.

Caution: Do not over tighten!

2

F

A

G

J

H

K

L

B

C

D

E

5A

5B

5C

5A

5E

5F

5D

6A

6B

6C

6D

6E

Summary of Contents for Amherst Price Pfister 49 Series

Page 1: ...antía el comprador original puede 1 llamar al 1 800 Pfaucet 1 800 732 8238 para hablar con un representante de servicio al cliente que lo pueda ayudar o 2 escribir al departamento de servicio al consumidor c o Price Pfister Inc 19701 DaVinci Lake Forest CA 92610 U S A e incluir una descripción del problema el número del modelo su nombre dirección número de teléfono y fecha aproximada de compra o 3 ...

Page 2: ...on may require new supply lines and or shut off valves or other additional tools 4 CHECKING THE CONTENTS OF THE BOX Upon opening the box check to ensure that all of the following items are included A Spout Body B Valve Body C Soap Dispenser D Pop Up Assembly E Lift Rod F Spout Gasket G Valve Gasket H Spout Locknut J Spout Metal Washer K Valve Washer L Valve Locknut If any of these items are missin...

Page 3: ...ect Housing 8A If the housing and the Inner Collet 8D separate slightly but do not pull off the Receiving Tube 8B the connection is secure To remove Hose 8D push up on Quick Connect Housing 8A holding Inner Collet 8D in place pull downward on Quick Connect Housing 8A until Receiving Tube 8B is free 9 SOAP DISPENSER INSTALLATION Insert Soap Dispenser Shank 9A through Foam Gasket 9B and into the sin...

Page 4: ...4A up the valve will be activated allowing water to flow The water flow will increase by continuing to lift up Lever Handle 14A By rotating Lever Handle 14A counterclockwise the water temperature will decreased to fully cold By rotating Lever Handle 14A clockwise the water temperature will increased to fully hot 15 SOAP DISPENSER OPERATION To activate Soap Dispenser 15A press Dispenser Head 15B to s...

Page 5: ...ercial use Installation of Said Trim is at Users Risk 1 800 PFAUCET 1 800 732 8238 For Toll Free Pfaucet information call 1 800 PFAUCET 1 800 732 8238 or visit www pricepfister com Installation Support Care and Warranty Information 17 HANDLE REMOVAL Carefully pry off Handle Cap 17A Remove Lever Retaining Screw 17B Handle Lever 17C and Handle Skirt 17D from Control Body 17E Reassemble handle by reve...

Page 6: ...a verifique que todos los artículos siguientes se encuentran presentes A Cuerpo del surtidor B Cuerpo de válvula C Dispensador de jabón D Conjunto de salto E Varillaparaelevación F Junta del surtidor G Junta de la válvula H Tuerca de fijación del surtidor J Arandela de metal del surtidor K Arandela de la válvula L Tuerca de fijación de la válvula Si falta alguno de estos artículos comuníquese con el ...

Page 7: ...a interior 8D se separan ligeramente pero no se desprende del tubo de recibo 8B la conexión rápida está firme Para quitar la manguera 8D empuje hacia arriba la caja de conexión rápida 8A y manteniendo la boquilla de interior 8D en posición empuje hacia abajo la caja de conexión rápida 8A hasta que el tubo de recibo 8B se desprenda 9 INSTALACIÓN DEL SURTIDOR DE JABÓN Inserte la espiga del surtidor d...

Page 8: ...tar la manija de palanca 14A la válvula se activará y permitirá el flujo de agua El flujo de agua aumentará al continuar levantando la manija de palanca 14A Al girar la manija de palanca 14A en sentido contra horario la temperatura del agua disminuirá hasta completamente fría Al girar la manija de palanca 14A en sentido horario la temperatura del agua aumentará hasta completamente caliente 15 FUNCIO...

Page 9: ...el usuario 1 800 PFAUCET 1 800 732 8238 Para obtener información mediante llamadas gratis llame al 1 800 PFAUCET 1 800 732 8238 o visite www pricepfister com Apoyo a instaladores Información sobre cuidado y garantías 17 RETIRO DE LA MANIJA Palanquee cuidadosamente y retire la tapa de la manija 17A con un destornillador o cuchilla pequeña Retire el tornillo de retención de la palanca 17B la palanca ...

Page 10: ...utres outils 4 VÉRIFICATION DU CONTENU DE LA BOÎTE Lors de l ouverture de la boîte vérifier qu elle contient toutes les pièces suivantes A Corps du bec B Corps de la valve C Distributeur de savon D Corpsdebonde E Tige de levage F Garniture de bec G Garniture de valve H Contre écrou de bec J Rondelle en métal de bec K Rondelle de valve L Contre écrou de valve Si l une quelconque de ces pièces manque...

Page 11: ...pteur intérieur 8D se séparent légèrement sans se désaccoupler le raccord rapide du tube récepteur 8B est bien assujetti Pour débrancher de tuyau 8D pousser le boîtier de raccord rapide 8A vers le haut et tout en maintenant le récepteur intérieur 8D en place tirer le boîtier de raccord rapide 8A de raccord rapide vers le bas jusqu à ce que le tube récepteur 8B soit libéré 9 POSE DU DISTRIBUTEUR DE...

Page 12: ...le levage de la manette 14A active le robinet pour permettre à l eau de couler Le débit augmente au fur et à mesure que l on relève la manette 14A Lorsqu on tourne la manette 14A dans le sens antihoraire la température de l eau baisse jusqu à ce que celle ci soit tout à fait froide Lorsqu on tourne la manette 14A dans le sens horaire la température de l eau augmente jusqu à ce que celle ci soit tr...

Page 13: ...erciaux La pose de telles garnitures se fait aux risques de l utilisateur 1 800 PFAUCET 1 800 732 8238 Pour les renseignement concernant le service san frais de Pfaucet appelez 1 800 PFAUCET 1 800 732 8238 appel ou visite www pricepfister com Aide pour le montage Rensignements sur l entretien et la garantie 17 DÉPOSE DE LA MANETTE Faire levier avec précaution sur le capuchon décoratif 17A à l aide ...

Page 14: ...hrome Cromo Pulido Chrome Poli J PVD Brushed Nickel PVD Niquel Cepillado PVD Nickel Brosse Y Tuscan Bronze Bronce Toscano Bronze Le Toscan Z Oil Rubbed Bronze Bronce Frotado Con Aceite Bronze Huilé 940 831 940 832 950 124 941 786 941 152 931 002 950 004 920 512 962 149 941 242 941 142 949 064C Gray Gris Gris 949 064B Black Negra Noire 949 065C Gray Gris Gris 949 065B Black Negra Noire 974 074 962 ...

Reviews: