background image

Model # 900143: Page 4 


SPECIFICATIONS 


Power Supply 

5 AMP  

Refrigerant Type 

R-134A 

Cold Water Power 

125 Watts 

Cold Capacity / Hour 

1.0 Gallons 

Cold Temp Range 

3

9

°

F – 5

9

°

Hot Water Power 

425 Watts 

Hot Capacity / Hour 

1.0 Gallons 

Hot Temp Range 

1

49

°

F – 199

°

F  

Dimensions 

36.3 inches H x 16.1inches W x 
14.1 inches D 

Net Weight 

27.1 lbs. 


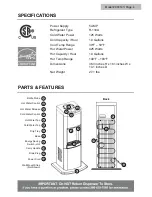
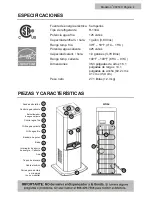
PARTS & FEATURES 


Bottle Probe 

Hot Water Control 

Hot Water Release 

Cold Water Control 

Hot Water Tap 

Cold Water Tap 

Drip Tray 

Back 

Base 

1

2

4

6

7

5

8

3

10 

11 

12 

Carry Handle 

Drain Plug 

Power Cord 

Wall Mount Strap    

(Not Shown) 

11

10

12

Energy Saving 

Switch - Hot 

9

Summary of Contents for 900143

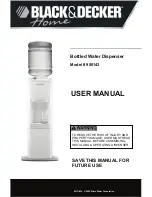
Page 1: ...er Dispenser Model 900143 PN O 034 2008 Primo Water Corporation TO REDUCE THE RISK OF INJURY AND PROPERTY DAMAGE USER MUST READ THIS MANUAL BEFORE ASSEMBLING INSTALLING OPERATING DISPENSER SAVE THIS MANUAL FOR FUTURE USE USER MANUAL ...

Page 2: ...sunlight Do NOT use outdoors Install and use only on a hard flat and level surface Do NOT place dispenser into an enclosed space or cabinet Do NOT operate dispenser in the presence of explosive fumes Position back of dispenser no closer than 4 inches from wall and permit free airflow between wall and dispenser There must be at least 4 inches clearance on the sides of the dispenser to permit airflo...

Page 3: ...g 11 Limited Warranty 12 KEY INFORMATION FOR FUTURE USE Please register your dispenser immediately at www primowater com For future support please record your serial number located on label on back of dispenser and date purchased Staple your receipt to manual You will need this information to obtain warranty service Product Bottled Water Dispenser Model Number 900143 Serial ID Number Date of Purch...

Page 4: ...city Hour 1 0 Gallons Hot Temp Range 149 F 199 F Dimensions 36 3 inches H x 16 1inches W x 14 1 inches D Net Weight 27 1 lbs PARTS FEATURES Bottle Probe Hot Water Control Hot Water Release Cold Water Control Hot Water Tap Cold Water Tap Drip Tray Back Base 1 2 4 6 1 7 5 8 3 2 3 4 5 6 7 8 10 11 12 Carry Handle Drain Plug Power Cord Wall Mount Strap Not Shown 11 10 12 Energy Saving Switch Hot 9 9 ...

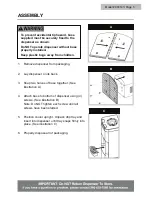
Page 5: ...n 1 Remove dispenser from packaging 2 Lay dispenser on its back 3 Snap two halves of base together See illustration A 4 Attach base to bottom of dispenser using 4 screws See illustration B Note Do NOT tighten each screw until all screws have been started 5 Position cooler upright Unpack drip tray and insert into dispenser until tray snaps firmly into place See illustration C 6 Properly dispose all...

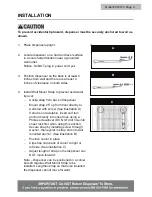
Page 6: ...ser Mount strap 25 up from floor directly to wall stud with screw See illustration A If stud is not available insert and turn anchor directly into sheet rock using a Philips screwdriver DO NOT drill hole into sheet rock first when using this anchor Secure strap by installing screw through washer then eyelet in strap and into wall mounted anchor See illustration B Position cooler in place Clip stra...

Page 7: ...operly grounded wall outlet 7 Turn energy saving switch on back to ON Initial Rinsing of Water Lines This unit has been tested and sanitized prior to packing and shipping During transit dust and odors can accumulate in the tank and lines Dispense and dispose at least one quart of water prior to drinking any water Dispensing Cold Water Note After setup it will take 1 hour to get water to maximum co...

Page 8: ...tap The circular shapes in the drip plate help align the flow of water This unit dispenses water at a fast rate To avoid splashes hold cup as close to the tap as possible 2 Push red hot water release inward and depress hot water control downward to start flow 3 Release hot water control once desired fill level is achieved Replacing an Empty Bottle Replace bottle as soon as you notice it is empty U...

Page 9: ...st to do prior to loading a fresh bottle 1 Flip switch on back of unit to OFF 2 Unplug power cord from wall outlet 3 Remove water bottle 4 Unclip Wall Mount Strap from back of dispenser and turn dispenser around so backside is facing away from the wall 5 Place a 2 gallon or larger bucket under the drain plug in the rear of the dispenser Remove drain cap and silicon plug Cold water will immediately...

Page 10: ...uct designed to remove calcium lime or rust These can be found in grocery and hardware stores Follow manufacturer s label instructions 14 Rinse system by dispensing 1 2 gallons of tap water through both taps into a pitcher Make sure all water has been dispensed 15 Replace baffle and probe assembly 16 Turn unit around and re clip Wall Mount Strap to back of dispenser 17 Clean a fresh water bottle w...

Page 11: ...er setup to dispense cold water Make sure the back of the dispenser is at least 4 inches from a wall and there is free airflow on all 4 sides of the dispenser Make sure tank is not overfilled due to a bottle leak Dispense water until bubbles appear in bottle Hot water is not hot It takes 15 20 minutes after setup to dispense hot water Make sure the power cord is properly connected to a working out...

Page 12: ...use alteration misapplication improper installation or improper maintenance or service by you or any third party or failure to perform normal and routine maintenance on the dispenser as set out in the User s Manual In addition the Limited Warranty does not cover damages to the finish such as scratches dents discoloration or rust after purchase The Limited Warranty is in lieu of all other express w...

Page 13: ...tellón Modelo no 900143 PARA REDUCIR EL RIESGO DE LESIONES Y DAÑOS MATERIALES EL USUARIO DEBE LEER ESTE MANUAL ANTER DE ENSAMBLAR INSTALAR Y USAR EL DISPENSADOR GUARDAR ESTE MANUAL PARA USO FUTURO MANUAL DEL USUARIO PN O 034 2009 Primo Water Corporation ...

Page 14: ... NO instalar el dispensador en espacios o gabinetes cerrados NO use este dispensador en presencia de gases explosivos Posicionar la parte posterior del dispensador a una distancia de por lo menos 4 pulgadas 10 cm de la pared para permitir el flujo de aire entre la pared y el dispensador Debe haber por lo menos 4 pulgadas 10 cm de espacio libre a los lados del dispensador para permitir el flujo de ...

Page 15: ...ada 12 INFORMACIÓN IMPORTANTE PARA USO FUTURO Por favor registre su dispensador inmediatamente en www primowater com Para servicio futuro por favor registre su número de serie ubicado en la etiqueta situada en la parte posterior del dispensador y la fecha de compra Engrape su recibo al manual Necesitará esta información para obtener servicio de garantía Producto Dispensador de agua en botellón Núm...

Page 16: ...149 F 199 F 65 C 93 C Dimensiones 36 3 pulgadas de alto x 16 1 pulgadas de largo x 14 1 pulgadas de ancho 92 2 cm x 41 cm x 35 9 cm Peso neto 27 1 libras 12 3 kg PIEZAS Y CARACTERÍSTICAS Sonda de botellón Control agua caliente Botón liberador de agua caliente Control agua fría Grifo agua caliente Grifo agua fría Bandeja de goteo Atrás Base 1 2 4 6 1 7 5 8 3 2 3 4 5 6 7 8 10 11 12 Asa Tapón de dren...

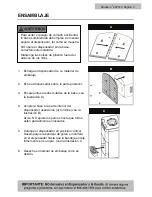
Page 17: ...ial de embalaje 2 Eche el dispensador sobre la parte posterior 3 Encaje juntas las dos mitades de la base vea la ilustración A 4 Acople la base a la parte inferior del dispensador usando los 4 tornillos vea la ilustración B Aviso NO ajuste los pernos hasta que todos estén parcialmente enroscados 5 Coloque el dispensador en posición vertical Desempaque la bandeja de goteo e insértela en el dispensa...

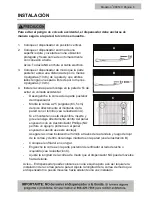
Page 18: ... Monte la correa a 25 pulgadas 63 5 cm del piso directamente al montante de la pared con el tornillo vea la ilustración A Si el montante no está disponible inserte y gire el anclaje directamente dentro del panel enyesado con un destornillador Phillips NO perfore un agujero primero en el panel enyesado cuando use este anclaje Asegure la correa instalando el tornillo a través de la arandela y luego ...

Page 19: ...s luego dispense un poco de agua del grifo de agua CALIENTE hasta que aparezcan burbujas de agua en el botellón 6 Enchufe el cable a un tomacorriente con conexión a tierra 7 Coloque en la posición ON encendido el interruptor de ahorro de energía situado en la parte posterior de la unidad Enjuague inicial de las líneas de agua Esta unidad ha sido probada y desinfectada antes de su empaque y envío S...

Page 20: ...e 15 a 20 minutos 1 Coloque una botella vaso jarra u olla de manera segura debajo del grifo de agua caliente La punta de flecha roja debajo del control de agua caliente indica la ubicación del grifo de agua caliente Las formas circulares en la bandeja de goteo ayudan a alinear el flujo de agua Esta unidad dispensa agua de forma rápida Para evitar salpicaduras acerque el vaso lo más posible al grif...

Page 21: ...epósito de agua fría y las líneas de agua Realizar Cada 3 meses o si nota un sabor extraño Tiempo requerido 15 minutos Aviso Es mejor hacer la desinfección antes de cargar un botellón nuevo 1 Coloque en la posición OFF apagado el interruptor situado en la parte posterior de la unidad 2 Desenchufe el cable eléctrico del tomacorriente de la pared 3 Saque el botellón 4 Desenganche la correa de montaj...

Page 22: ... depósitos minerales depósitos blancos use un producto de uso doméstico formulado para retirar calcio cal u óxido Estos productos se encuentran en supermercados y ferreterías Siga las instrucciones descritas en la etiqueta del fabricante 14 Enjuague el sistema dispensando 1 a 2 galones 3 7 a 7 5 litros de agua limpia a través de ambos grifos a una jarra Asegúrese de dispensar toda el agua 15 Vuelv...

Page 23: ...é a una distancia de por lo menos 4 pulgadas 10 cm de la pared y que haya espacio libre a los cuatro lados del dispensador Asegúrese de que el tanque no se llene excesivamente debido a una fuga en el botellón Dispense agua hasta que aparezcan burbujas en el botellón El agua caliente no está caliente El agua caliente se dispensará de 15 a 20 minutos después del encendido Asegúrese de que el cable e...

Page 24: ...o normal y rutinario del enfriador de agua como se prescribe en este manual del usuario Además la garantía limitada no cubre daños al terminado de la unidad tales como rasguños abolladuras descoloridos oxidaciones y otros daños causados por la intemperie después de la compra de la unidad Esta garantía limitada reemplaza cualquier otra garantía El fabricante no asume ninguna responsabilidad por gar...

Reviews: