background image

Gourmet Oven 


Maintenance 


31 

d.  While holding the pieces with your hand, upright the assembly and install onto studs in 

oven. Be careful not to disengage the baffle hooks from the rack support. 


e.  Repeat these steps for the right side support. 


9.  Reinsert the racks and drip pan. 

Summary of Contents for GO-36

Page 1: ...Gourmet Oven MODEL GO 36 GO 36T Operation Manual Serial Numbers 122192 and higher ...

Page 2: ...ville South Carolina or F O B authorized BKI Distributor The Company and or its authorized representatives will assume the normal replacement labor expense for the defective part for the period of the warranty as stated above excluding travel and or other expenses incidental to the replacement of the defective part where replacement work is performed during standard business hours and not subject ...

Page 3: ... 8 Setting the Cook Temperature 8 Setting the Cook Time 8 Setting the Hold Temperature 8 Cooking 8 Reviewing Set Points 9 Changing Set Points During Cooking 9 Canceling the Cooking Cycle 9 Power Failure During The Cooking Cycle 9 Probe Thermocouple Diagnostics 9 Important Instruction 9 Suggested Cooking Instructions 10 Power Level 10 Food Safety Requirements Internal Temperatures 10 Fowl 11 Pork 1...

Page 4: ...vice Department toll free 1 800 927 6887 Outside the U S call 1 864 963 3471 Safety Precautions Always follow recommended safety precautions listed in this manual Below is the safety alert symbol When you see this symbol on your equipment be alert to the potential for personal injury or property damage Safety Signs and Messages The following Safety signs and messages are placed in this manual to p...

Page 5: ...ble injury from hot cleaning solution Beware of High Voltage This equipment uses high voltage Serious injury can occur if you or any untrained or unauthorized person installs services or repairs this equipment Always use an Authorized Service agent to service your equipment Keep this manual with the Equipment This manual is an important part of your equipment Always keep it near for easy access If...

Page 6: ...ncies Be prepared for fires injuries or other emergencies Keep a first aid kit and a fire extinguisher near the equipment You must use a 40 pound Type BC fire extinguisher and keep it within 25 feet of your equipment Keep emergency numbers for doctors ambulance services hospitals and the fire department near your telephone Know your responsibilities as an Employer Make certain your employees know ...

Page 7: ...Gourmet Oven Introduction 5 Safety Decals ...

Page 8: ...Of Raw Meats Designate an area or shelf strictly for the storage of all raw meats to be used in the oven Raw product must always be stored at temperatures below 38 F 3 C Never store or mix raw foods above cooked foods as this is a health hazard The drippings from raw foods contaminate cooked or processed foods All chicken and chicken parts to be stored overnight must be thoroughly iced down and re...

Page 9: ...Gourmet Oven Operation 7 Operation Controls and Indicators The figure below depicts the oven s controls and indicators Refer to it as necessary while performing operating procedures in this section ...

Page 10: ...splayed OFF is displayed below 100 F or above 400 F Setting the Hold Temperature Press the SELECT button until the HOLD TEMP light turns on Press the UP or DOWN buttons until the desired temperature is displayed The hold function can be disabled by pressing the UP or DOWN buttons until OFF is displayed OFF is displayed below 100 F or above 250 F Pressing the SELECT button again returns the control...

Page 11: ...ook count down timer will stop 2 Change the cooking parameters by pressing the SELECT button until the desired indicator light turns on The display will show the pre set value 3 Press the UP and DOWN buttons to change the setting as desired 4 Resume the cooking cycle by press the START STOP button The CYCLE ON light will come on indicating that the cooking cycle has resumed Canceling the Cooking C...

Page 12: ...duct while the center is still cold Another application of the low power feature is to provide gentle heat when slow cooking meat products at temperature of 250 F or less The low power setting should only be used when cooking below 300 F The high power setting is used for baking and some holding applications frequent oven entry where a quick recovery is required This setting may also be used for r...

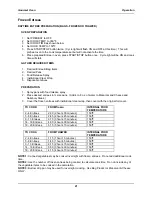
Page 13: ...HER REQUIRED ITEMS 1 Whole Turkeys 2 Full size shallow pans 3 Desired Seasoning 4 Knife if removing tails PREPARATION 1 Rinse turkeys in cold water 2 Pull and discard excess trimmings 3 Tuck wings and secure legs 4 Season as desired 5 Place 2 birds in each pan TO COOK AND HOLD FROM REFRIGERATED INTERNAL FOOD TEMPERATURE 1 Pan 4 00 4 hours 175ºF 2 Pans 4 15 4 hours 15 minutes 175ºF 3 Pans 4 30 4 ho...

Page 14: ... tails PREPARATION 1 Rinse chickens in cold water 2 Pull and discard excess trimmings 3 Tuck wings and secure legs 4 Season as desired 5 Place 6 birds in each pan TO COOK AND HOLD FROM REFRIGERATED INTERNAL FOOD TEMPERATURE 1 Pan 1 40 1 hour 40 minutes 175ºF 2 Pans 1 45 1 hour 45 minutes 175ºF 3 Pans 1 50 1 hour 50 minutes 175ºF 4 Pans 2 00 2 hours 175ºF TO COOK AND PULL FROM REFRIGERATED INTERNAL...

Page 15: ...cle GATHER REQUIRED ITEMS 1 Turkey Breasts 2 Full size shallow pans 3 Desired Seasoning 4 Knife if removing tails PREPARATION 1 Rinse turkey breasts in cold water 2 Pull and discard excess trimmings 3 Season as desired 4 Place 8 birds in each pan TO COOK AND HOLD FROM REFRIGERATED INTERNAL FOOD TEMPERATURE 1 Pan 2 00 2 hours 175ºF 2 Pans 2 10 2 hours 10 minutes 175ºF 3 Pans 2 20 2 hours 20 minutes...

Page 16: ...26 inch Grates 4 Institutional Clear Wrap 5 Desired Seasoning PREPARATION 1 Unwrap ribs and rinse with cold water 2 Place 7 ribs on pan with grate and season as desired 3 Cover meat with clear wrap completely and SEAL COMPLETELY TO COOK FROM REFRIGERATED INTERNAL FOOD TEMPERATURE 1 Tray 2 30 2 hours 30 minutes 170ºF 2 Trays 2 45 2 hours 45 minutes 170ºF 3 Trays 3 00 3 hours 170ºF 4 Trays 3 15 3 ho...

Page 17: ... inch Grates 4 Institutional Clear Wrap 5 Desired Seasoning PREPARATION 1 Unwrap ribs and rinse with cold water 2 Place 3 4 ribs on pan with grate and season as desired 3 Cover meat with clear wrap completely and SEAL COMPLETELY TO COOK FROM REFRIGERATED INTERNAL FOOD TEMPERATURE 1 Tray 2 30 2 hours 30 minutes 170ºF 2 Trays 2 45 2 hours 45 minutes 170ºF 3 Trays 3 00 3 hours 170ºF 4 Trays 3 15 3 ho...

Page 18: ...ates 4 Institutional Clear Wrap 5 Desired Seasoning PREPARATION 1 Unwrap Prime Rib and rinse with cold water 2 Place on pan with grate and season as desired 3 Cover meat with clear wrap completely DO NOT SEAL TO COOK FROM REFRIGERATED INTERNAL FOOD TEMPERATURE 1 Rib 1 30 1 hour 30 minutes 145ºF 2 Ribs 1 45 1 hour 45 minutes 145ºF 3 Ribs 2 00 2 hours 145ºF 4 Ribs 2 15 2 hours 15 minutes 145ºF 5 Rib...

Page 19: ...rates 4 Institutional Clear Wrap 5 Desired Seasoning PREPARATION 1 Unwrap Prime Rib and rinse with cold water 2 Place on pan with grate and season as desired 3 Cover meat with clear wrap completely DO NOT SEAL TO COOK FROM REFRIGERATED INTERNAL FOOD TEMPERATURE 1 Rib 2 00 2 hours 145ºF 2 Ribs 2 15 2 hours 15 minutes 145ºF 3 Ribs 2 30 2 hours 30 minutes 145ºF 4 Ribs 2 45 2 hours 45 minutes 145ºF 5 ...

Page 20: ...lace on pan with grate and season as desired 3 Cover meat with clear wrap completely DO NOT SEAL TO COOK FROM REFRIGERATED INTERNAL FOOD TEMPERATURE 1 Top Round 1 30 1 hour 30 minutes 145ºF 2 Top Rounds 1 45 1 hours 45 minutes 145ºF 3 Top Rounds 2 00 2 hours 145ºF 4 Top Rounds 2 15 2 hours 15 minutes 145ºF 5 Top Rounds 2 30 2 hours 30 minutes 145ºF 6 Top Rounds 2 45 2 hours 45 minutes 145ºF 7 Top ...

Page 21: ...d in oven and press START to activate cook cycle GATHER REQUIRED ITEMS 1 Steamship Round 2 18 x 26 inch Sheet Pans 3 18 x 26 inch Grates 4 Institutional Clear Wrap 5 Desired Seasoning PREPARATION 1 Unwrap Round and rinse with cold water 2 Place on pan with grate and season as desired 3 Cover meat with clear wrap completely DO NOT SEAL NOTE Internal product temperature MUST reach 140ºF For best ten...

Page 22: ...OOD TEMPERATURE 1 Corned Beef 3 00 3 hours 170ºF 2 Corned Beefs 3 20 3 hours 20 minutes 170ºF 3 Corned Beefs 3 40 3 hours 40 minutes 170ºF 4 Corned Beefs 4 00 4 hours 170ºF 5 Corned Beefs 4 20 4 hours 20 minutes 170ºF 6 Corned Beefs 4 40 4 hours 40 minutes 170ºF 7 Corned Beefs 5 00 5 hours 170ºF 8 Corned Beefs 5 20 5 hours 20 minutes 170ºF 9 Corned Beefs 5 40 5 hours 40 minutes 170ºF 10 Corned Bee...

Page 23: ...3 Cover the frozen entrees with institutional clear wrap then cover with the original foil cover TO COOK FROM frozen INTERNAL FOOD TEMPERATURE 2 4 Entrees 2 30 2 hours 30 minutes 150ºF 5 8 Entrees 2 45 2 hours 45 minutes 150ºF 9 13 Entrees 3 15 3 hours 15 minutes 150ºF 14 16 Entrees 4 30 4 hours 30 minutes 150ºF 18 20 Entrees 5 15 5 hours 15 minutes 150ºF TO COOK FROM THAWED INTERNAL FOOD TEMPERAT...

Page 24: ...with food release spray 2 Place desired entrees in size pans Add 4 to 8 oz of water to Macaroni and Cheese and Salisbury Steak 3 Cover the frozen entrees with institutional clear wrap then cover with the original foil cover TO COOK FROM frozen INTERNAL FOOD TEMPERATURE 2 4 Entrees 2 30 2 hours 30 minutes 150ºF 5 8 Entrees 2 45 2 hours 45 minutes 150ºF 9 13 Entrees 3 15 3 hours 15 minutes 150ºF 14 ...

Page 25: ...x30 pieces of wood NOTE Remove all plastic from stacking kit parts 1 Remove racks and drip pans from inside both ovens 2 Place two wood 2x4x30 pieces on the floor Tilt unit back onto wood pieces being careful not to crush fuse holders or power cord 3 Remove casters and place large aluminum base WB56210600 lip goes downward between the bottom of the oven and the casters Install the caster hardware ...

Page 26: ...for proper ventilation Wiring Electrocution equipment failure or property damage could result if an unlicensed electrician performs the electrical installation Ensure that a licensed electrician perform the electrical installation The oven when installed by an authorized BKI service agent must be grounded in accordance with local codes or in the absence of local codes with the National Electrical ...

Page 27: ...ctrical shock This unit may have more than one disconnect switch Using abrasive cleaners may damage the cabinet finish Use only a mild soap and water solution Never steam clean or get excess water in the interior of the cabinet as this can damage unit DO NOT USE OVEN CLEANER on this machine Caustic cleaners can cause damage to the machine Always wear appropriate personal protection equipment durin...

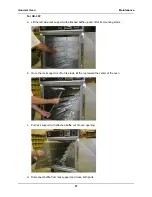
Page 28: ...riate procedure below For GO 36 a Lift the left side rack support up and off of its mounting studs b Once the rack support is off of its studs tilt the top toward the center of the oven c Pull rack support out of oven and clean d Repeat these steps for the right side rack support ...

Page 29: ...upport with attached baffle up and off of its mounting studs b Once the rack support is off of its studs tilt the top toward the center of the oven c Pull rack support with attached baffle out of oven opening d Disconnect baffle from rack support and clean both parts ...

Page 30: ...nd approved cleaner which is authorized for use on food surface areas 7 Wipe the unit dry with a soft cloth 8 To reinstall rack supports follow the procedures below For GO 36 a Insert the left rack support into the oven against the back wall b Hook the rack support hangers on the corresponding mounting studs c Repeat these steps for the right side rack support ...

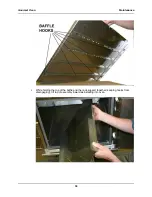
Page 31: ...aintenance 29 For GO 36T a To install baffle onto rack support hold the rack side of the support at a 45 angle to a level surface b Slide baffle into position as shown allowing hooks on baffle to engage rack support ...

Page 32: ...Gourmet Oven Maintenance 30 c While holding the top of the baffle and the rack support together keeping hooks from disengaging tilt top of assembly inward as installing into oven ...

Page 33: ...e holding the pieces with your hand upright the assembly and install onto studs in oven Be careful not to disengage the baffle hooks from the rack support e Repeat these steps for the right side support 9 Reinsert the racks and drip pan ...

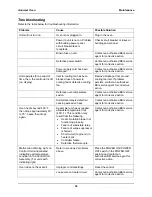
Page 34: ...mperature switch Contact an authorized BKI service agent for corrective action Solid state relay is defective causing excessive heat Contact an authorized BKI service agent for corrective action Oven heats beyond 400 F then drops approximately 50 to 75 heats then drops again Heater plenum has exceeded allowable temperature limit 450 F This condition may result from the following Heat circulation b...

Page 35: ...tion Oven will not come up to temperature Oven HIGH POWER LOW POWER switch is in the LOW POWER position with the oven control set in the 300 400 F range For these temperatures operate oven on HIGH POWER One or more heater elements not operating Contact an authorized BKI service agent for corrective action Control displays PROB Damaged probe Contact an authorized BKI service agent for corrective ac...

Page 36: ...P O Box 80400 Simpsonville S C 29680 0400 USA http www bkideas com Made and printed in the U S A LI0116 0407 ...

Reviews: