


◈
Self-Test
1. Make sure the paper roll has been installed properly.
2. Turn on the power while holding down the FEED button. The self-test begins.
3. The self-test prints the current printer status, providing the control ROM version and the
DIP switch setting.
4. After printing the current printer status, self-test printing will print the following, and
pause. (The PAPER LED light blinks.).
SELF-TEST PRINTING.
PLEASE PRESS THE FEED BUTTON
5. Press the FEED button to continue printing. The printer prints a pattern using the built-in
character set.
6. The self-test automatically ends and cuts the paper after printing the following.
*** COMPLETED ***
7. After the self-test is complete, the printer returns to normal on-line status.
※
Note
The self-test lets you know if your printer is operating properly. It checks the print quality,
ROM version, and DIP switch settings.
◈
Specifications
Item
Details
Printer
Printing Method
Thermal Line Printing
Dot Density
SRP-350plusII: 180 dpi (7dots/mm)
SRP-352plusII: 203 dpi (8dots/mm)
Printing Width
72 mm
Characters per line
(Default)
SRP-350plusII
: 42 (Font A) / 56 (Font B) /
56 (Font C)
SRP-352plusII
: 48 (Font A) / 64 (Font B) /
64 (Font C)
Printing Speed *1)
SRP-350plusII:59.10 lines/sec , 250 mm/sec
SRP-352plusII:61.33 lines/sec , 230 mm/sec
Receive Buffer Size
4K Bytes
SMPS Input Voltage
100~240 VAC
Frequency 50/60
Hz
SMPS Output Voltage
24 VDC
Temperature
0 ~ 45
℃
(Operating)
-20 ~ 60
℃
(Storage)
Humidity
10 ~ 80 % RH (Operating)
10 ~ 90 % RH (Storage)
; Except for paper
Auto Cutter
1,800,000 Cuts
Mechanism MCBF *2) 70,000,000
Lines
Paper
Paper Type
Paper Roll
Roll Width
79.5±0.5 mm
Roll Diameter
Max 83mm
Paper Thickness
0.062~0.075mm
Paper Tube
Inner: Ø12mm (0.47”)
Outer: Ø18mm (0.71”)
※
Note
*1) Printing speed may be slower depending on the data transmission speed and the
combination of control commands.
*2) The above values are calculated under printing level 2 with recommended paper at
normal temperature.
The values may vary with environment temperature, printing level, etc.
◈
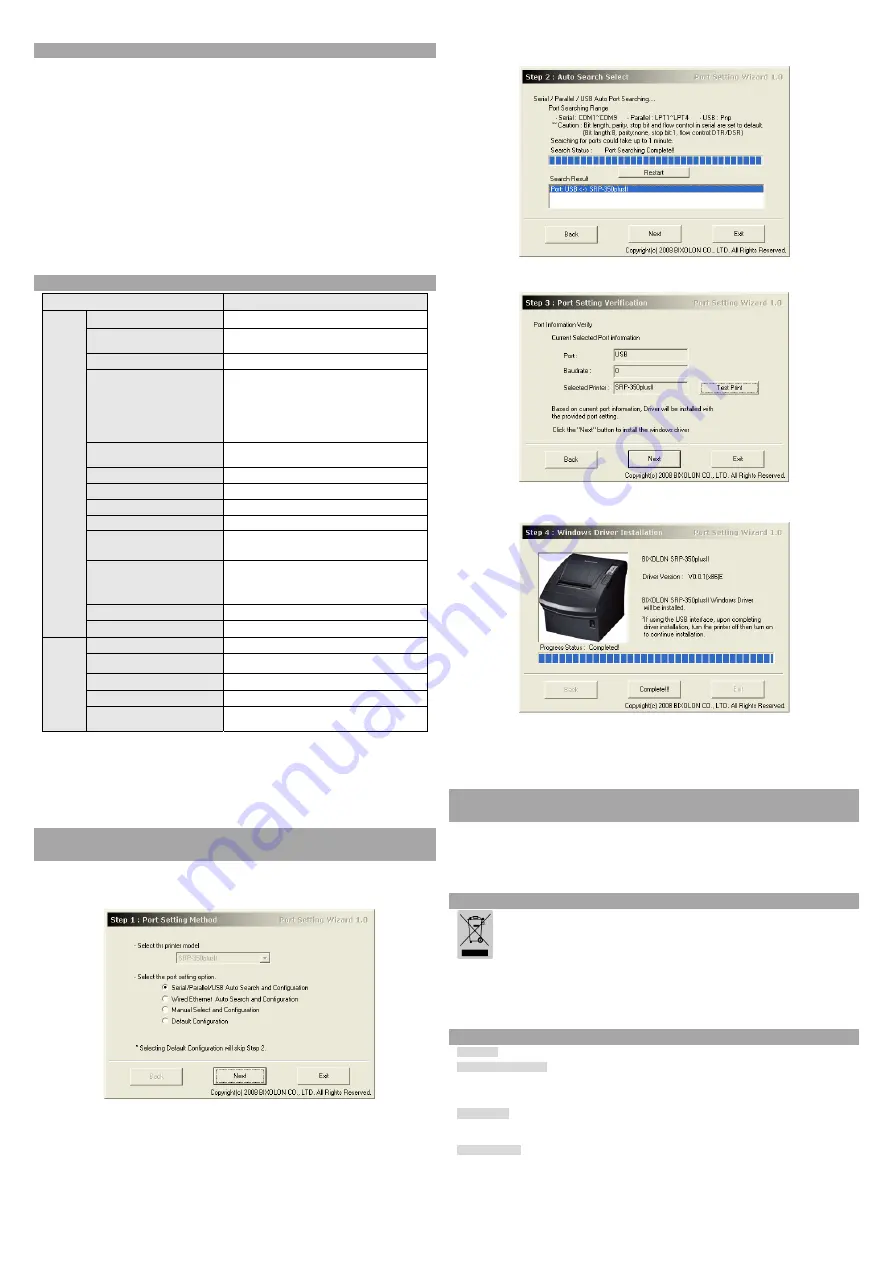
Automatic Windows driver installation for printers with Serial
/ Parallel / USB interface
1. Connect the printer to the computer and turn it on.
2. Select “Serial/Parallel/USB Auto Search and Configuration” in “Step 1: Port Setting
Wizard” screen.
3. Click the “Next” button; the computer starts searching printers.
* The range of the search is as follows.
- Serial: COM1~COM9
- Parallel: LPT1~LPT4
- USB: Plug&play
4. When the port search is complete, select the corresponding printer from “Search Result”
and click “Next” button.
5. Verify the selected printer.
You can use the “Test Print” button to print the test page.
6. Click the “Next” button to finish the installation of the Windows driver with the selected
port settings.
※
Note
If the automatic Windows driver installation fails with the selected interface, choose the
manual installation option in the second step to install the driver manually.
- Refer to the User’s Manual for detailed instructions. (Accompanying CD)
◈
Windows driver installation for Ethernet interface, manual
installation, and default values configuration
Refer to the User’s Manual (accompanying CD) for following installations besides automatic
installation for Serial / Parallel / USB interface.
1. Automatic installation for Ethernet interface
2. Manual installation
3. Default values configuration
◈
WEEE (Waste Electrical and Electric Equipment)
This marking shown on the product or its literature, indicates that is should not be
disposed with other household wastes at the end of its working life, To prevent
possible harm to the environment or human health from uncontrolled waste disposal,
please separate this from other types of wastes and recycle it responsibly to promote
the sustainable reuse of material resources. Household users should contact either the
retailer where they purchased this product, or their local government office, for details
of where and how they can take this item for environmentally safe recycling. Business
users should contact their supplier and check the terms and conditions of the purchase
contract. This product should not be mixed with other commercial wastes for disposal.
☎
BIXOLON Co., Ltd.
●
Website
http://www.bixolon.com
●
Korea Headquarters
(Add) 7th~8th FL, Miraeasset Venture Tower, 685, Sampyeong-dong, Bundang-gu, Seongnam-si,
Gyeonggi-do, 463-400, Korea
(Tel.) +82-31-218-5500
●
U.S. Office
(Add) BIXOLON America Inc., 3171 Fujita St, Torrance, CA 90505
(Tel.) +1-858 764 4580
●
Europe Office
(Add) BIXOLON Europe GmbH, Tiefenbroicher Weg 35 40472 Düsseldorf
(Tel.) +49 (0)211 68 78 54 0


