BIXOLON DX420E Unified Utility-Ii Manual Download Page 12

Label Printer 


Rev.  1.00 

- 12 - 

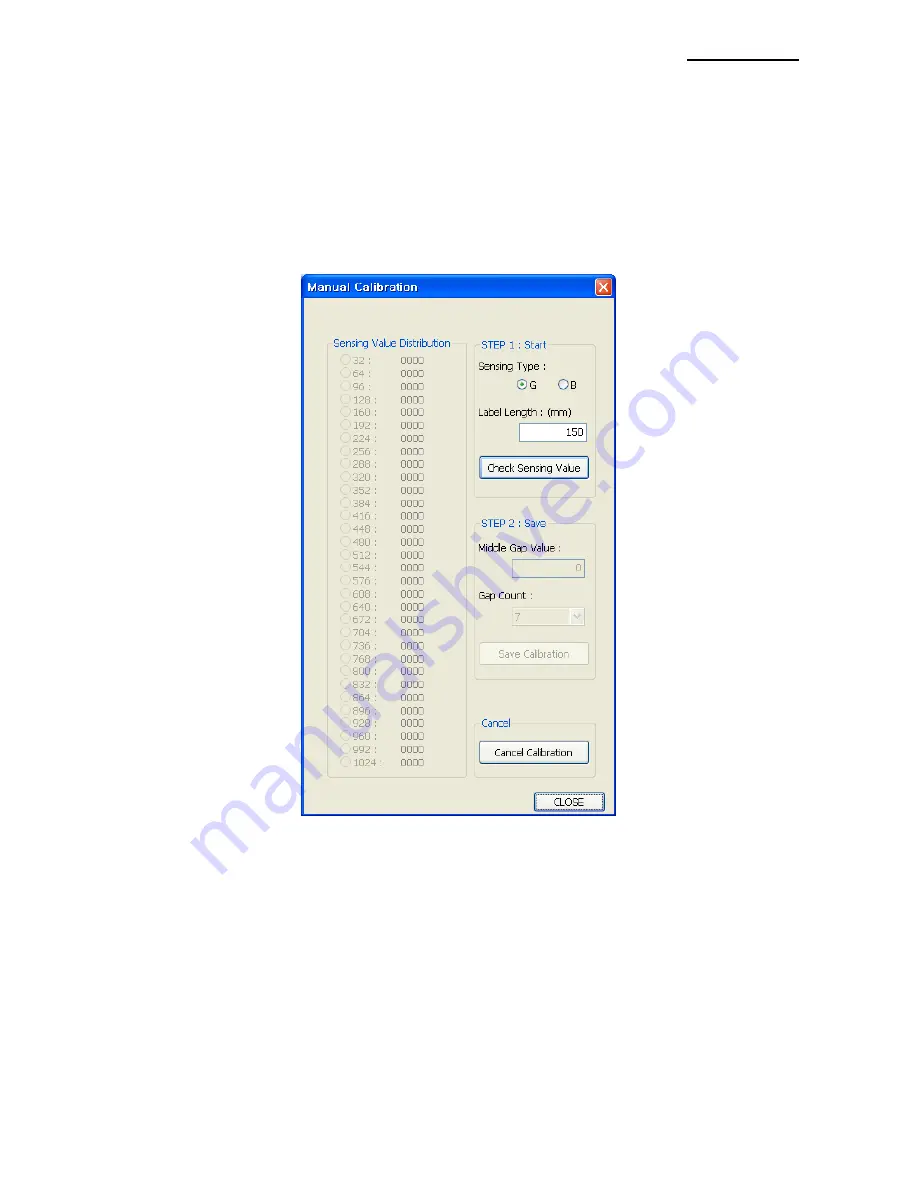
3-3 Manual Calibration 

 
Manual-calibration of media detection can be used when the printer cannot detect a media 
gap (or black mark) even after auto-calibration has been executed. 
 
Users can calibrate sensor parameters in detail. 
 
Please make sure the printer is connected and execute the utility program. 
Press the Calibration Setting Manager Button after setting the interface type. 


1) 

Select the sensing type and input the label length by millimeter and click on “Check   

Sensing Value” tap. Then printer starts to calibrate. 
 

2) After scanning the paper, the scanned values are displayed on the utility. 
   
3) Optimal sensing values will appear in black bold letters on the left of the utility screen   

and select one of the values and click on “Save Calibration”. 
 

4)  If  chosen  value  does  not  work  properly,  please  try  the  other  values  among  the  black 

bold letters. 

 
5) 

To go back to the initial value, please click on “Cancel Calibration”. 


Summary of Contents for DX420E

Page 1: ...Unified Utility II Manual Label Printer Rev 1 00 SLP TX400 TX400E SLP TX403 TX403E SLP DX420 DX420E SLP DX423 DX423E http www bixolon com...

Page 2: ...Usage Preparation 4 3 Unified Label Utility II Usage 5 3 1 User Setting Manager 5 3 2 Configure Print Quality 11 3 3 Manual Calibration 12 3 4 PCX File Downloader 13 3 5 File Transfer 15 3 6 Printer T...

Page 3: ...en saving a black and white PCX format image to flash memory 5 File transfer This function is used when sending test files such as command scripts to the printer 6 Printer Tools This function is used...

Page 4: ...d from the accompanying CD and Latest file versions can be downloaded from the BIXOLON website http www bixolon com The file name is as follows Unified Label Utility II exe 3 Select the interface type...

Page 5: ...ze and print density to values suited to the user environment Click the Configure Printer Setting 3 1 1 Serial Communication Setting 1 Click the Serial 2 Click the Get button to read the printer setti...

Page 6: ...asic Tab to configure speed darkness and Media options 2 Click the Get button to read the printer setting value 3 Modify each value 4 If you want to lock the setting value check the lock checkbox 5 Cl...

Page 7: ...3 Advanced Settings 1 Click the Advanced tab to configure Meida handling process options 2 Click the Get button to read the printer setting value 3 Modify each value 4 Click the Set to Printer to app...

Page 8: ...Label Printer Rev 1 00 8 3 1 4 Real time Clock 1 Click the Real time Clock tab to set Real Time Clock 2 Configure the clocks and click the Set to Printer to apply to printer...

Page 9: ...Language 1 Click the Language tab to set Default Codepage Default International Character set 2 Click the Get button to read the printer setting value 3 Modify each value 4 Click the Set button to ap...

Page 10: ...n initialize Motor TPH Cutter statistic and set USB serial number 2 Click the Get button to read the printer information value 3 Click the Init Motor Stat Init TPH Stat Init Cutter Stat to initialize...

Page 11: ...ith different settings 2 Click the Print Sample label s button to start printing refenece labels which have specific identitier 3 Choose Label identifier of the label with best printng quality among t...

Page 12: ...on after setting the interface type 1 Select the sensing type and input the label length by millimeter and click on Check Sensing Value tap Then printer starts to calibrate 2 After scanning the paper...

Page 13: ...PCX file pcx 2 Enter the image name and click the Download button The image name is used to recall or delete images 3 4 2 Image Delete ID 1 Check the list of stored images by clicking the Image Inform...

Page 14: ...Label Printer Rev 1 00 14...

Page 15: ...le Transfer This function is used when sending test files such as command scripts to the printer 1 Click Send File button on the main window 2 Select the file to be sent and click the Download button...

Page 16: ...ons Calibration media To execute auto calibration to calibrate media sensor Load factory defaults To set printer s default configuration as factory s initial setting Reset printer Reboot printer Enter...

Page 17: ...Communication Tool on the main window to start this function 2 Type the command lines direclty or open the save command script file 3 Click the Send to Printer button to send data to printer 4 If the...

Page 18: ...create a brief label sample for test printing 1 Click the SLCS Tester button 2 Click the Multi Send button to send data to printer 3 If the command which request response from printer to host is used...

Page 19: ...Direction creates a command for speed print density and print direction setting i Margin Width Length creates a command for margin and width and length of print paper setting j Check Printer Status c...

Reviews: