background image


Page 

4

 of 

9


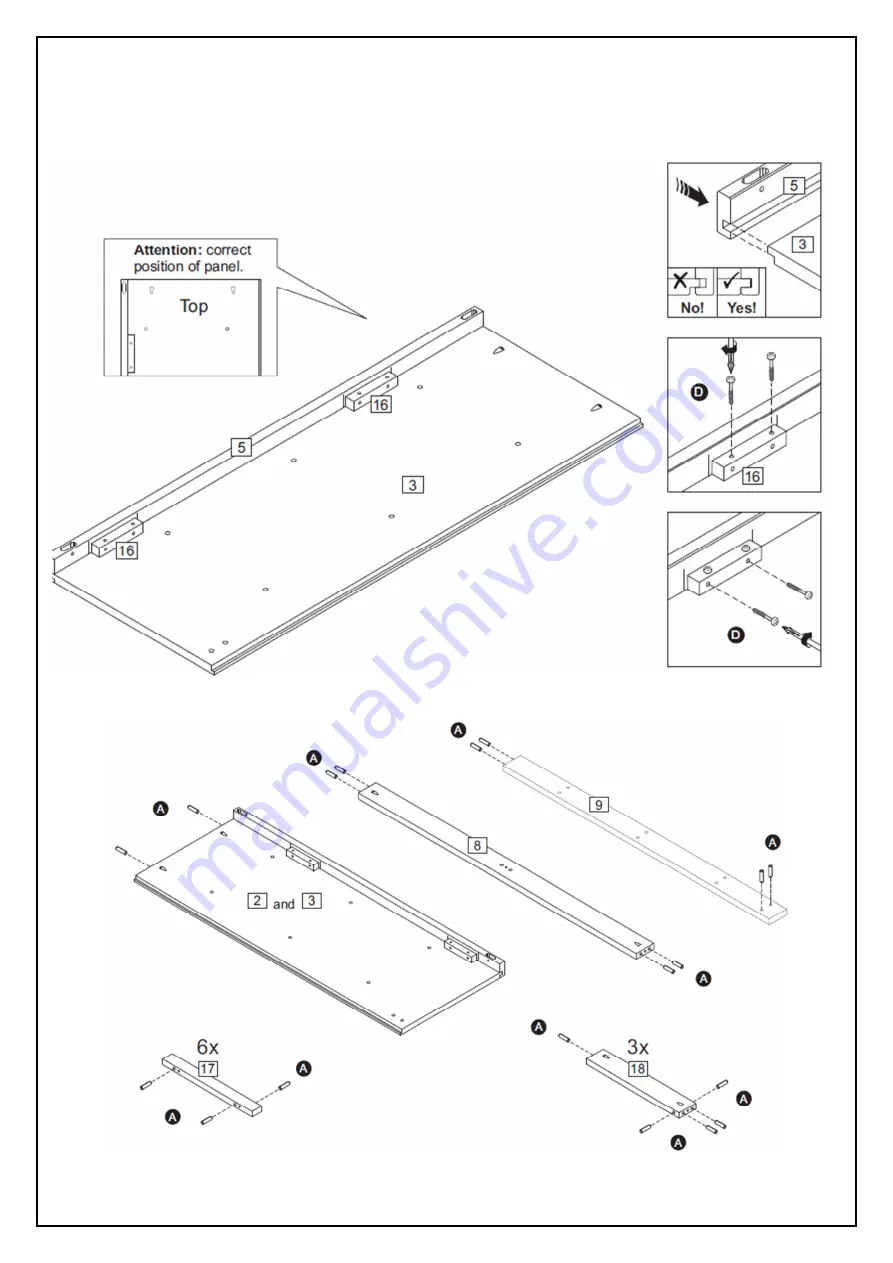
Step 2:

 Insert the left panel (3) to the left front frame (5) making sure the parts are pushed together and 

lined up. Place the cleats (16) between the marks shown and secure using hardware part D and a 
screwdriver (not provided). 

DO NOT use any power tools as this may damage the frame and will invalidate any claim. 


Step 3:

 Insert hardware part A using a small mallet (not provided). 

DO NOT use any power tools as this may damage the frame and will invalidate any claim. 


Summary of Contents for Santiago 6 Drawer Chest

Page 1: ...which is a wood with natural characteristics including knots grains clusters or indentations On unpacking the item you may notice an odour due to production processes but this will disappear after a period of time DO NOT place the item next to a radiator or direct sunlight this item is susceptible to temperature change It is recommended an even room temperature be maintained with no sudden fluctua...

Page 2: ...4 Right Front Frame 1 D 35 mm Screw 42 5 Left Front Frame 1 E 19 mm Bolt 6 6 Front Frame 2 F Handle 6 7 Middle Front Frame 1 G Tack 32 8 Rear Base Plinth 1 You will need a small mallet and a screwdriver 9 Back Column 1 10 Back Panel 2 11 Spine 2 12 Drawer Front 6 13 Drawer Side 12 14 Drawer Back 6 15 Drawer Base 6 16 Cleat 4 17 Side Drawer Runner 6 18 Middle Drawer Runner 3 ...

Page 3: ...ont frame 4 making sure the parts are pushed together and lined up Place the cleats 16 between the marks shown and secure using hardware part D and a screwdriver not provided DO NOT use any power tools as this may damage the frame and will invalidate any claim ...

Page 4: ... cleats 16 between the marks shown and secure using hardware part D and a screwdriver not provided DO NOT use any power tools as this may damage the frame and will invalidate any claim Step 3 Insert hardware part A using a small mallet not provided DO NOT use any power tools as this may damage the frame and will invalidate any claim ...

Page 5: ... the frame and will invalidate any claim Step 5 Connect the front frames 6 to the middle front frame 7 DO NOT use any power tools as this may damage the frame and will invalidate any claim Step 6 Attach the right panel 2 and left panel 3 using hardware part B and a screwdriver not provided DO NOT use any power tools as this may damage the frame and will invalidate any claim ...

Page 6: ...er not provided DO NOT use any power tools as this may damage the frame and will invalidate any claim Step 8 Join together the two assembled sections using hardware part D and a screwdriver not provided DO NOT use any power tools as this may damage the frame and will invalidate any claim ...

Page 7: ...r not provided DO NOT use any power tools as this may damage the frame and will invalidate any claim Step 10 Attach the side drawer runners 17 using hardware part D and a screwdriver not provided DO NOT use any power tools as this may damage the frame and will invalidate any claim ...

Page 8: ...dware part G and a small mallet not provided DO NOT use any power tools as this may damage the frame and will invalidate any claim Step 12 Assemble the drawer components using hardware parts C E and F with a screwdriver not provided DO NOT use any power tools as this may damage the frame and will invalidate any claim ...

Page 9: ...Page 9 of 9 Step 13 Insert the assembled drawers and secure using hardware part A and a small mallet not provided DO NOT use any power tools as this may damage the frame and will invalidate any claim ...

Reviews: