Chapter 2: Hardware installation
| 7
X470GTA
Chapter 2: Hardware installation
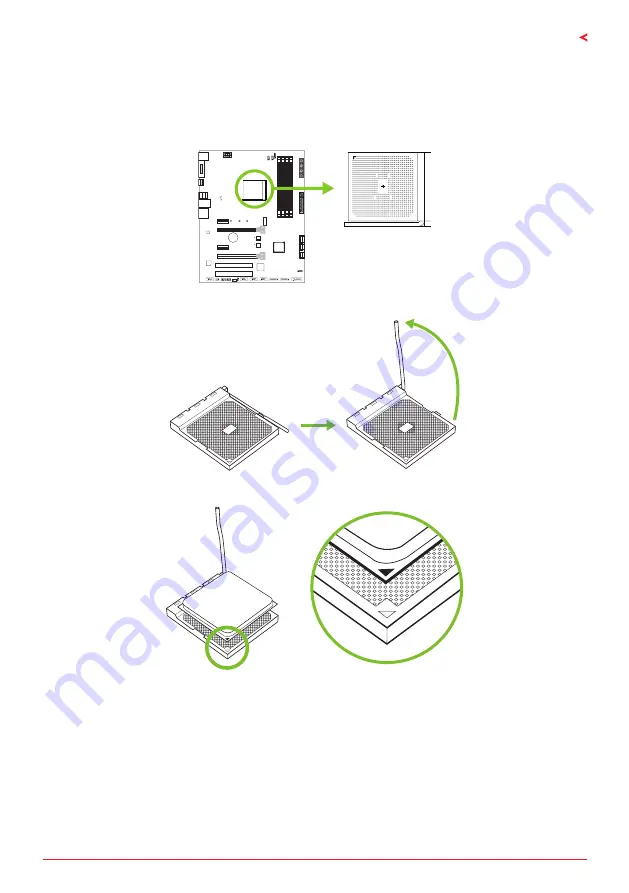
2.1 Install Central Processing Unit (CPU)
Step 1: Locate the CPU socket on the motherboard
Step 2: Pull the socket locking out from the socket and then raise the lever up to a 90-degree
angel.
Step 3: Look for the white triangle on socket, and the gold triangle on CPU should point
towards this white triangle. The CPU will fit only in the correct orientation.
Summary of Contents for X470GTA
Page 6: ...6 Chapter 1 Introduction 1 5 Motherboard Layout Note represents the 1st pin...
Page 39: ...FCC FCC 15 Class B BIOSTAR BIOSTAR BIOSTAR CE 2004 108 CE 2006 95 CE 1999 05 CE...
Page 41: ...3 X470GTA 1 1 0 45 1 2 Serial ATA x4 ATX I O x1 x1 x1...
Page 44: ...6 1 5 1...
Page 45: ...7 X470GTA 2 1 CPU 1 CPU 2 90 3 CPU CPU...
Page 46: ...8 4 CPU CPU 2 2 A 1 2...
Page 47: ...9 X470GTA B 1 2 CPU CPU CPU CPU...
Page 62: ...24 UEFI BIOS eHot Line eHot Line Send Send Do Not Send Save As...
Page 64: ...26 UEFI BIOS RACING GT Utility RACING GT 1 2 3 4...
Page 67: ...UEFI BIOS 29 X470GTA 1 CPU 2 3 CPU 4 CPU 5 6 7...
Page 71: ...33 X470GTA RAID 1 2 RAID 1 RAID1 RAID 2 2 RAID 1 100 2 RAID 10 RAID 0 RAID 1 4 6 8 RAID RAID1...


