12 | Chapter 2: Hardware installation
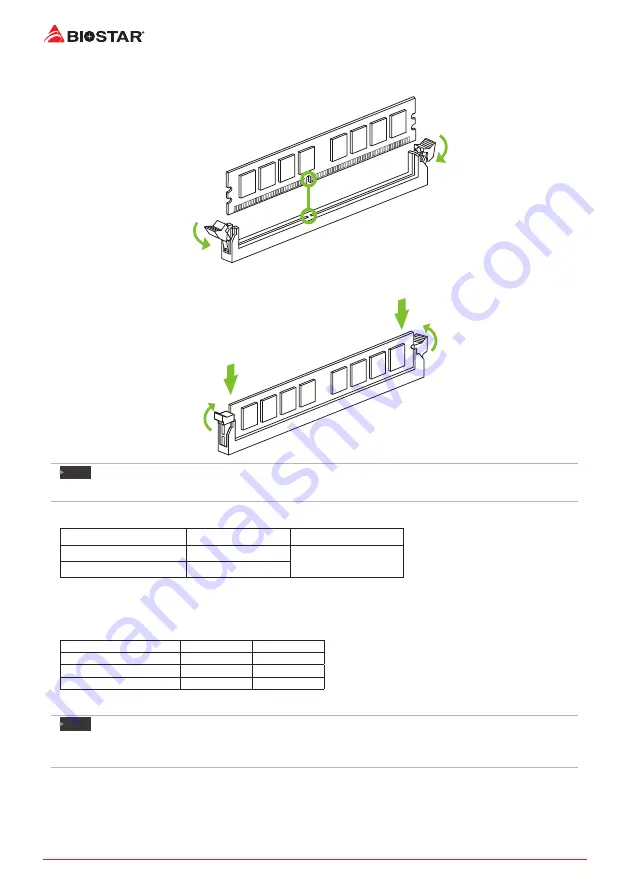
Step 1: Unlock a DIMM slot by pressing the retaining clips outward. Align a DIMM on the slot
such that the notch on the DIMM matches the break on the slot.
Step 2: Insert the DIMM vertically and firmly into the slot until the retaining clips snap back in
place and the DIMM is properly seated.
Note
»
If the DIMM does not go in smoothly, do not force it. Pull it all the way out and try again.
Memory Capacity
DIMM Socket Location DDR4 Module
Total Memory Size
DIMMA1
4GB/8GB/16GB
Max is 32GB.
DIMMB1
4GB/8GB/16GB
Dual Channel Memory Installation
Please refer to the following requirements to activate Dual Channel function:
Install memory module of the same density in pairs, shown in the table.
Dual Channel Status
DIMMA1
DIMMB1
Disabled
O
X
Disabled
X
O
Enabled
O
O
(O means memory installed, X means memory not installed.)
Note
»
When installing more than one memory module, we recommend to use the same brand and
capacity memory on this motherboard.
Summary of Contents for X370GTN
Page 6: ...6 Chapter 1 Introduction 1 5 Motherboard Layout Top View Note represents the 1st pin...
Page 7: ...Chapter 1 Introduction 7 B350GTN X370GTN Back View...
Page 39: ...FCC FCC 15 Class B BIOSTAR BIOSTAR BIOSTAR CE 2004 108 CE 2006 95 CE 1999 05 CE...
Page 41: ...3 B350GTN X370GTN 1 1 0 45 1 2 Serial ATA x4 ATX I O x1 x1 x1...
Page 44: ...6 1 5...
Page 45: ...7 B350GTN X370GTN 1...
Page 46: ...8 2 1 CPU 1 CPU 2 90 3 CPU CPU...
Page 47: ...9 B350GTN X370GTN 4 CPU CPU 2 2 A 1 2...
Page 56: ...18 2 8 LED LED LED RACING GT 3 3 1 RGB LED 2 MOSFET LED...
Page 62: ...24 UEFI BIOS eHot Line eHot Line Send Send Do Not Send Save As...
Page 64: ...26 UEFI BIOS RACING GT Utility RACING GT 1 2 3 4...
Page 67: ...UEFI BIOS 29 B350GTN X370GTN 1 CPU 2 3 CPU 4 CPU 5 6 7...


