


Chapter 2: Hardware installation
| 13
H410MHG
Install an Expansion Card
You can install your expansion card by following steps:
• Read the related expansion card’s instruction document before install the expansion
card into the computer.
• Remove your computer’s chassis cover, screws and slot bracket from the computer.
• Place a card in the expansion slot and press down on the card until it is completely
seated in the slot.
• Secure the card’s metal bracket to the chassis back panel with a screw.
(This step is only
for installing a VGA card.).
• Replace your computer’s chassis cover.
• Power on the computer, if necessary, change BIOS settings for the expansion card.
• Install related driver for the expansion card.
Note
»
Please be note that you will need to use M2 type screwdriver if you want to install or uninstall the
screw. It is recommended not to use a screwdriver that does not meet the specifications, otherwise
the screw may be damaged.
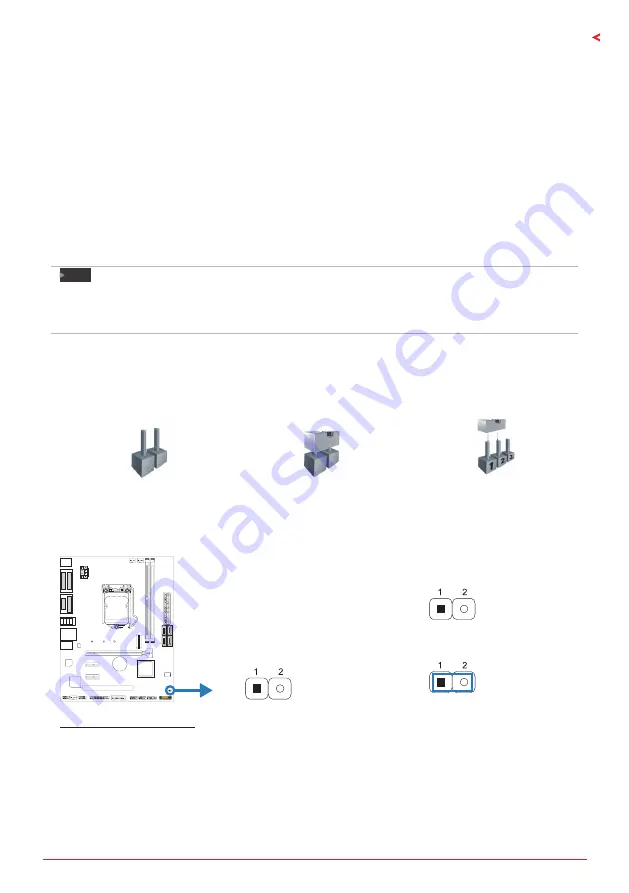
2.6 Jumper & Switch Setting
The illustration shows how to set up jumpers. When the jumper cap is placed on pins, the
jumper is “close”, if not, that means the jumper is “open”.
Pin opened
Pin closed
Pin 1-2 closed
JCMOS1: Clear CMOS Jumper
The jumper allows users to restore the BIOS safe setting and the CMOS data. Please carefully
follow the procedures to avoid damaging the motherboard.
Pin 1-2 Open: Normal Operation (Default)
Pin 1-2 Close: Clear CMOS data
Clear CMOS Procedures:
1. Remove AC power line.
2. Set the jumper to “Pin 1-2 close”, you can use a metal object like a screwdriver to touch
the two pins.
3. Wait for five seconds.
4. After clearing the CMOS values, be sure the jumper is “Pin 1-2 open”.
5. Power on the AC.
6. Load Optimal Defaults and save settings in CMOS.
Summary of Contents for H410MHG
Page 6: ...6 Chapter 1 Introduction 1 5 Motherboard Layout Note represents the 1st pin...
Page 33: ...FCC FCC 15 Class B TV BIOSTAR BIOSTAR BIOSTAR 3 3 CE 2004 108 CE 2006 95 CE 1999 05 CE...
Page 34: ...KC Korea EMC 1 KC 2 KC 3 BIOSTAR Microtech Int l Corp KC 4 5...
Page 36: ...4 1 1 1 1 0 45 1 2 ATA x2 ATX x1 x1 DVD x1...
Page 39: ...1 7 H410MHG 1 5...
Page 40: ...8 2 2 2 1 CPU 1 CPU CPU 2 3...
Page 41: ...2 9 H410MHG 4 CPU CPU 5 CPU LGA1200 CPU CPU CPU...
Page 42: ...10 2 2 2 CPU 1 CPU CPU CPU CPU 2 2 CPU CPU CPU CPU CPU...
Page 54: ...22 3 UEFI 5 Open 6 OK 7 DEL Save Exit Restore Defaults Save Changes and Reset Save...
Page 55: ...3 UEFI 23 H410MHG 3 3 1 DVD 2 3 BIOScreen Utility BMP...
Page 56: ...24 4 4 4 1 DVD DVD A B C DVD DVD SETUP EXE http get adobe com reader...
Page 59: ...4 27 H410MHG 4 4 1 LED 2 1 2 3 1 CMOS 2 1 2 CMOS 1 2...
Page 60: ...28 4 CPU CPU CPU CPU 1 CPU CPU 2 CPU 3 CPU CPU CPU 1 2 3 1 CMOS CMOS JCMOS1 2 3...
Page 61: ...FCC FCC 15 Class B BIOSTAR BIOSTAR BIOSTAR CE 2004 108 CE 2006 95 CE 1999 05 CE...
Page 63: ...3 H410MHG 1 1 0 45 1 2 Serial ATA x2 ATX I O x1 x1 x1...
Page 66: ...6 1 5 1...
Page 67: ...7 H410MHG 2 1 CPU 1 CPU CPU 2 3...
Page 68: ...8 4 CPU CPU 5 CPU LGA1200 CPU CPU CPU CPU...
Page 69: ...9 H410MHG 2 2 1 CPU CPU CPU 2 2 CPU CPU CPU CPU...


