background image


C7SM-1.01 


39/70 

Service Manual of Cardio 2000 

Section 5. Disassembly and Assembly 

 
5-1. Module Description 


Base Board 

CPU Board 

Power Board 
(SMPS) 

UI Board 

Summary of Contents for CardioCare EKG2000

Page 1: ...EKG2000 SERVICE MANUAL Version 1 0 www ebionet com ...

Page 2: ...C7SM 1 01 2 70 Service Manual of Cardio 2000 Revision History Edition Date Page Comment Ver 1 0 2019 10 18 Initial Release ...

Page 3: ...n 2 Troubleshooting 18 2 1 Power 18 2 2 Wave Printing 19 2 3 Diagnosis 22 2 4 Filter 23 2 5 Trouble Shooting Guide 25 Section 3 Adjustment 31 3 1 LCD Backlight 31 3 2 Lead Fault 32 3 3 Filter Setting 33 Section 4 Block Diagram Description 34 4 1 Circuit Block Diagram 34 4 2 Equipment Overview 35 4 3 Size and Weight 38 Section 5 Disassembly and Assembly 39 5 1 Module Description 39 5 2 Internal Blo...

Page 4: ...e Part List 60 Section 7 Connector Pin Assignment 63 7 1 Patient Cable Port 63 Section 8 PCB Part Disposition 64 8 1 Base Power Analog Board 64 8 2 CDUI Board 65 8 3 CPU Board 66 Section 9 Software Upgrade 67 9 1 Requirement of Upgrading 67 9 2 Procedure of Upgrading Cardio7 UI screen upgrade method is same 68 ...

Page 5: ...ce by pressing one key A battery optional can be added to the device so that the device can be operated conveniently during bedside visits or emergency conditions 1 2 Features of the Equipment Print 12 channel ch cardiac signals with reports in 3ch 1 rhythm 6ch 1 rhythm and 12ch rhythm patterns on A4 or Letter size printing paper Record and print 12 channel rhythms continuously and simultaneously ...

Page 6: ... package and check the items below are included Also be sure to check for any damage to the body and accessories Basic Components and Accessories CardioCare2000 Body 1 EA Dimension 290 W 300 D 97 5 H mm Patient Cable 1 EA Length 3 700mm Max Limb Electrodes 1 SET Chest Electrodes 1 SET ECG Paper 1 EA Power Cable 1 EA Length 3 000mm Max ...

Page 7: ...ONS You may have distortion or signal noise when you use nonstandard or other brand accessories We strongly recommend you use only the authorized accessories which we supply WARNING How to replace battery Please make sure you use the right battery we show here Otherwise we are not liable for any damages and or explosion fire caused by using the wrong battery ...

Page 8: ...C7SM 1 01 8 70 Service Manual of Cardio 2000 Body Configuration Top View Handle Printer Cover Printer Cover Switch LCD Control Panel ...

Page 9: ...ice Manual of Cardio 2000 Front View Printer Cover Switch Rear View Protective Ground Terminal Power Switch AC Power Connection Port Fuse 250V 5A High breaking type USB Port Use for equipment upgreades only RJ45 LAN Port ...

Page 10: ...e is a risk of electric shock if the Rest stand of the equipment is damaged or can not be fixed to the product Do not use the product and immediately ask the manufacturer and the seller for repair NOTE To avoid an expected electric shock do not open the equipment cover or disassemble the equipment Refer servicing to Bionet Inc ...

Page 11: ... LCD are as follows Display ECG signal level out of 5 10 20 aut Auto Gain Display printing speed out of 12 5 25 50 Display base line filter setting on or off Display EMG filter setting on or off Display heart rate Display channel form of the output report out of 3ch 1rhy 6ch 1rhy 12ch rhy 60s 1rhy Display rhythm channel setting out of I II III aVR aVL aVF V1 V2 V3 V4 V5 V6 1 0 1 2 5 O F F O F F 1 ...

Page 12: ...l without having an A C power supply When an A C power is supplied the battery indicator will be either red or green depending on the charge level No color will be shown if there is no battery installed in the device Indicate AC power is operated if LED is illuminated green and not in use if LED is off Control panel Select signal level mm mV out of 5 10 20 aut I aVF 10 V1 V6 5 Select printing spee...

Page 13: ... 10 seconds by pressing key and prints in A4 sized report form after calculating the measurement parameter of the recorded ECGs Print the same report as previously printed one in record mode or prints after changing system setting such as filter signal level output speed channel form rhythm cannel of previously recorded ECGs data in record mode Exit during printing or recording of ECGs Except that...

Page 14: ...e battery battery charge indicator lamp will light up red color If the battery is running low on power three continuous buzzer alarms will sound If this occurs turn off the device and connect the A C power before turning the device back on Required time for charging more than 4 hours Continuous battery operating time 1 hour Caution For the protection of environment do NOT throw wasted battery away...

Page 15: ...aterials Power Connection The equipment needs electrical power to operate Plug in one end of the power cable to wall socket and the other to CardioCare2000 Patient Cable Connection Connect the patient cable to the patient cable connection port on the right side of the body Connect limb electrodes to RL N LL F RA R and LA L leads of the patient cable and chest electrodes to V1 C1 V2 C2 V3 C3 V4 C4 ...

Page 16: ...arge at our service centers When having troubles during this period please provide us with the model name serial number date of purchase and a description of the problem you are experiencing CAUTIONS Federal law restricts this device to sale by or on the order of a physician 1 6 Specification ECG Leads Simultaneous 12 Leads Resting ECG Recording Channel 3CH 1RHY 6CH 1RHY 12CH 1CH Long Time 1min Ga...

Page 17: ...se 0 05 150 with in 3dB Isolated Defibrillation and ESU Protected Line Power Input 100 240Vac 1 5 0 75A 50 60Hz Output 15Vdc 4 2A Battery type Replaceable and Rechargeable Lithium ion 10 8V 3350mA Battery Capacity 360 minutes of continuous operation without recording or 200 ECGs in 12 channel format at 25mm s and 10mm mV with a battery charged during approximately 3 hours from total discharge with...

Page 18: ...fuses on the Power Module SMPS and on fuse on the Base board is cut If it is replace Power board Case1 Check if the soldering of J1 on the Base board SMPS Base board Connector is poor Re solder the cable When the EKG2000 is turned on the pin no 8 s voltage has to be always 14 6V 1 Is the pin no 1 2 s voltage is 14 6 Yes replace the main board 2 Is the pin no 1 2 s voltage is 14 6 No replace the po...

Page 19: ... chest electrode to the body parts 5 If used on the dry skin or in the winter season connectivity may be degraded In that case used water or ECG gel The electrode must be washed after using ECG gel Otherwise the electrode will be rusted and corroded 1 2 Some wave patterns are not shown in V1 6 Connection location of the limbs electrode and the chest electrode 2 The diagnosis is not shown in print ...

Page 20: ...e and triangle at the bottom of the Keypad 3 Press the right arrow key once to select FLT and then press the menu key 4 Check if the filter value shows BASE ON MUSC OFF AC 60 Hz LDF 150Hz and if not correct it 5 Since the noise occurs as in problems 2 and 3 if the AC filter is turned off or set at different frequency from the power source the system must be set at 50Hz or 60Hz to correspond to the...

Page 21: ...may not be detected Replace it 3 If discoloring is too noticeable in the limbs electrode replace it 6 The wave pattern shows the straight line among V1 6 1 If some wave patterns are too small as shown in the problem 6 the problem is most likely to be with the patient cable limbs electrode or chest electrode 2 If the problem is not with the accessories then the main board is the problem 3 The main ...

Page 22: ...ars 2 LVH occurs when the sum of one of V1 or V2 and one of V5 or V6 is 3 5 or higher 3 Upgrade to the latest version of the software 2 Diagnosis shows MI 1 If MI is diagnosed it is likely that the print button was pressed before the wave patterns are stabilized 2 Check HR before printout and print it again 3 Upgrade to the latest version of the software ...

Page 23: ...ine drift by respiration and electromyogram may be recorded in the output signals There are three types of the noise filter 60Hz 50Hz and OFF When set to OFF noise is not eliminated Set to 50Hz it indicates to filter 50Hz power noise Set to 60Hz it means filtering 60Hz power noise When the system is powered by battery power noise is not generated so you may have clear ECG signal if set to OFF In E...

Page 24: ...ear ECG signal The low frequency filter can be set to 40Hz 100Hz and 150Hz and OFF Set to 40Hz it eliminates all signals over 40Hz The set value is indicated on the lower part of the printed form If you set the filter to OFF 250Hz is indicated If set to 40Hz 40Hz is indicated Set to 100 Hz 100Hz is indicated If set to 150Hz 150Hz is indicated FREQUENCY 40HZ100HZ 150HZ 250HZ ...

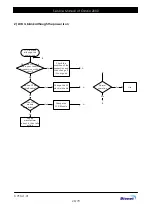
Page 25: ... the fuse Again blown fuse Does the power switch cable short circuit Change the power switch cable Does the main power connector break down Change the main power connector Normal operation Use No Yes Yes Yes Yes No Yes B A B Does the main power module produce the power properly Repair or change the main power module No Yes Ask the manufacturer about it then take action No Yes A A A A A No No No ...

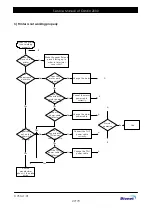
Page 26: ...d cable Change the 20 pin shield cable Does the LCD cable have a poor condition of connection or short circuit Check the condition of the connection and then change if it s not good Is the LCD module unsatisfactory Change the LCD Module Normal operation Use No Yes Yes Yes No Yes B A B Ask the manufacturer about it then take action A A A No No ...

Page 27: ...n take action Have you connected the motor power cable correctly Change the motor No Connet the motor power cable correctly No Have you connected the TPH powor cable correctly Connect the THP power cable correctly No Does you place on the printer correctly No Make the paper flat and place it facing up in order to let printer cover shut Is the motor power cable satisfactory Change the motor power c...

Page 28: ...electrode connected to the patient cable correctly Normal operation Use No No Yes Yes B A B Is the electrode connected to the patient cable correctly A Change the patient cable A Cleanse the electrode with alcohol or water then it use Reconnected the electrode to the patient cable properly Ask the manufacturer about it then take action No A A Yes No Yes Control the volume by setting a gain on the ...

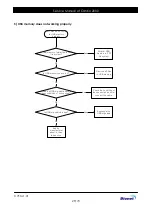
Page 29: ...n FAT file system Is USB memory space full Does the USB sig cable have a poor condition of connection Is USB sig cable broken Format USB memory in FAT file system Remove all files in USB memory Check the condition of the connection and Re connect the cable Exchange the USB sig cable No No No Yes Yes Yes Yes No Ask the manufacturer about it then take action ...

Page 30: ... properly Does USB Barcode reader not work properly Does the USB sig cable have a poor condition of connection Is USB sig cable broken Check the condition of the connection and Re connect the cable Exchange the USB sig cable No Yes Yes No Ask the manufacturer about it then take action ...

Page 31: ...C7SM 1 01 31 70 Service Manual of Cardio 2000 Section 3 Adjustment 3 1 LCD Backlight The LED backlight is powered by two resistors as shown in the following figure ...

Page 32: ...C7SM 1 01 32 70 Service Manual of Cardio 2000 3 2 Lead Fault NOTE Ready LED is turned off when the lead fault occurs ...

Page 33: ...ter off EMG signal is induced from muscle and internal organs of the patient For clear ECG signal output it is necessary to eliminate EMG signal interference EMG filter can be set by pressing MUSC key MUSC key switches on or off On or off indicates EMG filter is applied or not The selected setting is shown on the bottom line of the output form indicated EMG On or EMG Off Low pass filter can be sel...

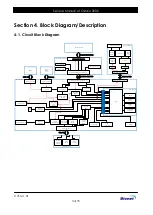
Page 34: ...alog Module Connector User Interface Module Connector Printer Connector USB 1 Port LAN PORT RJ45 Touch controller Backlight Power RS232 Transceiver Ethernet Transceiver Paper Sensor Driver 5V 3 3V 4 2V Power Motor Driver TPH Signal Transceiver Charger Power MCU System Power Switch Coin Battery Buzzer User Interface Module Connector PSU Connector Battery Connector Ready LED AC Battery Indicator LED...

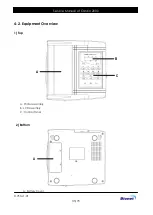
Page 35: ...C7SM 1 01 35 70 Service Manual of Cardio 2000 4 2 Equipment Overview 1 Top A Printer Assembly B LCD Assembly C Control Panel 2 Bottom A Battery Cover A C B A ...

Page 36: ...rdio 2000 3 Front A Printer Cover Switch B Top Cover Assembly C Bottom Cover Assembly 4 Rear A Protective Ground Terminal B Power Switch C AC Power Connection Port D USB Port Use for equipment upgrade only E RJ45 LAN Port A C B C A B D E ...

Page 37: ...C7SM 1 01 37 70 Service Manual of Cardio 2000 5 Right Side A Patient Cable Connection Port 6 Left Side A Handle A A ...

Page 38: ...C7SM 1 01 38 70 Service Manual of Cardio 2000 4 3 Size and Weight Size 290 W X 300 H X 89 5 D mm Weight approx 3 Kg ...

Page 39: ...C7SM 1 01 39 70 Service Manual of Cardio 2000 Section 5 Disassembly and Assembly 5 1 Module Description Base Board CPU Board Power Board SMPS UI Board ...

Page 40: ... LED Ready LED Membrane Keys Power Indicator LED Show the state of connection with AC adapter and a green light indicator when plugging AC adapter into device Battery Indicator LED A light indicator lets you know that there is battery and show your current battery charge strength A red light indicator lets you know that the battery is charging and a green light indicator lets you know the batter i...

Page 41: ... D Input DC Connector SMPS Output E Voltage Regulator 3 ea F LCD Data Connector G Motor Driver H Main Connector I Transformer J Isolation IC 2 ea K Patient Cable Connector L MCU 3 ea The digital part consists of MCU DC DC Converter DC AC Controller and chip which are linked to other external modules A B C D E F G H J I K L ...

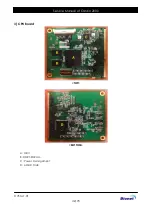
Page 42: ...C7SM 1 01 42 70 Service Manual of Cardio 2000 3 CPU Board TOP BOTTOM A MCU B DDR3 SDRAM C Power Management D eMMC Flash ...

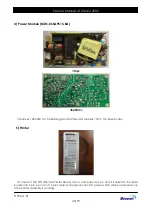
Page 43: ... 240V AC 50 60Hz signal or battery and supplies 15V to the Base board 5 Printer It consists of the TPH Thermal Printer Head motor and paper sensor And it is linked to the Base board with 3 pin 6 pin and 14 pin cable and approves 24V AC power which will be approved only if the printer assembly is working ...

Page 44: ...h Li ion Rechargeable battery It is packed in parallel with 2 sets which are connected with 3 cells in series and 1 spacer The cables of battery consist of 3 pins connector which are VCC GND GND Battery Check as follow picture GND Battery Check cable should be connected to the board because the cable is for checking the status of battery GND GND Battery Check VCC ...

Page 45: ...C7SM 1 01 45 70 Service Manual of Cardio 2000 7 LCD Character LCD It connects to CDUI Board LCD with 14 pin Pin Header It consists of LCD ...

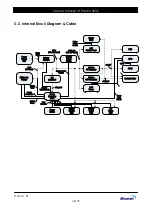
Page 46: ...een LED Battery Orange LED AC Green LED Power Button 24V Printer Power PM 3 3V LDO Printer MCU VSYS 15V 9V 12 6V VLINE 15V VBAT 9V 12 6V SYS_5V SYS_3 3V System Power Control Power State Signals Battery Level Battery Temp User interface Printer Power Control VPM_3 3V Battery Charger LCD Power CPU VCPU Analog Isolator Charger State Control Battery Connection System Power Switch VSYS_SW 15V 9V 12 6V ...

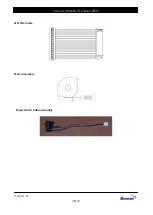
Page 47: ...C7SM 1 01 47 70 Service Manual of Cardio 2000 2 Cable LCD Assembly 40Pin FFC Cable Battery Cable Assembly ...

Page 48: ...C7SM 1 01 48 70 Service Manual of Cardio 2000 QN TPH Cable Motor Assembly Power Switch Cable Assembly ...

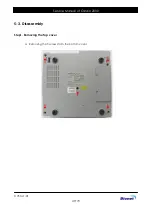
Page 49: ...C7SM 1 01 49 70 Service Manual of Cardio 2000 5 3 Disassembly Step1 Removing the Top cover a Removing the 5 screws from the bottom cover ...

Page 50: ...anual of Cardio 2000 b Removing the Top cover 1 Open the printer cover by pushing slide knob 2 Disconnect 40 pin FFC cable and Main Cable 3 Remove Top cover as shown below Pull 40 pin FFC Cable from the connector of Base board ...

Page 51: ...C7SM 1 01 51 70 Service Manual of Cardio 2000 Bottom Cover Assembly Top Cover Assembly ...

Page 52: ...C7SM 1 01 52 70 Service Manual of Cardio 2000 Step2 Replacing the Printer Assembly a Remove the 4 screws from the bottom cover b Disconnect the 3 printer cables from the Base Board ...

Page 53: ...C7SM 1 01 53 70 Service Manual of Cardio 2000 Printer Assembly Step3 Replacing the Base Board a Remove the 9 screws from the bottom cover ...

Page 54: ...C7SM 1 01 54 70 Service Manual of Cardio 2000 b Disconnect the power connector and the battery cable c Disconnect the power switch cable and ground cable ...

Page 55: ... Service Manual of Cardio 2000 Step5 Replacing the Power Module SMPS a Disassemble Ground cable of Power Board SMPS and AC Inlet Ground cable from Protection Grounding Terminal b Remove the 4 screws from SMPS Bracket ...

Page 56: ...C7SM 1 01 56 70 Service Manual of Cardio 2000 Step6 Replacing the Key Board a Remove the 4 screws from Inside of Top cover ...

Page 57: ...C7SM 1 01 57 70 Service Manual of Cardio 2000 b Remove the 4 screws and disconnect the 40Pin SMD FFC cable Main cable Membrane Keys cable Step7 Replacing the LCD a Remove the 4 screws from LCD bracket ...

Page 58: ...C7SM 1 01 58 70 Service Manual of Cardio 2000 Step8 Replacing the Battery a Remove the 2 screws from Bottom cover b Take out Battery from Bottom cover c Remove the Battery cable connector ...

Page 59: ...01 59 70 Service Manual of Cardio 2000 5 4 Assembly Assemble the reverse way from Step 8 to Step 1 Note Please check whether two parts which is circled in red rubber handle printer lock are connected correctly ...

Page 60: ...C7SM 1 01 60 70 Service Manual of Cardio 2000 Section 6 Replaceable Parts List and Accessory 6 1 Replaceable Part List Top Cover Ass y ...

Page 61: ...C7SM 1 01 61 70 Service Manual of Cardio 2000 Bottom Cover Ass y Printer Module Ass y ...

Page 62: ...C7SM 1 01 62 70 Service Manual of Cardio 2000 EKG2000 Ass y Battery Ass y ...

Page 63: ... 01 63 70 Service Manual of Cardio 2000 Section 7 Connector Pin Assignment 7 1 Patient Cable Port Pin Description Pin Name 1 V2 2 V3 3 V4 4 V5 5 V6 6 GND 7 N C 8 N C 9 RA 10 LA 11 LL 12 V1 13 N C 14 RL 15 N C ...

Page 64: ...C7SM 1 01 64 70 Service Manual of Cardio 2000 Section 8 PCB Part Disposition 8 1 Base Power Analog Board Top Bottom ...

Page 65: ...C7SM 1 01 65 70 Service Manual of Cardio 2000 8 2 CDUI Board Top Bottom ...

Page 66: ...C7SM 1 01 66 70 Service Manual of Cardio 2000 8 3 CPU Board Top Bottom ...

Page 67: ...are Upgrade 9 1 Requirement of Upgrading AdvancePreparation 1 USB memory Note 1 2 Unzip the bionet zip file and copy to USB memory the bionet zip file 3 Copy to bionet_ekg2000 packages folder the bup file Note 1 File system of USB memory must be the FAT32 or FAT ...

Page 68: ...od is same 1 Connect to the usb port that upgrade software files are copied to a usb memory Setup Path key SYS UPGRADE 2 1 Enter the Password 2 2 Run Upgrade Program that check the password Note 1 Note 1 PASSWORD Products that display the current date MMDD key SYS DATE ex Basic Date Aug 25 Password 0825 ...

Page 69: ...C7SM 1 01 69 70 Service Manual of Cardio 2000 3 1 Select the upgrade file 3 2 Press key 4 1 Select the APP version Press key 4 2 Run to upgrade 5 When the upgrade is complete turn off and on ...

Page 70: ... ebionet com U S A sales service representative Bionet America Inc 2691 Dow Ave Suite B Tustin CA92780U S A Toll Free 1 877 924 6638 Fax 1 714 734 1761 e mail support bionetus com Website www bionetUS com European sales service representative MGB Endoskopische Gerä te GmbH Berlin Schwarzschildstraße 6 D 12489 Berlin Germany Tel 49 0 30 6392 7000 Fax 49 0 30 6392 7011 e mail sales mgb berlin de Web...

Reviews: