background image

6

spray tecHnIQue for your Binks cub sl HVlp spray gun

spray tecHnIQue

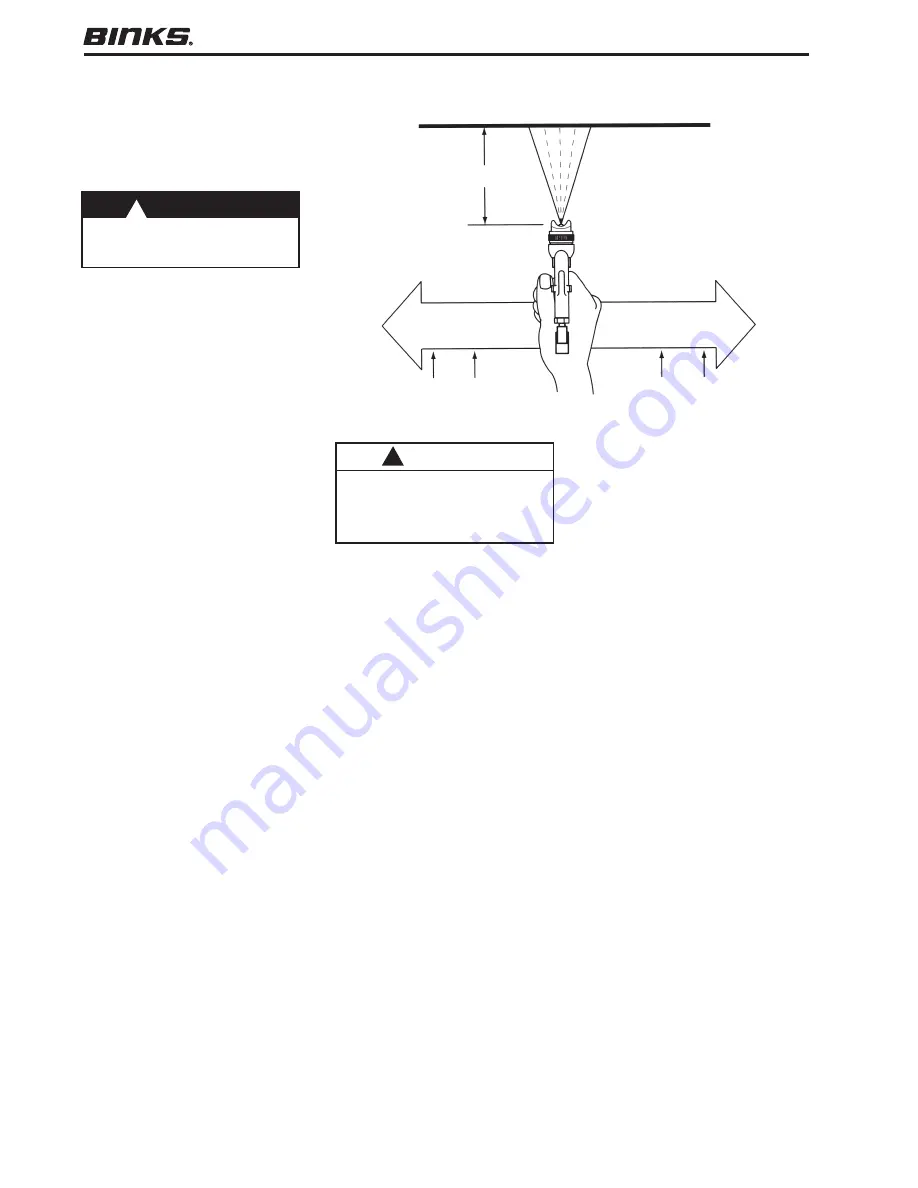
To get a good finish you must handle 
the gun properly. Hold the gun per-
pendicular to the surface you are 

painting. Make each paint stroke par-
allel to the plane of the surface being 
painted. Start the stroke before you 
trigger the gun and release the trigger 
before you end the stroke. This will 
give you accurate control of both gun 
and material and prevent excessive 
build-up of material at the stroke ends.

The distance between the gun and 
surface should be 6"-10" depending 
on the material and the atomizing 
pressure. The material deposited 
should always be even and wet. Lap 
each stroke about half of the preced-
ing stroke to obtain a uniform finish.

If you HaVe trouBle  

wItH gun operatIon  

or resultIng fInIsH
faulty spray pattern

A faulty spray pattern is often caused 
by dried materials around the fluid 
nozzle tip or in the air nozzle left 
behind by improper cleaning. Soak 
these parts in thinner to soften the 
material and remove it with brush  
or cloth.

IntermIttent spray

Fluttering spray is caused by one  
of the following problems:


1.  The nut that attaches the fluid cup 

may be loose. The packing nut 
(28) may be loose. The packing 
(29) may be worn and need 
replacement. The fluid nozzle (35) 
may be loose.

 2.   Insufficient fluid available.  

Refill the cup.

spIttIng

Spitting is caused by anything that 
restricts  the movement of the fluid 
needle assembly (10). The probable 
causes are:
 1.   The packing nut (28) is too tight.
 2.   The fluid needle (13) is bent. You 

may be able to straighten it. 
Otherwise, it must be replaced.

 3.   Dried material has built up on the 

needle or in the fluid nozzle (35).

 4.   Lumps or impurities in the fluid. 

Strain the fluid.

6"-10"

spray tecHnIQue

   CauTion

never use anything metal to clean 

the air nozzle. these parts are pre-

cisely machined, and any damage 

to them will cause faulty spray 

patterns.

!

    Warning

always wear appropriate gloves, eye 

protection and a respirator when 

using your gun.

!

start 

stroke

trigger 

gun

end 

stroke

release

trigger 

Summary of Contents for Cub SL 7011 Series

Page 1: ...ve touch up and detailing industries and is well suited to other specialty finishing and small area applications Several options in fluid nozzle sizes make the gun adaptable to a variety of uses See the Parts List on page 2 and Fluid Nozzle Table on page 7 for these options This Part Sheet contains an exploded drawing and detailed parts list to enable a complete understanding of the gun s construc...

Page 2: ...3 54 4482 Trigger stud 1 24 54 4483 trigger screw 1 25 54 4462 trigger 1 26 54 4125 Spindle cap 1 27 54 4134 seal retainer 1 28 55 847 packing nut 1 29 55 846 Packing 1 30 54 4107 fluid inlet 1 4 NPS m 1 31 54 3928 Plug 10 32 x 1 4 Hex Head 1 32 54 3925 gasket 1 33 20 5740 O Ring 2 020 PTFE 1 34 54 4124 head insert 1 35 fluid nozzle 1 36 air nozzle 1 37 54 4123 RETAINING RING 1 Parts List When ord...

Page 3: ...ube to connector on cup lid 2 Push the other end of vent tube down through loop on side of cup lip 3 Insert the threaded fluid inlet into the swivel nut taking care to position the vent tube away from the gun trigger 4 Rotate the swivel nut until tight to attach the cup to the fluid inlet how to set up your gun for pressure assist operations 1 Screw the swivel nut onto the threaded end of the flui...

Page 4: ...ng your Siphon and Pressure Assist Cups 1 Remove the vent tube or check valve assembly from the gun and cup assembly 2 Unscrew the cup from the gun and rinse cup in solvent 3 Using a cloth soaked in solvent wipe the vent tube or check valve assembly to remove paint Cleaning gun used with pressure containers 1 Shut off air supply to container and release pressure on the container 2 Hold a piece of ...

Page 5: ...taining ring 37 fluid inlet 30 air nozzle 36 fluid nozzle 35 head insert 34 o ring 33 from the front of gun 3 Unscrew the trigger screw 24 from the trigger stud 23 and remove the trigger stud and trigger from the handle assembly 2 Note the direction in which the spindle cap 26 is positioned 4 Use a screwdriver to unscrew the seal retainer 27 5 Push out the front u cup seal and replace it 6 Reassem...

Page 6: ...nozzle left behind by improper cleaning Soak these parts in thinner to soften the material and remove it with brush or cloth Intermittent Spray Fluttering spray is caused by one of the following problems 1 The nut that attaches the fluid cup may be loose The packing nut 28 may be loose The packing 29 may be worn and need replacement The fluid nozzle 35 may be loose 2 Insufficient fluid available R...

Page 7: ...ows Gun Inlet Pressure Nozzle Atomizing Nozzle Atomizing PSI Air Flow SCFM Pressure PSI 20 6 0 3 30 7 5 5 45 10 0 9 50 11 0 10 Gun inlet pressure is measured at the gun inlet fitting with the gun triggered Air Pressure recommendations Type of Material Atomizing PSI Gun Inlet PSI Regulator PSI Primer Surfaces 3 4 20 26 27 33 Light Stains Inks 4 5 26 30 33 38 Acrylic Enamels 6 7 35 40 44 47 Lacquers...

Page 8: ...gun operating pressures We recommend that you use Nozzle Test Gauge Part No 54 4150 shown below for accurate nozzle operating pressures Test gauge ACCESSORY 54 4150 Gauge only 59 299 3 13 2013 Binks All rights reserved Printed in U S A U S A Canada Customer Service 195 Internationale Blvd Glendale Heights IL 60139 630 237 5000 Toll Free Customer Service and Technical Support 800 992 4657 Toll Free...

Reviews: