C. Operation
Cold Lamination
Turn on the power switch ( at the right back of the machine),the temperature will indicate 000 and speed will
indicate 0, adjust the speed according to the cold lamination film in order to achieve a best lamination quality,
then start the cold lamination.
Note: If you shift to cold lamination after hot lamination, then please wait 20mins to 30mins for the temperature
to cool down, then start cold lamination.
Hot Lamination
Turn on the power switch, set the proper temperature among the temperature adjustment buttons according to
the laminating material, then machine start warm up, while the indication window show speed with 3 then
machine start running; when the temperature reach the set temperature, ready light on, it means the roller
temperature already reach the set lamination temperature, adjust the speed according to the material, now you
can start hot lamination. Put the documents into the laminating pouch film, then put the sealed side into the
laminator first, and put it in the middle of the entrance. Wether the temperature is too high or too low, please
adjust the temperature or speed by the keys directly.
Notes:
When insert the pouch into the machine, make sure put it in the middle of the entrance
Must put the sealed side of the pouch into the machine first, or the laminating pouch film will be winkle or
jammed around the roller, if this happen, then please press the REV key immediately to get the pouch film out,
Stop
After finish lamination, first press COLD button, waiting till the roller cool down ( lower than 60
℃
), then turn
off the power switch, this is better for the life span of roller.
Please also disconnect the plug with power supply.
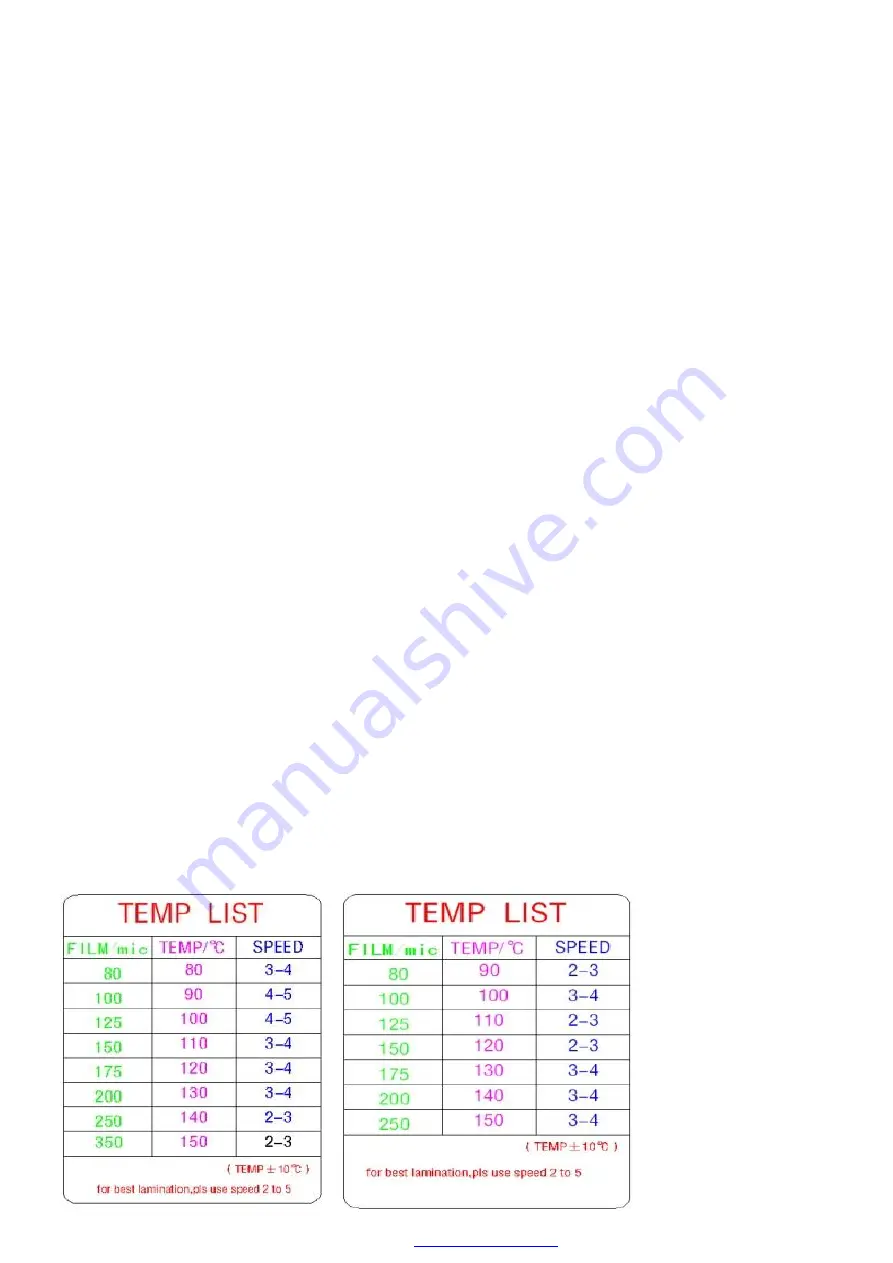
D. Lamination Temperature
These laminators are temperature adjustable model, under 25
℃
room temperature, we recommend the
following temperature for the lamination.
PDA3-336HL PDA3-330SL
–
PDA3-330TL
文件使用
"pdfFactory Pro"
试用版本创建


