Binatone WR3005N3 Quick Installation Manual Download Page 2


Chapter 1.  Connecting the Router 

Before installing the router, you should have connected your PC to the Internet 

through your broadband service successfully. If there are any problems, please 

contact with your ISP. After that, please install the router according to the following 

steps. Don't forget to pull out the power plug and keep your hands dry. 
a.  Power off your PC(s), Cable/DSL modem, and the router. 
b.  Locate an optimum location for the router. The best place is usually near the 

center of the area in which your PC(s) will wirelessly connect. 

c.  Adjust the direction of the antenna. Normally, upright is a good direction. 
d.  Connect the power adapter to the power socket on the router, and the other 

end into an electrical outlet. The router will start to work automatically. 

After finishing the steps above, please choose the operation mode you need and 
carry out the corresponding steps. There are three operation modes supported by 

this router: Standard Wireless Router, Repeater and WISP Client Router. 

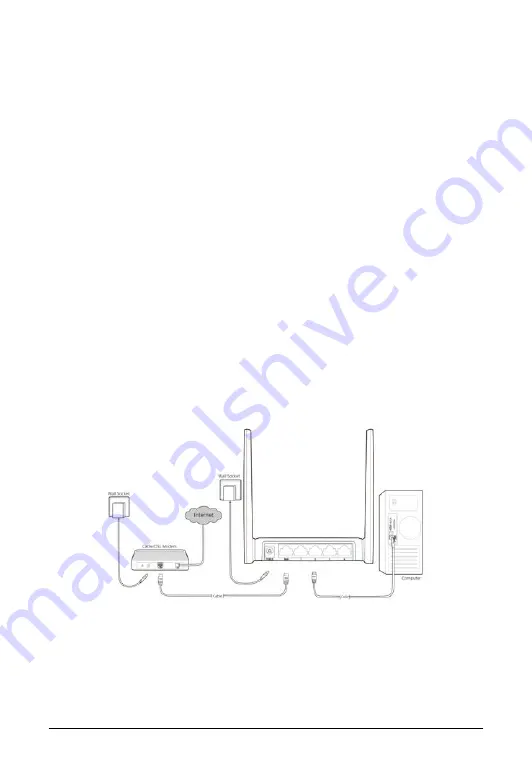
1.1 Standard Wireless Router Mode 

The default mode of the router is Wireless Router. On this mode, it can be 

connected to Cable/DSL Modem or directly connected to a wired network with an 

Ethernet cable. Computers can connect to the device by both wired way through 
the wired port LAN and wireless way. 


a.  Connect the PC(s) to the LAN Ports on the router. 
b.  Connect the DSL/Cable Modem to the WAN port on the router. 
c.  Power on your PC(s) and Cable/DSL modem. 

Summary of Contents for WR3005N3

Page 1: ...Quick Installation Guide WR3005N3 300Mbps Wireless N Router 7109504814 REV1 0 0...

Page 2: ...nect the power adapter to the power socket on the router and the other end into an electrical outlet The router will start to work automatically After finishing the steps above please choose the opera...

Page 3: ...ou repeat a Connect the PC s to the LAN Ports on the router b Power on the PC s or notebook s 1 3 WISP Client Router In WISP mode the router enables multiple users to share Internet connection from WI...

Page 4: ...ser b After a moment a login window will appear Enter admin for the User Name and Password both in lower case letters Then click OK or press Enter Chapter 3 Connecting to the Internet a After successf...

Page 5: ...you select Auto Detect the Router will automatically detect the connection type your ISP provides The appropriate configuration page will be displayed when an active Internet service is successfully...

Page 6: ...provided by your ISP and then click Next IV If PPPoE Russian PPPoE is selected the next screen will appear as shown below Enter the User Name and Password provided by your ISP and then click Next V I...

Page 7: ...ress or domain name provided by your ISP and also enter the corresponding parameters Select Dynamic IP if none of the above parameters are provided Then you just need to enter server IP address or dom...

Page 8: ...d by your ISP and also enter the corresponding parameters Select Dynamic IP if none of the above parameters are provided Then you just need to enter server IP address or domain name provided by your I...

Page 9: ...see the Finish page Click the Finish button to finish the Quick Setup 3 2 Repeater Mode When you choose Repeater Mode on Working Mode page take the following steps a Wireless Repeater page will appea...

Page 10: ...e the second item is selected The target network s SSID will be automatically filled into the corresponding box c Click Next button and then DHCP Server page will appear as shown below You can configu...

Page 11: ...Next For advanced settings please refer to 3 1 Standard Wireless Router b Click the Next button You can configure the basic settings for the wireless network on this page c Click Survey button on the...

Page 12: ...11 d The Finish page is shown below Click the Reboot button to make your wireless configuration take effect and finish the Quick Setup...

Reviews: