BILT HARD TL-PW-336 Operator'S Manual Download Page 20

18


MAINTENANCE


Regular maintenance will extend the life of this pressure washer and improve its performance. The warranty does not 
cover items that result from operator negligence, misuse, or abuse. To receive full value from the warranty, operator must 
maintain the pressure washer as instructed in this manual, including proper storage.


Pre-operation Steps


Before starting the engine, perform the following pre-operation steps:


Check the level of the engine oil and the fuel tank level


Remove any debris that has collected on the pressure washer.


Check water inlet screen for damage. Clean inlet screen if it is clogged.

Check high pressure hose for damage.

Briefly run garden hose to flush out any debris or insects.

Inspect the work area for hazards.

Remove Debris


• 


Use a damp cloth to wipe exterior surfaces. If dirt is caked on, use a soft bristle brush.


After Each Use


Follow the following procedure after each use:


Shut off engine and turn off water supply. Release water pressure by pointing spray gun in a safe direction and
squeezing the trigger.

Disconnect high pressure hose, spray gun, and nozzle. Drain water from items and use a rag to wipe down the outside
of the hose and spray gun.

Empty the water from the pump by pulling the recoil starter 6 times.

Store unit in a clean and dry area.

Use of a pressure washer pump conditioner is recommended, follow the instructions provided by the manufacturer of
the pump conditioner.

Maintenance Schedule


After First 5 Hours


Change Engine Oil


After Each Use


Check and Clean Water Inlet screen


Check High Pressure Hose


Check and Clean Detergent Siphoning Tube


Check Spray Gun for Leaks


Clean Debris


Check Engine Oil Level before starting


Annually (20 hr Use)


Change Engine Oil (Service more often under dirty or dusty conditions)


Annually (50 hr Use)


Check and Clean Air Filter


Annually (100 hr Use)


Service or Replace Spark Plug


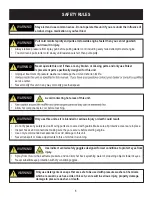
WARNING!


Before inspecting or servicing this machine, make sure the engine is off and no parts are


moving. Disconnect the spark plug wire and move it away from the spark plug.


Summary of Contents for TL-PW-336

Page 1: ...Model TL PW 336 Gasoline Pressure Washer OPERATOR S MANUAL...

Page 2: ...Accessory Hook 11 Attaching Spray Gun 12 Adding Engine Oiland Fuel 13 Operation 15 How to Start Pressure Washer 15 How to Turn Off Pressure Washer 16 How to UseSpray Gun 16 Using Spray Nozzle 17 How...

Page 3: ...ll 888 680 2849 INTRODUCTION Specifications TL PW 336 Pressure PSI 3300 Flow Rate GPM 2 6 Water Temperature o F o C 104 40 Max Hose Length ft 25 Soap Tank Capacity L 1 2 Nozzles 0o 15o 25o 40o Soap En...

Page 4: ...Carbon monoxide gas is a poisonous odorless gas that can cause headache confusion fatigue nausea fainting sickness seizures or death If you start to experience any of these symptoms IMMEDIATELY get f...

Page 5: ...attempt to reach a little further WARNING Moving parts can catch on clothing jewelry and hair Do not wear loose clothing or gloves Remove jewelry or anything else that could be caught in movingparts T...

Page 6: ...ne Use only recommended accessories to avoid damage to thisunit Never transport or make adjustments to this unit while it is running WARNING Avoid contacting hot areas of thisunit Allow hot components...

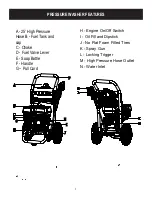
Page 7: ...itch I Oil Fill and Dipstick J No Flat Foam Filled Tires K Spray Gun L Locking Trigger M High Pressure Hose Outlet N Water Inlet A 25 High Pressure Hose B Fuel Tank and cap C Choke D Fuel Valve Lever...

Page 8: ...8 ENGINE PARTS ASSEMBLY...

Page 9: ...0 43 96058 GASKET CYLINDER HEAD 44 91359 BOLT M8X60 45 97108 SPARK PULG 46 241901 ROD PUSH 47 240502 SHROUD 48 91325 BOLT M6X12 49 96045 PACKING HEADCOVER 50 241111 COVER COMP CYLINDER HEAD 51 245702...

Page 10: ...8 PRESSURE WASHER PARTS ASSEMBLY...

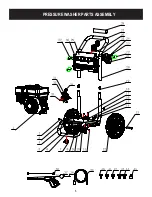
Page 11: ...TTON 20 815470 206 THE FRAME RAILS 21 814154 UPPER BUTT 22 814001 PLASTIC EXPANSION SCREW 23 90024 NUT M6 24 94221 FLAT WASHER 6 12 25 91811 BOLT M6 50 26 92108 SCREW ST4 8 16 27 814058 HIGH PRESSURE...

Page 12: ...roduct by cutting down the sides of the box 3 Remove the product parts and all accessories Make sure all items listed on the packing list are included and not damaged WARNING Do not operate this press...

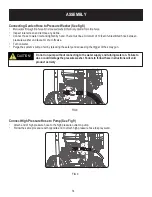
Page 13: ...e bottom up and install the acorn nut Wrench tighten until there is a slight crush on the frame tube Do not over tighten Install Handle See fig 2 Install upper frame handle onto the lower frame by sli...

Page 14: ...s engine was certified for extended periods of time may increase emissions High altitude performance can be improved by specific modifications to the carburetor If you always operate your generator at...

Page 15: ...start theengine To check oil set pressure washer on a level surface wipe dipstick clean then reinsert dipstick without re threading Adding Fuel See fig 7 Set pressure washer on a clean and level surfa...

Page 16: ...m s pump of air by releasing the safety and squeezing the trigger of the spray gun Connect High Pressure Hose to Pump See Fig 9 Attach end of high pressure hose to the high pressure outlet onpump Foll...

Page 17: ...and pull the recoil handle starter cord slowly until resistance is felt then pull rapidly Squeeze the Gun trigger and release the pressure after every failed attempt to start the pressure washer This...

Page 18: ...rigger up or down until it clicks to apply or remove the safety Pull back on the trigger to begin operating pressurewasher FIG 13 FIG 14 WARNING Pull cord recoils rapidly and pulls arm towards engine...

Page 19: ...Rinse surface with cool water before applying cleaner Prepare detergent as required by job For best results follow detergent directions as supplied from manufacturer Remove cap from detergent contain...

Page 20: ...engine and turn off water supply Release water pressure by pointing spray gun in a safe direction and squeezing the trigger Disconnect high pressure hose spray gun and nozzle Drain water from items a...

Page 21: ...om kinking or wear If damage is found immediately replace hose Inspect couplings for damage Immediately replace hose if damage isfound Spray Gun Make sure the spray gun is connected securely Inspect t...

Page 22: ...ctions provided with kit Air Filter Storing Pressure Washer If storing pressure washer for 30 days or more follow the proceduresbelow Add fuel stabilizer to gasoline to keep gasoline from going stale...

Page 23: ...tricted 1 Inspect garden hose for kinks or 2 Water not turned on to full power leaks Make sure you are using 3 Not using high pressure nozzle a large enough garden hose min inch diameter 2 Open water...

Reviews: