background image

1

|


P


a


g


e

VENTAMATIC, LTD.

P.O. Box 728, Mineral Wells, TX 76068-0728 •  PHONE 1-800-433-1626 •  WWW.BVC.COM

BALANCING / WOBBLING TROUBLESHOOTING

Please note that not all ceiling fans are the same, even in the same model—some may move more or less than others.
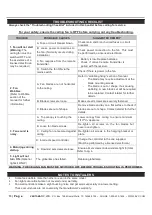
Movement of a couple of centimeters is quite acceptable and does not suggest that the fan will fall down.

Even though all blades are weighted and grouped by weight, it is impossible to eliminate wobble altogether. This s hould
not be considered a fault. Ceiling fans tend to move during operation due to the fact that they are not generally rigidly
mounted.

You may do the following action to reduce the wobbling:

1) Check all the blade mounting screws are tightened and securely.
2) Wobbling problems may result from inconsistent blade level. To check blade level, measure the distance from each

blade tip to the ceiling.

Note:

If measurements are inconsistent:

-

Check that the blade mount screws are not over tightened or loose, which can cause the blade tip to not sit
level;

-

An out of shape blade can cause wobbling, check by removing the blade and lay it on a flat surface. A good flat

blade will lay flat on the surface.

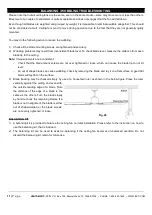
3) Blade tracking may be checked simply by use of a household ruler as shown in the below figure. Place the ruler

vertically against the ceiling and even with
the outside leading edge of a blade. Note
the distance of the edge of a blade is the
same as the others. Turn the blade slowly
by hand to check the remaining blades. If a
blade is not in alignment, the blade is either
out of shape/warped or the blade screws
are not evenly tightened or loose.

BALANCING KIT

Fig. 26

1.

A balancing kit is provided to balance the ceiling fan on initial installation. Please refer to the instruction on how to
use the balancing kit, that is included.

2.

The balancing kit can be used to assist re-balancing if the ceiling fan becomes un-balanced overtime. Do not
discard the balancing kit, retain for future use.

Summary of Contents for ICF84

Page 1: ...FAN OPERATION DC CEILING FAN MODELS ICF84 INSTALLATION OPERATION MAINTENANCE WARRANTY INFORMATION CAUTION READ AND SAVE THESE INSTRUCTIONS FOR SAFE INSTALLATION AND OPERATION Made in Taiwan For additional assistance call our Customer Service Line at 1 800 433 1626 ...

Page 2: ...fixed wiring in accordance with the wiring rules 4 Do not dispose of electrical appliances as unsorted municipal waste use separate collection facilities Contact your local government for information regarding the collection systems available If electrical appliances are disposed of in landfills or dumps hazardous substances can leak into the groundwater and get into the food chain damaging your h...

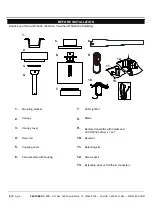
Page 3: ...ck contents You should have the following 1 2 3 4 5 6 7 8 9 10 11 12 1 2 3 4 5 6 7 9 8 10 11 12 13 Mounting bracket Canopy Canopy cover Downrod Coupling cover LED Light Kit Receiver Blade Screws pack 13 Extending wires 40 with pin connector Balancing kits Remote transmitter with holder and 3V CR2032 battery x 1 set Fan assembly with housing ...

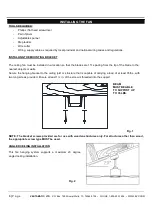
Page 4: ...at the blades are 1 ft spacing from the tip of the blade to the nearest objects or walls Secure the hanging bracket to the ceiling joist or structure that is capable of carrying a load of at least 35lbs with two long screws provided Ensure at least 1 in of the screw is threaded into the support Fig 1 NOTE The bracket screws provided are for use with wooden structures only For structures other than...

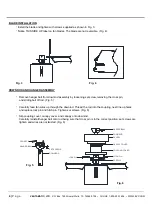
Page 5: ...d hitch pin Tighten set screws Fig 6 Slip coupling cover canopy cover and canopy onto downrod Carefully reinstall hanger ball onto rod being sure that cross pin is in the correct position set screws are tighten and wires are not twisted Fig 6 Install the blade and tighten with screws supplied as shown in Fig 3 Notice THIS SIDE UP label on fan blades The blade are not reversible Fig 4 DOWNROD AND H...

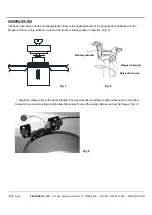
Page 6: ...onto the mounting bracket Ensure the registration slot of the hanger ball is positioned on the stopper of the mounting bracket to prevent the fan from rotating when in operation Fig 8 Adjust the safety cable to the desired length It is recommended to attach a safety cable near the mounting bracket to a secure mounting point to allow the canopy to cover the safety cable as well as the hanger Fig 9 ...

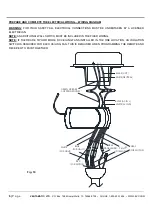
Page 7: ...SWITCH IS REQUIRED FOR EACH CEILING FAN THIS IS REQUIRED WHEN PROGRAMMING THE REMOTE AND RECEIVER TO PAIR TOGETHER Fig 10 N L GRAY SIGNAL WIRE YELLOW FOR MOTOR GRAY FOR MOTOR RED FOR MOTOR BLUE FOR LIGHT WHITE FOR LIGHT WHITE NEUTRAL GREEN OR BARE COPPER GROUND BLACK AC IN L WHITE AC IN N PREPARE AND COMPLETE THE ELECTRICAL WIRING WIRING DIAGRAM 6 P a g e VENTAMATIC LTD P O Box 728 Mineral Wells T...

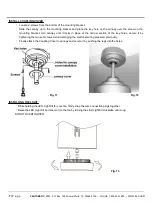
Page 8: ...y until it locks in place at the narrow section of the key holes secure it by tightening the two set screws Avoid damaging the electrical wiring prepared previously Finally attach the Coupling Cover to canopy and secure it by pushing the lugs into the holes Fig 11 Fig 12 INSTALLING THE LIGHT While holding the LED Light Kit for your fan firmly snap the wire connection plugs together Raise the LED L...

Page 9: ...8 P a g e VENTAMATIC LTD P O Box 728 Mineral Wells TX 76068 0728 PHONE 1 800 433 1626 WWW BVC COM USING YOUR CEILING FAN Fig 14 ...

Page 10: ...9 P a g e VENTAMATIC LTD P O Box 728 Mineral Wells TX 76068 0728 PHONE 1 800 433 1626 WWW BVC COM ...

Page 11: ...eed after installation Loss of control No reverse function after installation Loss of control Remote cannot communicate with the receiver Solution If the fan runs at the highest speed continuously it means the wiring of the installation is correct When the fan operates on high speed only or fails to operate in reverse function or any other command s it is recommended to repair the communication pa...

Page 12: ...surements are inconsistent Check that the blade mount screws are not over tightened or loose which can cause the blade tip to not sit level An out of shape blade can cause wobbling check by removing the blade and lay it on a flat surface A good flat blade will lay flat on the surface 3 Blade tracking may be checked simply by use of a household ruler as shown in the below figure Place the ruler ver...

Page 13: ...ts with rubber cushioning or with ball joints to allow free movement Please note that not all ceiling fans are the same even in the same model some may move more or less than others NORMAL WEAR AND TEAR Threaded components working slightly loose or blade carriers even slightly bent due to vigorous cleaning or bumping can cause extra wobble and noise THIS IS NOT COVERED UNDER WARRANTY but a little ...

Page 14: ...d Contact retailer for further details B Blade screws are loose Make sure all screws are securely fastened C Blades are out of shape Remove blade and lay on a flat surface to check if blades are out of shape Contact retailer for further details 3 Fan sound is noisy A Top canopy is touching the ceiling Lower canopy from ceiling to ensure minimum 1 10th in clearance B Loose fan blade screws Re tight...

Page 15: ...ement of any part or component and the shipping charges incurred for the repair or replacement and return to you of any part or component not covered by this warranty including parts or components damaged by you The company reserves the right to demand and receive written evidence of the date of purchase before undertaking its obligations under this warranty The right to demand and receive written...

Reviews: