background image

- 28 -

Warranty & Service

This appliance is guaranteed for 3 years from the 
date of purchase. It has been carefully produced 
and meticulously checked before delivery. Please 
keep your receipt as proof of purchase. Contact 
your service centre by telephone in case of 
questions pertaining to the warranty.
Your goods can be transmitted free of cost only in 
this manner.
The warranty covers only material or manufacturing 
faults, not normal wear or damage to fragile parts 
such as switches or rechargeable batteries.
The appliance is intended solely for private, not 
commercial, use. If this product has been subjected 
to improper or inappropriate handling, abuse, or 
interventions not carried out by one of our autho-
rised sales and service outlets, the warranty will 
be considered void. This warranty does not 
affect your statutory rights.

DES Ltd

Units 14–15
Bilston Industrial Estate
Oxford Street
Bilston
WV14 7EG
Tel.: 0870 787 6177
Fax: 0870 787 6168

e-mail: [email protected]

Importer

KOMPERNASS GMBH
BURGSTRASSE 21
D-44867 BOCHUM

www.kompernass.com

IB_KH701_E1462_GB_LB5  04.10.2007  13:18 Uhr  Seite 28  

Summary of Contents for KH 701

Page 1: ...ID Nr KH701 10 07 V1 ROBOT DE COCINA Instrucciones de manejo ROBOT DA CUCINA Instruzioni per l uso FOOD PROCESSOR Operating Instructions 5 ROBOT DE COCINA ROBOT DA CUCINA K CHENMASCHINE Bedienungsanl...

Page 2: ...1 2 3 4 a d s y q w e r i o u t q w q w f g h j k l q w q w CV_KH701_E1462_LB5_V1 09 10 2007 8 46 Uhr Seite 5...

Page 3: ...ar con el brazo amasador la varilla para batir o la varilla para mezclar 4 Trabajar con el picador 5 Trabajar con el mezclador 6 Limpieza y cuidados 7 Soluci n de fallos 7 Evacuaci n 8 Garant a y serv...

Page 4: ...les as como su falta de conocimientos o de experiencia les impida hacer un uso seguro del mismo si no est n bajo vigilancia o han sido instrui dos correctamente Vigile a los ni os para asegurarse de q...

Page 5: ...ezclar con tapa u Picador i Disco rallador o Disco raspador reversible a Eje impulsior del picador s Disco de corte reversible d Tapa con compactador para el picador f Tecla de liberaci n g Interrupto...

Page 6: ...y La base del bol para mezclar y debe introducirse en las cavidades k del aparato Pulse la tecla de liberaci n f y lleve el brazo basculante h a la posici n de funcionamiento 1 v ase cap tulo Posicion...

Page 7: ...to Introduzca los ingredientes o cu lelos a trav s de las aperturas de llenado de la tapa Despu s del trabajo Conecte el aparato a trav s del interruptor girato rio g Coloque el interruptor giratorio...

Page 8: ...spu s del trabajo Conecte el aparato a trav s del interruptor gira torio g Gire el picador u en sentido antihorario y ret relo Desmonte el picador u y limpie todas las piezas v ase cap tulo Limpieza y...

Page 9: ...clador Peligro de lesiones por cuchillas afiladas No toque la cuchilla del mezclador con las manos desnudas Atenci n No utilice productos de limpieza abrasivos Para la limpieza introduzca agua con un...

Page 10: ...ontacto por tel fono con su punto de servicio habitual ste es el nico modo de garantizar un env o gratuito La garant a cubre los defectos de fabricaci n o del material pero no las piezas sujetas a des...

Page 11: ...10 seg 3 4 Zanahorias pata tas pepinos 500gr 1 25 seg 2 3 4 Zanahorias pata tas pepinos 500gr 2 50 seg 2 3 4 Zanahorias pata tas pepinos 500gr 25 seg 2 3 4 Zanahorias pata tas pepinos 500gr 1 25 seg 2...

Page 12: ...10...

Page 13: ...sta e frullino 14 Funzionamento con tritatutto 15 Funzionamento con mixer 16 Pulizia e cura 17 Eliminazione dei guasti 17 Smaltimento 17 Garanzia assistenza 18 Importatore 18 Quantit di riempimento co...

Page 14: ...o mentali o prive dell esperienza e o della conoscenza necessaria a meno che tali persone non vengano sorvegliate da un responsabile per la sicurezza o abbiano ri cevuto indicazioni sull impiego dell...

Page 15: ...Disco di tritatura o Disco di grattugia a Albero motore tritatutto s Disco di taglio d Coperchio con pressa per il tritatutto f Tasto di sbloccaggio g Interruttore rotante h Braccio girevole j Motore...

Page 16: ...pitolo Posizioni di esercizio figura 1 Posizionare l interruttore rotante g su P e mante nere fino a quando il motore j si ferma in posi zione di parcheggio figura 2 Se il motore non si muove signific...

Page 17: ...enitore y Pulire tutti gli elementi v capitolo Pulizia e cura Funzionamento con tritatutto Avviso assicurarsi che sul braccio girevole h non si trovi il gancio da impasto q la frusta e o il frullino w...

Page 18: ...l mixer figura 7 Collocare il mixer r la marcatura della base deve poggiare sulla marcatura dell apparecchio base e ruotare in senso antiorario fino all arresto figura 8 Versare gli ingredienti Quanti...

Page 19: ...matico di sicurezza Impostare l interruttore rotante g su 0 Staccare la spina dalla presa Fare raffreddare l apparecchio per 15 minuti Se dopo 15 minuti l apparecchio non ancora completamente raffredd...

Page 20: ...e garantire una spedizione gratuita della merce La prestazione della garanzia vale solo per difetti del materiale o di fabbricazione Il prodotto desti nato esclusivamente all uso domestico e non a que...

Page 21: ...iolo da insalata 500g 1 25 sec 2 3 4 Carota patata cetriolo da insalata 500g 2 50 sec 2 3 4 Carota patata cetriolo da insalata 500g 25 sec 2 3 4 Carota patata cetriolo da insalata 500g 1 25 sec 2 3 4...

Page 22: ...20...

Page 23: ...isks 24 Working with the food processor 25 Working with the mixer 26 Cleaning and care 27 Troubleshooting 27 Disposal 27 Warranty Service 28 Importer 28 Recommended filling quantities 29 Read these op...

Page 24: ...in experience and or knowledge unless they are supervised by a person responsible for their safety or receive from this person instruction in how the appliance is to be used Children should be superv...

Page 25: ...u Food processor i Rubbing disc o Rasper turning disc a Drive shaft for food processor s Cutter turning disc d Lid with stodger for the food processor f Unlocking button g Turn switch h Swivel arm j D...

Page 26: ...tion 1 see chapter Operating positions Fig 1 Place and hold turn switch g in position P until the drive motor j remains stationary in the park position Fig 2 Should the drive motor not move it is alre...

Page 27: ...es from the drive motor j Remove the mixing bowl y Clean all parts see chapter Cleaning and care Working with the food processor Note Ensure that on the swivel arm h neither the kneading hooks q the w...

Page 28: ...Remove the drive protection lid for the mixer Fig 7 Fit the mixer r Marking on the base onto the marking on the base machine and turn it anti clockwise as far as it will go Fig 8 Fill with ingredient...

Page 29: ...has overheated and triggered the automatic safety switch off Place the rotary switch g at 0 Remove the plug from the wall socket Allow the appliance to cool for 15 minutes If after 15 minutes the app...

Page 30: ...normal wear or damage to fragile parts such as switches or rechargeable batteries The appliance is intended solely for private not commercial use If this product has been subjected to improper or ina...

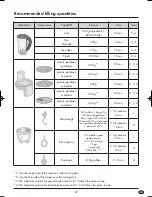
Page 31: ...cubes 110g 10 sec 3 4 Fluids 1000ml 10 sec 3 4 carrots potatoes cucumber 500g 1 25 sec 2 3 4 carrots potatoes cucumber 500g 2 50 sec 2 3 4 carrots potatoes cucumber 500g 25 sec 2 3 4 carrots potatoes...

Page 32: ...30...

Page 33: ...ken Schlag und R hrbesen 34 Arbeiten mit Durchlaufschnitzler 35 Arbeiten mit Mixer 36 Reinigen und Pflegen 37 Fehler beheben 37 Entsorgen 37 Garantie Service 38 Importeur 38 Empfohlene F llmengen 39 L...

Page 34: ...benutzt zu werden es sei denn sie werden durch eine f r ihre Sicherheit zust ndige Person beaufsichtigt oder erhielten von ihr Anweisungen wie das Ger t zu benutzen ist Kinder sollten beaufsichtigt we...

Page 35: ...el u Durchlaufschnitzler i Reibscheibe o Raspel Wendescheibe a Antriebswelle Durchlaufschnitzler s Schneid Wendescheibe d Deckel mit Stopfer f r den Durchlaufschnitzler f Entriegelungstaste g Drehscha...

Page 36: ...triebsposition 1 siehe Kapitel Betriebspositionen bringen Bild 1 Drehschalter g auf P stellen und festhalten bis der Antrieb j in Parkposition stehen bleibt Bild 2 Bewegt sich der Antrieb nicht ist di...

Page 37: ...he Kapitel Reinigen und Pflegen Arbeiten mit Durchlaufschnitzler Hinweis Stellen Sie sicher dass sich am Schwenkarm h weder Knethaken q Schlag e oder R hrbesen w befinden Um das Ger t f r den Betrieb...

Page 38: ...pitel Betriebspositionen bringen Mixerantriebsschutzdeckel abnehmen Bild 7 Mixer r aufsetzen Markierung am Sockel auf Markierung am Grundger t und gegen den Uhrzeigersinn bis zum Anschlag drehen Bild...

Page 39: ...chaltung ist aktiviert Drehschalter g auf 0 stellen Netzstecker aus der Steckdose ziehen Das Ger t 15 Minuten abk hlen lassen Ist das Ger t nach den 15 Minuten noch nicht vollst ndig abgek hlt wird es...

Page 40: ...le oder f r Besch digungen an zerbrechlichen Teilen z B Schalter oder Akkus Das Produkt ist lediglich f r den privaten und nicht f r den gewerblichen Gebrauch bestimmt Bei missbr uchlicher und unsachg...

Page 41: ...4 Eisw rfel 110g 10 sek 3 4 Fl ssigkeiten 1000ml 10 sek 3 4 Karotte Kartoffel Salatgurke 500g 1 25 sek 2 3 4 Karotte Kartoffel Salatgurke 500g 2 50 sek 2 3 4 Karotte Kartoffel Salatgurke 500g 25 sek...

Page 42: ...40...

Reviews: