A:
9300 S.W. Gemini Drive Beaverton, OR 97008 USA
W:
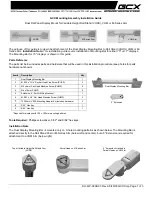
Figure 1.
E200-UMK Assembly
INSTALLATION
Flush Mounting Assembly Instructions
1. Attach the Universal Mount Bracket to the mounting
surface. Refer to Bolt Pattern for hole placement.
Note:
Wall Mounting fasteners must be supplied by
the Installer as mounting requirements may vary.
2. Install two (2) 3.5 x 16mm Philips truss-head deep
thread screws into the reinforced slot in the enclosure,
one on each side of the loudspeaker enclosure.
(Figure 1) These will be the screws at the top of the
bracket. Slide the loudspeaker enclosure into the top
of the bracket until the two screws rest in the bracket
slots.
3. Tighten the two top screws. Install and tighten four (4)
additional 3.5 x16mm Philips truss-head deep thread
screws (two (2) on each side) through the slots of the
bracket into the reinforced slot in the enclosure.
Note:
Pilot holes in the enclosure are factory-
suggested mounting positions but the bracket may
be mounted at any position along the length of the
column as needed to suit a particular installation.
4. Secure the loudspeaker with a safety cable attached
to the loop on the top (Figure 2). The cable should
be attached to the included bracket, and mounted to
a secondary mounting point close to the top of the
enclosure to avoid any kinetic force if the primary
mount should fail.
E200-UMK Bolt Pattern
(will accommodate third-party
mounting products)
IMPORTANT:
When mounting an ENT200 loudspeaker,
always attach the safety point at the top of the enclosure to the
safety cable support bracket (included). The installer is
responsible for sourcing the proper safety cable to meet all applicable
local building codes and standards. The safety cable must be of
sufficient strength to suspend the loudspeaker in the event that the
primary mounting bracket should fail. After final positioning of the
loudspeaker, make sure to remove as much slack as possible from the
safety cable to minimize shock load in the event of bracket failure.
(6) M3.5 x 16
Philips truss-head
sheet metal screws
Universal Mount Bracket
16JUL2021
Note:
Every effort has been made to ensure that the information
contained in this manual was complete and accurate when
printed. However, due to ongoing technical advances, changes or
modifications may have occurred that are not covered in this manual.
The latest version is available at
Figure 2.
Attaching the safety cable
Safety Cable Bracket
Safety Cable
(not included)
Safety Cable Loop
CONTACT US
Email:
Web:
Screw into loudspeaker
enclosure first (see Step 2)


