background image

X3 Elliptical


Page 29 

CONSOLE OPERATION 


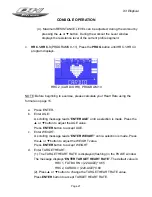
4

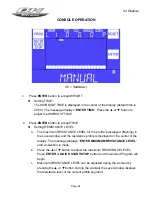
  Initial appearance of program display:   


CP.1 (MANUAL) 


CP.2 (ROLLING HILL) 


Summary of Contents for X3 - V1

Page 1: ... MANUAL BH FITNESS 20155 Ellipse Foothill Ranch CA 92610 Phone 949 206 0330 866 325 2339 USA Canada Fax 949 206 0013 Email fitness bhnorthamerica com Web www bhnorthamerica com and www bhfitness com Issued 21 August 2008 v1 ...

Page 2: ...ORTANT SAFETY INFORMATION 3 ASSEMBLY 5 HEART RATE CALCULATION 16 CONSOLE OPERATION 17 Buttons 19 Modes 21 Programs 22 Manual Program CP 1 23 Custom CP 8 25 CP 1 CP 7 26 HRC 1 HRC 3 PROGRAMS 9 11 27 Appearance of Program Displays 29 WARRANTY 35 ...

Page 3: ...explaining safety instructions to each user 10 The unit can only be used by one person at a time Unit Safety 1 For safety maintain a minimum clearance around the unit Maintain 18 inches on the front and on each side of the unit plus 24 inches at the rear of the unit 2 Install and use the unit on a flat stable surface with some type of protection for the floor or carpet Do not place it alongside wa...

Page 4: ...s a handle 12 Keep the electrical cord away from heated surfaces 13 Never operate the unit when the air openings are blocked Keep the air openings free of lint hair and the like 14 Do not drop or insert any objects into any openings 15 Do not use outdoors or near water 16 Do not operate where aerosol spray products are being used or where oxygen is being administered Adapter Safety The Adapter may...

Page 5: ...Cover 2 56 Front Stabilizer 1 63 Rear Stabilizer 1 70 Left Rocker 1 71 Right Rocker 1 111 Left Pedal Assembly 1 112 Right Pedal Assembly 1 131 Left Handrail 1 132 Right Handrail 1 138 Computer 1 141 Bottle 1 142 Bottle Holder 1 143 Bolt Cover 4 144 Pedal 2 145 Transformer 1 172 Lubricant 1 182 Rear Stabilizer Cover 1 ...

Page 6: ... Ø25 x Ø9 x 2 0t 2 152 Truss Hex Screw M8 x 15 7 154 Arc Washer Black 7 155 Screw M10 x 95 2 156 Acorn Nut M10 4 157 Spring Washer M10 x 3 0t 8 158 Washer Ø20 x Ø10 2 x 3t 8 159 Bolt M8 x 50 4 160 Spring Washer M8 x 2 0t 4 161 Arc Washer Nickel printed 4 162 Acorn Nut M8 4 163 Hex Bolt M10x85 4 167 Round Head Philips Screw M6 x 12 6 168 Screwdriver 1 169 Lug Open Spanner Wrench 13 17 Ends 1 170 He...

Page 7: ...X3 Elliptical Page 6 ASSEMBLY Assembly Fasteners ...

Page 8: ...X3 Elliptical Page 7 ASSEMBLY 1 Assemble the front stabilizer 56 to the main frame 1 with bolt 155 washers 157 158 and acorn nut 156 ...

Page 9: ...d acorn nuts 156 Only hand tighten the bolts until the next step 3 A Fasten the rear stabilizer 63 and frame 1 with washers 158 157 and bolts 163 3 B Tighten the bolts nuts in Step 2 3 C Apply lubricant 172 to the upper mating surface of both rear stabilizers 63 rails Apply lubricant 172 to upper surface of rails ...

Page 10: ... with middle control wire 31 Fasten the uprights to frame 1 with washers 154 148 and bolts 152 5 Connect the upper control wire 51 and computer 138 wire Connect the hand pulse wires 52 and computer wires Then secure the computer on the upright 45 with screws 140 Insert the book shelf iron string 183 into computer ...

Page 11: ... right pedal assembly 111 112 onto the frame with washers 147 148 and bolt 146 Install bolt cover 143 7 Look for L and R labels on the handrails Slide the protecting covers 46 and wave washers 18 onto the upright 45 Install the left and right handrails 131 132 washers 151 148 and bolts 146 on the uprights Install bolt cover 143 ...

Page 12: ... for L and R labels Fasten the rockers 70 71 onto handrails 131 132 with bolts 159 washers 161 160 and acorn nut 162 9 Fasten the left and right rockers 70 71 to the left and right pedal assemblies 111 112 with bolts 116 and nylon nuts 115 ...

Page 13: ...BLY 10 Fasten the pedal 144 on the left and right pedal assembly 111 112 with screws 167 11 Remove screws 49 from the upright 45 Fasten the bottle holder 142 onto the upright with screw 49 Insert the bottle 141 into bottle holder ...

Page 14: ...nd the unit does not lean to the left or right Adjust up rear nuts 181 hand tight only Adjust the middle foot pads 69 to the floor Adjust up middle nuts 181 hand tight only Try to slide a piece of paper under all four foot pads 69 to verify that they all touch the floor Adjust up four nuts 181 with double open spanner wrench 180 to tighten foot pads 69 Try to slide a piece of paper under all four ...

Page 15: ...lizer 63 with screws 43 14 The users can adjust the distance between the pedals 144 according to personal requirement Turn the knob 126 to adjust the distance and set both pedals to the same number A number from 1 to 5 will appear in the window at the top of each pedal Number Display Window ...

Page 16: ...X3 Elliptical Page 15 ASSEMBLY 15 Insert the transformer 145 into the front of the frame 1 Connect the transformer to a 110 120V 15 or 20 Amp dedicated circuit ...

Page 17: ...ur age in years from the number 220 To ensure that you are exercising correctly try to keep between 65 and 85 of your maximum heart rate value For example the maximum heart rate that a 30 year old user must not exceed is 220 30 190 heart beats per minute BPM 190 x 0 65 123 heart beats per minute 190 x 0 85 161 heart beats per minute Do not exceed 85 So the heart rate exercise range for a 30 year o...

Page 18: ...X3 Elliptical Page 17 CONSOLE OPERATION ...

Page 19: ...Overview 1 When the user holds both hand grip sensor or wears a chest belt the symbol flashes in the PULSE field The display range is 50 210 BPM When only P is shown the pulse is not being detected This can be caused by a disconnected HR cable or unstable heart rate 2 End of Workout In a workout where Time is counting down from a set value to 0 00 the console beeps when the Time reaches 0 00 A mes...

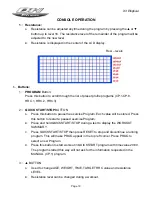
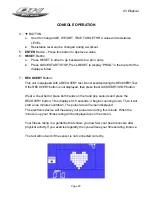
Page 20: ...button to pause the exercise Program Each value will be stored Press this button to restart a paused exercise Program B Press and hold QUICKSTART STOP during a test to display the WORKOUT SUMMARY C Press QUICKSTART STOP then press RESET to stop and discontinue a running program This will make PROG appear in the top left corner Press PROG to select a new Program D Press this button to start workout...

Page 21: ...If the RECOVERY button is not displayed then press the QUICKSTART STOP button Wear a chest belt or place both hands on the hand grip sensors and press the RECOVERY button Time displays 0 10 seconds it begins counting down Then it will start a one minute countdown The pulse rate will remain displayed The electronic device will measure your pulse rate during this minute When the minute is up your fi...

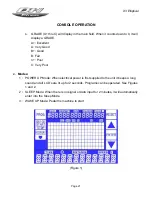
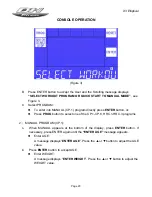
Page 22: ... Fair C Poor C Very Poor 4 Modes 1 POWER UP Mode When electrical power is first supplied to the unit it beeps a long sound and all LCD s are lit up for 2 seconds Programs can be operated See Figures 1 and 2 2 SLEEP Mode When there is no signal or data input for 2 minutes it will automatically enter into the Sleep Mode 3 WAKE UP Mode Pedal the machine to start Figure 1 ...

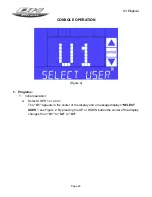
Page 23: ...gure 2 5 Programs 1 Initial operation A Select USER 1 or 2 or 3 The U1 appears in the center of the display and a message displays SELECT USER see Figure 2 By pressing the UP or DOWN button the center of the display changes from U1 to U2 to U3 ...

Page 24: ...ENTER button or z Press PROG button to select one of the CP 1 CP 8 HRC 1 HRC 3 programs 2 MANUAL PROGRAM CP 1 A When MANUAL appears at the bottom of the display press ENTER button If necessary press ENTER again until the ENTER AGE message appears z Enter AGE A message displays ENTER AGE Press the or button to adjust the AGE value B Press ENTER button to accept AGE z Enter WEIGHT A message displays...

Page 25: ... RESISTANCE LEVEL for the profile is displayed flashing in the Level window and the resistance profile is displayed on the center of the display The message displays ENTER MAXIMUM RESISTANCE LEVEL until a selection is made b Press the or button to adjust the maximum RESISTANCE LEVEL Press ENTER or QUICK START STOP button and the workout Program will begin c Maximum RESISTANCE LEVEL can be adjusted...

Page 26: ... Press the PROG button until the CP 8 program displays a Press ENTER b There is a CP 8 Custom Profile stored in the memory A message displays CREATE CUSTOM RESISTANCE PROFILE c Press or button to adjust RESISTANCE LEVEL in each profile segment d Press ENTER button to accept RESISTANCE LEVEL and move to the next profile segment e Press and hold the ENTER button for three seconds to accept Custom pr...

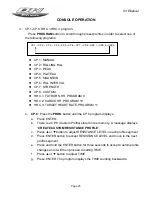
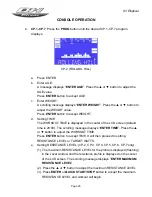
Page 27: ...the LCD screen default time is 20 00 The scrolling message displays ENTER TIME Press the or button to adjust the WORKOUT TIME Press ENTER button to accept TIME It will then proceed to setting RESISTANCE LEVEL or TARGET WATTS e Setting RESISTANCE LEVEL CP 2 CP 3 CP 4 CP 5 CP 6 CP 7 only 1 The maximum RESISTANCE LEVEL for the profile is displayed flashing in the Level window and the resistance profi...

Page 28: ...a Press ENTER b Enter AGE A scrolling message reads ENTER AGE until a selection is made Press the or button to adjust the AGE value Press ENTER button to accept AGE c Enter WEIGHT A scrolling message reads ENTER WEIGHT until a selection is made Press the or button to adjust the WEIGHT value Press ENTER button to accept WEIGHT d Enter TARGET HEART 1 The TARGET HEART RATE is displayed flashing in th...

Page 29: ...N e Enter TIME 1 The WORKOUT TIME is displayed in the center of the display default time is 20 00 The message displays ENTER TIME 2 Press the or button to adjust the WORKOUT TIME 3 Press ENTER button to accept the TIME and begin the workout ...

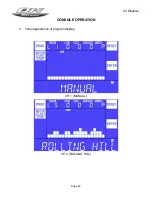
Page 30: ...X3 Elliptical Page 29 CONSOLE OPERATION 4 Initial appearance of program display CP 1 MANUAL CP 2 ROLLING HILL ...

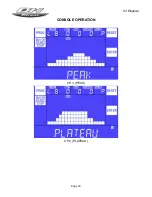
Page 31: ...X3 Elliptical Page 30 CONSOLE OPERATION CP 3 PEAK CP 4 PLATEAU ...

Page 32: ...X3 Elliptical Page 31 CONSOLE OPERATION CP 5 MOUNTAIN CP 6 HILL INTERVAL ...

Page 33: ...X3 Elliptical Page 32 CONSOLE OPERATION CP 7 STRENGTH CP 8 CUSTOM ...

Page 34: ...X3 Elliptical Page 33 CONSOLE OPERATION HRC 1 FAT BURN HR PROGRAM 9 HRC 2 CARDIO HR PROGRAM 10 ...

Page 35: ... 00 99 00 minute second 20 00 No 2 DISTANCE 0 00 99 99 mile or km 0 00 No 3 SPEED 0 0 99 9 mile or km per hour 0 0 No 4 PULSE 50 210 bpm 0 No 5 CALORIES 0 999 kcal 0 No 6 WATT 0 999 watt 0 No 7 RPM 0 250 rpm 0 No 8 AGE 10 100 year 30 Yes 9 1 WEIGHT ENGLISH 2 WEIGHT METRIC 50 300 lb 20 150 kg 150 70 Yes Yes 10 BRAKE RESISTANCE LEVEL L1 L16 L1 No ...

Page 36: ...alifornia 92610 USA For troubleshooting assistance or to confirm your claim please phone 949 206 8152 800 475 7899 USA only 866 325 2339 USA Canada BH FITNESS extends the following exclusive limited warranty which shall apply only to the use of the device in the home Any other use of the device shall void this warranty FRAME Lifetime Home Warranty BH Fitness warrants the Frame against defects in w...

Page 37: ...r and the product must be located within the retailer s service area Labor warranty does not include the travel time and or expense that may result from the unit being outside of the seller or repair technician s normal service zone EXCLUSIONS AND LIMITATIONS This warranty applies only to the original owner and is not transferable This warranty is expressly limited to the repair or replacement of ...

Reviews: