background image

EN-18

Other Mode

Navigation Operations

To navigate by the unit, simply select the 

desired navigation application on the main 

menu. Then navigate by the touch screen. 

AUX Operations

Select [A/V In 1]/[A/V In 2] on the main menu 

to visit auxiliary device. 

Steering Wheel Control

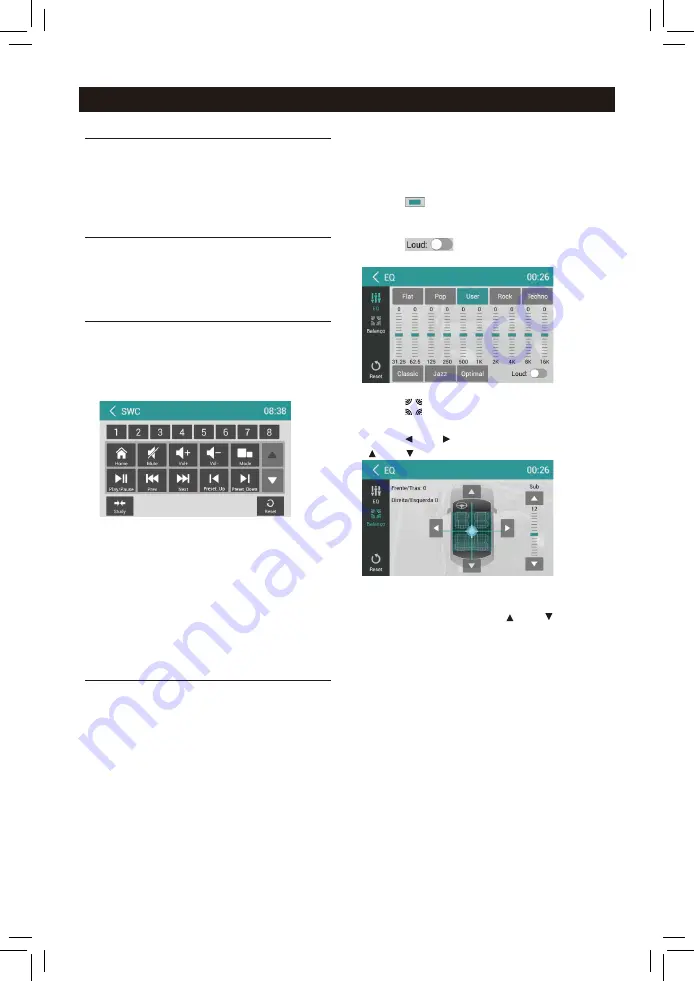
Select [SWC] on the main menu to enter SWC 

setting menu.

1.  Touch number button to select a SWC 

button.


2.  Select a function.

3.   Press each individual steering wheel control 

button for each corresponding function.

4.  Touch [Study] to program.

5.   Once the final steering wheel control button 

is programmed, the functions are saved 

and the programming will end.

6.  Touch [ Reset ] to reset the programming.

File Explorer

Select [File Explorer] on the applications menu 

to view the files and folders on the SD card.

The USB files and folders are in the folder 

named "external_usb".

You  can  install  applications  and  edit  files/ 

folders.

Select [EQ] on the menu to enter sound 

setting mode.

Touch to select a preset EQ on upper side of 

the screen from Flat, Pop, User,Rock, Techno,  

Classic and Jazz.

Touch [ 

 ] to adjust the level, Frequency.

Touch [ Reset ]to cancel the equalizer function 

settings.

Touch [ 

 ] to turn on/off the loud.

Touch [ 

 ] to enter 

Fader/Balance/

Subwoofer setting menu.

Touch [   ] or [   ]

 to setup Balance, touch


[   ] or [   ] to setup Fader.

Sub Woofer

 Sub woofer Level: Touch [   ] or [   ] to adjust 

subwoofer Level.

Sound setting

Summary of Contents for BT5200

Page 1: ...2 Din DVD Multimedia Station Built in Navigation Bluetooth BT5200 Instrucciones de Operación ...

Page 2: ...r smell Only connect the unit to a 12 volt power supply with proper negative grounding MUTE OK MUTE OK Never install this unit where the operation and condition for driving safely is compromised MUTE OK MUTE OK Never use the video display while the car is in motion The use of video playback while driving is a violation of traffic laws and increases the risk of traffic accidents MUTE OK MUTE OK MUT...

Page 3: ...etergent can be used 3 When playing a new disc New disc may have some rough spots around the inner and outer edges If such a disc is used remove these rough spots with a pencil or ball point pen etc Precautions Contents Precautions 1 Control Panel 3 Remote Control 4 Basic Operations 6 Turn on off the power 6 Mute 6 Adjust the Volume 6 Playing Source Selection 6 When Vehicle is Put in Reverse 6 Whe...

Page 4: ...Button Show main menu press Show main options long press 5 Button Back to previous MENU 6 Volume Increase Decrease the volume 7 Microphone Built in and External Microphone We recommend to use External Microphone for better Quality Internal Mic is just for urgent use in case of External Mic broken 8 Disc Slot Insert the disc with label side facing up 9 Map Card Slot 2 3 4 5 6 1 7 8 9 ...

Page 5: ...ack 11 Setup menu 12 Enter OK key 13 Move the cursor up down left right Up down Manual tuning 14 Numeric keys 15 Mute the volume 16 Unit power 17 Select DVD subtitle language 18 Select DVD angle 19 Return to previous display 20 Main menu 21 Clear information 22 Hang up 23 Previous Next Auto tuning long press Fast backward forward long press 24 Display settings 25 Adjust volume 26 Play Pause 27 Go ...

Page 6: ...tions If the remote control doesn t work change the battery 5 Use button shaped lithium battery CR2025 3V only 6 DO NOT recharge disassemble heat or expose the battery to fire 7 Insert the battery in proper direction according to the and 8 Store the battery out of children reach it can be hazardous if swallowed to avoid the risk of accident Uninstall Battery Slide out the battery compartment tray ...

Page 7: ...ource mode you have selected When Vehicle is Put in Reverse If the rear view video camera is connected the unit automatically switches to CAMERA source during reverse driving The unit returns to the previous source after the vehicle has been taken out of reverse When Parking Brake Applied 1 If PRK SW cable is connected to hand brake switch the video display of the TFT monitor will be controlled by...

Page 8: ... BACK button on the panel to exit Disc Operation Insert a Disc Insert a disc into the slot and the unit will change to disc mode automatically Notes Please confirm whether there is a disc in the unit before you insert another one The unit will exit current playing source and enter DVD mode when one disc is inserted The following disc formats are supported CD R CD RW DVD R DVD R DVD RW DVD RW Eject...

Page 9: ...at play 9 To enter search menu 10 Hide the second line of control buttons Mixed Disc Playback When inserting a mixed disc the unit will read the disc and show the files list For some discs you need to choose Music Video Photo to play back 1 5 2 3 4 6 1 Return to home menu 2 Show music list 3 Show video list 4 Show photo list 5 Show the folders 6 File Folder list Drag the list up down to scroll Tou...

Page 10: ...unit will turn into standby mode Sequential Track Playback for CD VCD MP3 WMA Only You can play all the tracks in random order 1 During playback press button on the screen to select random playback 2 Press to select sequential playback Disc Operation Search 1 Touch Goto on the control bar 2 Input the chapter number 3 Touch OK to confirm DVD Audio Select Press button to select audio language to lis...

Page 11: ...requency will be changed in steps Touch the or button on the operation bar to tune in a lower higher station Auto Tuning Hold the or button on the operation bar for more than 2 seconds to seek a lower higher station To stop searching repeat the operation above or press other buttons having radio functions Note When a station is received searching stops and the station is played Auto Store Only sta...

Page 12: ... the operation bar to show key search menu Touch the keypad to input the frequency touch OK to goto the station directly To cancel an input number touch USB Operations Using USB device 1 Connect your USB device to the USB cable which you placed in the dashboard or glove box during installation of the car radio When connecting an USB device the unit will read the files automatically You need to cho...

Page 13: ...t of the screen 2 Touch an album shown on the list 3 Select a song to play Select Music by Song Name 1 Touch Songs on the left of the screen 2 Select a song to play Playlists Add a song to favorite playlist 1 Press a song and select 2 Add it to an favorite playlist If choose Favorite you need input a name of the playlist Delete a song from favorite playlist 1 Touch favorite and select a playlist n...

Page 14: ... from the unit and may be dangerous Do not use unauthorized products Using an Android mobile phone as a USB storage device If you want to use your Android mobile phone as an USB storage 1 Connect your Android mobile phone to the unit by an USB cable 2 Set USB connection type of your mobile phone to Mount SD card If you select Charge only it can t be recognized by the unit 3 In the setting menu of ...

Page 15: ...ms if extreme volume level is set during the telephone call Touch Phone on the main menu to enter Bluetooth Phone mode 1 If the Bluetooth function of the unit is off the unit will ask you to turn it on Default setting is on 2 Turn on Bluetooth function of your mobile phone 3 Search for new Bluetooth devices on your phone Select ANDROID from the pairing list on the mobile phone and enter password D...

Page 16: ...y and continuous stream Users can stream music from their external audio player to their car stereo wirelessly and listen to the tracks through the car s speakers Please consult your nearest dealer for more information on the product of wireless audio streaming transmitter offered CAUTION Please avoid operating your connected mobile phone while audio streaming as this may cause noise or the sound ...

Page 17: ...tor via an iPod cable OPTIONAL Touch iPod on the main menu to enter iPod menu If iPod isn t on the current menu slide the bottom bar left or right to find it Pausing play 1 Touch the button on the bottom of the screen to pause play PAUSE appears in the display and button becomes 2 Touch button to resume play Selecting a track Track up Touch the button to move to the beginning of the next track Tra...

Page 18: ...network in system settings menu Select on the main menu to view a website Touch the dialog box on the upper side of the screen to show keypad Input the website address and touch Go to visit it Drag the web page to scroll E mail Select Email or other mail software on the applications menu First you must setup an account or sign into an existing account Enter your Email address and password Then you...

Page 19: ...he functions are saved and the programming will end 6 Touch Reset to reset the programming File Explorer Select File Explorer on the applications menu to view the files and folders on the SD card The USB files and folders are in the folder named external_usb You can install applications and edit files folders Select EQ on the menu to enter sound setting mode Touch to select a preset EQ on upper si...

Page 20: ...fast boot off 1 day 3 days or 5 days Beep On Turn on the beep sound Each time you press a button the unit beeps Off Turn off the beep sound Quick gesture operations definition Adjust Video Settings 1 Touch Video 2 Touch an option repeatedly to select Video settings Options Description Parking On Off Enable video disable video When in park On mode the screen will display WARNING information if you ...

Page 21: ...ewing for children under 17 R Restricted re parental guidance is advised for children under the age of 17 NC17 Unsuitable for children under age 17 ADULT Acceptable for adults only Parental Set password to restrict the play of discs The default password is 000000 Networks To setup the wireless configuration such as Wi Fi For Wi Fi settings refer to Internet Personal To setup Location access Securi...

Page 22: ...ord through the installation hole into the engine compartment and connect to the car battery Otherwise a high possibility of serious short circuit to the electrical system may occur If you need to replace the fuse please replace with a 15A fuse Using no fuse or a fuse with an improper rating may cause damage to the unit or a potential fire If a proper fuse is installed and problems continue to occ...

Page 23: ...EN 22 Parking Brake Cable Connections Back Up Camera Connections Device Connections Orange Wire ...

Page 24: ...EN 23 Device Connections Wiring Diagram OPTIONAL ...

Page 25: ...ted incorrectly The disc is dirty or damaged Disc must be inserted with the label side facing up Clean the disc and check for damage Try another disc Sound skips due to vibration Mounting angle is over 30 Mounting is unstable Adjust mounting angle to less than 30 Mount the unit securely with the supplied parts TUNER mode Unable to receive stations The antenna is not connected properly Connect the ...

Page 26: ... Noise Ratio 70dB Dynamic Range 70dB Distortion line out 0 8 Frequency Response 3dB 20Hz 20KHz Maximum Output Power 4 50W Load Impedance 4Ω AUX IN Distortion 0 8 Frequency Response 3dB 20Hz 20KHz Audio Input Level 500mV Audio Audio Output Impedance 10KΩ Audio Output Level 2Vrms Max Video Normal Video Input Level CVBS 1 0 0 2V Video Input Impedance 75Ω Video Output Impedance 75Ω Video Output Level ...

Page 27: ...CLASS 1 LASER PRODUCT P N 127075007004 ...

Reviews: