background image


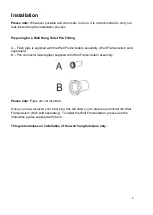
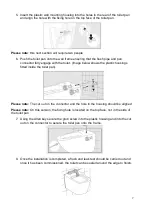
5.  Insert the plastic wall mounting housing into the holes in the rear of the toilet pan 

and align the hole with the fixing hole on the top face of the toilet pan. 


Please note

: this next section will require two people 

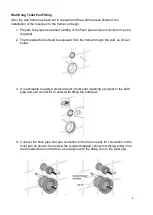
6.  Push the toilet pan onto the wall frame ensuring that the flush pipe and pan 

connector fully engage with the toilet. (Image below shows the plastic housings 
fitted inside the toilet pan). 


Please note: 

The cut out on the connector and the hole in the housing should be aligned. 

Please note: 

On this version, the fixing hole is located on the top face, not in the side of 

the toilet pan 

7.  Using the Allen key secure the grub screw into the plastic housing and into the cut 

out on the connector to secure the toilet pan onto the frame. 


8.  Once the installation is completed, a flush and leak test should be carried out and 

once it has been commissioned, the toilet can be sealed around the edge to finish. 


Summary of Contents for BeBa_25857 Verona

Page 1: ...eBa_25867 Alcor Wall Hung Toilet Toilet seat and Wall Frame cistern sold separately Waste pipe sold separately if a new installation Please note Image is for illustrative purposes only and may differ...

Page 2: ...Times Fast Track 100 We hope your new product exceeds your highest expectations However if you experience any problems please call our friendly UK call centre on 0330 390 3062 9am 7pm Monday to Friday...

Page 3: ...3 Contents Parts 4 Tools required 4 Installation o Preparing for a Wall Hung Toilet Pan Fitting 5 o Wall Hung Toilet Pan Fitting 6 7 Troubleshooting 8 Maintenance 8 Cleaning 8...

Page 4: ...4 Parts Toilet Pan Fixing kit below components A Allen key B 2 x Threaded connector fixing bolts C 2 x Plastic wall mounting housing D 2 x Grub screw Tools required Allen key supplied Silicone...

Page 5: ...stern assembly Wall Frame cistern sold separately B Pan connector waste pipe supplied with Wall Frame cistern assembly Please note Pipes are not included Once you have received your toilet pan this wi...

Page 6: ...ded bars should be exposed from the frame through the wall as shown below 3 It is advisable to apply a small amount of lubricant washing up liquid to the flush pipe and pan connector to assist with fi...

Page 7: ...the plastic housings fitted inside the toilet pan Please note The cut out on the connector and the hole in the housing should be aligned Please note On this version the fixing hole is located on the t...

Page 8: ...on the syphon remove the top section of the syphon and check the washer for damage 4 If the washer is damaged then replace Maintenance All of the maintenance measures resulting from troubleshooting a...

Reviews: