background image

OPERATION

The appliance is intended only for domestic use, not for professional use.
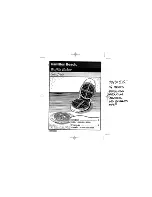
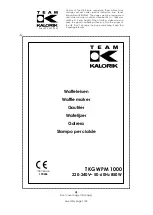
The following description is associated with the image on page 2:

1.  Housing

2.  Green pilot light ‘Temperature reached’

3.  2 baking plates

4.  Strong bottom plate

5.  Red pilot light ‘Power’

6.  Handle

1.  Unpack the device and remove all packaging parts.

2.  Clean the baking trays before using for the first time (see ‘Cleaning and maintenance’).
PLEASE NOTE:

• 

The first time you use the appliance, it may produce slight smoke and a specific odour. This is normal 

and will disappear on its own. Ensure sufficient ventilation.

• 

Keep birds away from the appliance when the appliance is in operation. When heating the non-stick 

coating on the baking tray, a substance can be released that is a nuisance to birds.

Preheating

1.  Place the appliance on a flat, level surface.

2.  This appliance must be connected to an earthed socket.

3. 

 The baking trays ware at the correct temperature when the green pilot light turns off, after app. 2 min.

Baking

1.   Preheat the appliance as explained in ‘Preheating’.

2.   Grease both baking plates. Use a brush to spread the oil or butter over the surface.

3.   Pour the required amount of batter onto the bottom baking plate. Make sure no batter is spilt over the  


edge of the baking plate. Close the lid.

4.   Bake the waffles to the required colour.

5.  Open the appliance once the waffles are ready.

6.    Carefully remove the waffles with a heat-resistant wooden or plastic spatula; take care not to damage 

the non-stick coating.

7.   Once you have finished baking waffles, remove the plug from the plug socket and open the appliance  


to allow the baking plates to cool down.

PLEASE NOTE:

•   Waffles usually take between 3 to 5 minutes to prepare.

•   Do not use sharp forks or knives! 

CLEANING AND MAINTENANCE

Clean the baking tray after each use.

1.  Disconnect from mains power supply and let the appliance cool down.

2.  Clean the baking tray with a soft cloth or a plastic dishwashing brush in warm water with washing-up 

liquid.

3.  Dry the device thoroughly after cleaning.

PLEASE NOTE:

• 

 Do not use aggressive or abrasive cleaning agents or sharp objects (such as knives or hard brushes) 

when cleaning.

SERVICE

If an unexpected problem occurs, please visit 

www.bestron.com/service

 for assistance.

10

EN

Summary of Contents for AMW500P

Page 1: ...ploi set mixeur plongeur ES Manual del usuario mixer a immersione EN Instruction manual stick mixer set Gebrauchsanweisung Stabmixer set Handleiding staafmixer set AYW1123 50 60 Hz 220 240 Volts 550 W...

Page 2: ...ES SE PL HU Bedienungsanleitung 3 Mode d emploi 5 Handleiding 7 Instruction manual 9 Istruzioni per l uso 11 Manual del usuario 13 Instruktionsmanual 15 Instrukcja u ytkowania 17 Haszn lati utas t s...

Page 3: ...deren W rmequellen in Kontakt kommen Das Ger t darf nicht ber einen externen Zeitschalter oder ein separates System mit Fernbedienung bedient werden Halten Sie das Ger t nur an den Griffen fest Alle M...

Page 4: ...ide Heizplatten einfetten Verwenden Sie einen Pinsel um das l oder die Butter auf der Oberfl che zu verteilen 3 Geben Sie die gew nschte Teigmenge auf die untere Heizplatte Achten Sie darauf dass kein...

Page 5: ...es de chaleur L appareil ne peut pas tre mis en marche l aide d un minuteur externe ou par un syst me s par t l commande Tenez toujours l appareil par les poign es tous les composants en m tal peuvent...

Page 6: ...auffage 2 Graissez les deux plaques de cuisson Utilisez un pinceau pour r partir l huile ou le beurre sur la surface 3 Versez la quantit de p te requise sur la plaque inf rieure Veillez ce que la p te...

Page 7: ...deksel Zorg ervoor dat elektrische apparaten snoeren of stekkers niet in aanraking komen met water andere vloeistoffen of andere hittebronnen Het apparaat mag niet in werking worden gesteld door midde...

Page 8: ...ken 1 Verwarm het apparaat voor zoals beschreven in Voorverwarmen 2 Vet beide bakplaten in Gebruik een kwastje voor het verdelen van de olie of boter 4 Leg de gewenste hoeveelheid deeg op de onderste...

Page 9: ...when opening and closing the lid Do not allow electrical devices cables or plugs to come into contact with water other liquids or other heat sources The appliance must not be operated by means of an e...

Page 10: ...explained in Preheating 2 Grease both baking plates Use a brush to spread the oil or butter over the surface 3 Pour the required amount of batter onto the bottom baking plate Make sure no batter is sp...

Page 11: ...entazione o le spine non entrino mai a contatto con acqua altri liquidi o siano posti troppo vicino ad altre fonti di calore L apparecchio non deve essere messo in funzione con un timer esterno o un s...

Page 12: ...zione Preriscaldamento 2 Ungi entrambe le teglie da forno Usa un pennello per spalmare l olio o il burro sulla loro superficie 3 Versare la quantit necessaria di impasto sulla piastra inferiore Verifi...

Page 13: ...uidos u otras fuentes de calor El aparato no debe encenderse por medio de un temporizador externo ni por un sistema de control remoto separado Sujete el aparato s lo por las asas Todas las partes met...

Page 14: ...el apartado de Precalentamiento 2 Engrase ambas placas para hornear Use un cepillo para esparcir el aceite o la mantequilla sobre la superficie 3 Vierta la cantidad necesaria de mantequilla sobre la...

Page 15: ...t nger locket L t inte elektriska enheter kablar eller kontakter komma i kontakt med vatten andra v tskor eller v rmek llor Apparaten f r inte anv ndas med hj lp av en extern timeromkopplare eller av...

Page 16: ...som f rklaras i F rv rmning 2 Sm rj b da bakplattorna Anv nd en borste f r att sprida olja eller sm r ver ytan 3 H ll den n dv ndiga m ngden smet p botten av bakplattan Se till att ingen smet spills...

Page 17: ...zawsze trzymaj za uchwyt Nie dopuszczaj do kontaktu urz dze elektrycznych kabli lub wtyczek z wod innymi p ynami lub innymi r d ami ciep a Urz dzenie nie mo e by obs ugiwane za pomoc zewn trznego wy c...

Page 18: ...z dzenie zgodnie z opisem w cz ci Podgrzewanie 2 Nasmaruj obie p yty do pieczenia Za pomoc p dzla rozprowad na ich powierzchni olej lub mas o 3 Wlej odpowiedni ilo ciasta na doln p yt do pieczenia Dop...

Page 19: ...jen arra hogy az elektromos k sz l kek k belek vagy csatlakoz k ne rintkezzenek v zzel m s folyad kokkal vagy m s h forr sokkal A k sz l ket tilos k ls id z t kapcsol val illetve t vir ny t val rendel...

Page 20: ...t s c m r szben le rtak szerint 2 Zs rozza meg mindk t s t lapot S t ecsettel oszlassa el a fel leten az olajat vagy a vajat 3 ntse a sz ks ges mennyis g t szt t az als s t lapra gyeljen arra hogy a t...

Page 21: ......

Page 22: ......

Page 23: ......

Page 24: ...A CON NOSOTROS SERVICIO AL CLIENTE DE WHATSAPP BESTRON COM WHATSAPP ALL YOU WANT TO KNOW ABOUT YOUR UNIQUE 5 YEAR WARRANTY ALLES WAS SIE BER IHRE EINZIGARTIGE 5 JAHRES GARANTIE WISSEN M CHTEN TOUT CE...

Reviews: