


22
OperaTing YOur TreaDMill
SaFetY keY anD cLip
The safety key is designed to cut the main power to the treadmill should you fall. Therefore,
the safety key is intended to bring the treadmill to an immediate stop. At high speeds, it may
be uncomfortable and somewhat dangerous to come to a complete stop immediately. So,
use the safety key as an emergency stop only. To bring the treadmill to a complete stop
safely and comfortably, use the stop button.
Your treadmill will not start unless the safety key is properly inserted into
the safety key holder on the left side of the console. The other end of the
safety key should be securely clipped to your clothing.
Never use the treadmill without securing the safety key clipped to your clothing.
Pull on the safety key clip to make sure it will not come off your clothing.
If the safety key is not in place or not connected properly, the console will display an e07
error.
getting On anD OFF the tReaDmiLL
Handle with care when getting on or off the treadmill. Try to use the handlebars while get-
ting on or off. While you are preparing to use the treadmill, do not stand on the running belt.
Straddle the running belt by placing your feet on both side rails of the treadmill deck. Place
your foot on the belt only after the belt has begun to move at a consistent slow speed.
During exercise, keep your body and head facing forward at all times. Never attempt to turn
around on the treadmill when the running belt is still moving. When you have finished ex-
ercising, stop the treadmill by pressing the stop button. Wait until the treadmill comes to a
complete stop before attempting to get off the treadmill.
For your safety, step onto the belt when the speed is no more than 1.5 mph.
Never start the treadmill at a running speed and attempt to get on while it is moving at higher
speeds.
Summary of Contents for BFT50
Page 1: ...BFT50 O w n e r s M a n u a l v 091709...
Page 11: ...11 S T EP 1 Above shows STEP 1 assembled and completed...
Page 13: ...13 S T EP 2 Above shows STEP 2 assembled and completed...
Page 15: ...15 S T EP 3 Above shows STEP 3 assembled and completed...
Page 17: ...12 17 S T EP 4 Above shows STEP 4 assembled and completed...
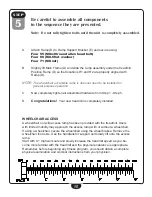
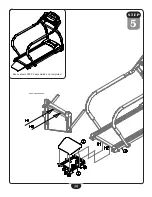
Page 19: ...19 S T EP 5 Above shows STEP 5 assembled and completed...
Page 39: ...39 BFT50 Wiring Diagram...
Page 40: ...40 Exploded View Diagram...
Page 41: ...41 Exploded View Diagram...
Page 42: ...42 Notes...
Page 43: ...43 Notes...