background image

 29

CONSOLE OPERATION

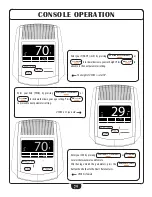
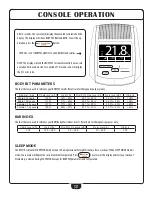
Enter your HEIGHT (inch) by pressing 

UP/RE

CO

VERY

 or 

DO

WN

 to increase/decrease your set height. Press 

M

OD

E

 to 

advance to the next parameter setting.




The height of USER 3 is set at 70”. 


   TEMP.

          76


º

f

UP/RE

CO

VERY

M

OD

E

DO

WN

RESET/G

O

B

OD

Y FAT

UP/RE

CO

VERY

M

OD

E

DO

WN

RESET/G

O

B

OD

Y FAT


    TEMP.


 3

70

NO.

in

€


76


º

f


   TEMP.

          76


º

f

UP/RE

CO

VERY

M

OD

E

DO

WN

RESET/G

O

B

OD

Y FAT

UP/RE

CO

VERY

M

OD

E

DO

WN

RESET/G

O

B

OD

Y FAT


    TEMP.


 3

29

NO.

YEAR

€


76


º

f


   TEMP.

          76


º

f

UP/RE

CO

VERY

M

OD

E

DO

WN

RESET/G

O

B

OD

Y FAT

UP/RE

CO

VERY

M

OD

E

DO

WN

RESET/G

O

B

OD

Y FAT


    TEMP.


 3

70

NO.

in




76


º

f

Enter your AGE (YEAR) by pressing 

UP/RE

CO

VERY

 or 

DO

WN

 to increase/decrease your age setting. Press 

M

OD

E


to proceed to next parameter setting.

USER 3 is 29 years old. 

ž

Enter your SEX by pressing 

UP/RE

CO

VERY

 or 

DO

WN


to select between male and female.
After having entered the parameters, press the 

RESET/G

O


button then hold onto the Heart Rate Contacts. 




USER 3 is female. 

Summary of Contents for BFCT1R

Page 1: ...OWNER S MANUAL BFCT1R v 051816 ...

Page 2: ...CTIONS VI SETTING UP YOUR BFCT1R VII CONSOLEFEATURES VIII CONSOLE DISPLAY FEATURES IX CONSOLEOPERATION X EXERCISETIPSANDGUIDELINES XI TROUBLESHOOTING XII SERVICING THE BFCT1R XIII HARDWARE XIV HARDWARE LIST XV EXPLODED VIEW DIAGRAM 3 4 5 6 7 21 22 23 24 25 26 31 32 33 34 35 36 38 39 41 42 43 www BestFitness com ...

Page 3: ...lly read through this manual thoroughly Instructions contained in this document are not intended to cover all details or variations possible with Best Fitness Equipment or to cover every contingency that may be met in conjunction with installation operation maintenance or troubleshooting of the equipment Even though we have prepared this manual with extreme care neither the publisher nor the autho...

Page 4: ...or damaged Return the equipment to a service center for examination and repair Never drop or insert objects into any opening in the equipment Always check the unit before each use Make sure that all fasteners are secure and in good working condition Do not use the equipment outdoors or near water PERSONAL SAFETY DURING ASSEMBLY It is strongly recommended that a qualified dealer assemble the equipm...

Page 5: ...5 FEATURES CONTACT HEART RATE SENSORS CONSOLE TENSION ADJUSTMENT FULLY SHROUDED FLYWHEEL FOOT PLATE ERGONOMIC HANDLE BARS LEVEL STABILIZER TRANSPORT WHEELS STATIONARY HANDLE ...

Page 6: ...The dimensions of the BFCT1R are Width 1 9 X Length 4 3 The usage space is Width 3 X Length 6 The usage space is the overall space needed for operation The usage space needed for the BFCT1R could be more depending on the user Minimum Usage Space Suggested Usage Space 3 6 MAX LOAD 800LB 360KG WARNING 250LB 113KG ...

Page 7: ...e illustrations only important safety notes and other tips are included in the text Some pieces may have extra holes that you will not use Use only those holes indicated in the instructions and illustrations NOTE To find out the length of a particular bolt measure its shank the long narrow part beneath the head Refer to the following diagram NOTE After assembly you should check all functions to en...

Page 8: ...A Connect Rear Leg B to Main Frame A using Two 4 M8x90 round allen head bolt Two 58 M8x25 arc washer NOTE Use the larger 8mm washer B Connect Front Leg C to Main Frame A using Two 21 M8x72 round allen head bolt Two 20 M8x19 arc washer NOTE Use the smaller 8mm washer S T E P 1 ...

Page 9: ...9 S T E P 1 Above shows STEP 1 assembled and completed ...

Page 10: ...Cable 52 as shown in Diagram 2 Pull the cable up as shown in Diagram 3 then seat it in the slot Pull out Plastic Component 99 as shown in Diagram 4 C Connect Upper Harness 50 to Lower Harness 53 D Slide Upright D onto Main Frame A and secure using Four 45 M8x16 round allen head bolt Four 44 M8 spring washer Four 12 M8 washer E Let Shroud E slide to the bottom of Upright D S T E P 2 WARNING DO NOT ...

Page 11: ...11 S T E P 2 Above shows STEP 2 assembled and completed ...

Page 12: ...35 M17 wave washer E Slide Right Stride Bar G onto Upright D and Right Foot Frame 15 onto Right Crank 56 F Secure Right Stride Bar G onto Upright D using One 10 M10x20 round allen head bolt One 11 M10 spring washer One 9 M16 2 d washer One 35 M17 wave washer G Secure Right Foot Frame 15 onto Right Crank 56 using One 10 M10x20 round allen head bolt One 11 M10 spring washer One 9 M16 2 d washer One ...

Page 13: ...13 S T E P 3 Above shows STEP 3 assembled and completed ...

Page 14: ...sented A Connect Left Foot Plate J to Left Foot Frame 14 using Three 37 M8x45 hex head bolt Three 12 M8 washer Three 13 M8 nylon nut B Connect Right Foot Plate K to Right Foot Frame 15 using Three 37 M8x45 hex head bolt Three 12 M8 washer Three 13 M8 nylon nut S T E P 4 ...

Page 15: ...15 S T E P 4 Above shows STEP 4 assembled and completed ...

Page 16: ...re presented A Route Upper Cable Harnesses 43 through the hole in Upright D then up as shown Let Upper Cable Harnesses 43 hang from the top of Upright D B Secure Handle Bar L to Upright D using Four 45 M8x16 round allen head bolt Four 44 M8 spring washer S T E P 5 ...

Page 17: ...17 S T E P 5 Above shows STEP 5 assembled and completed ...

Page 18: ... Right Stride Shroud Q to the pivot between Left Stride Bar F and Left Foot Frame 14 and secure using Four 59 ST4 2x18 phillips head screw D Connect Left Stride Shroud R and Right Stride Shroud Q to the pivot between Right Stride Bar G and Right Foot Frame 15 and secure using Four 59 ST4 2x18 phillips head screw E Connect Left Front Handle Shroud M and Left Rear Handle Shroud P to the pivot betwee...

Page 19: ...19 S T E P 6 Above shows STEP 6 assembled and completed ...

Page 20: ...using Two 57 M4x10 cross pan head screw Two 60 M5 washer C Connect Rear Upright Shroud V and Front Upright Shroud U to Upright D and secure using Two 59 ST4 2x18 phillips head screw D Connect HR Cable Harness 43 and Upper Harness 50 to Console 31 NOTE Carefully fit the wires back into the hole in Upright D before securing the console S T E P 7 ...

Page 21: ...21 S T E P 7 Above shows STEP 7 assembled and completed Battery Compartment Front Back Insert Upright Here ...

Page 22: ...recommended to place a dedicated equipment mat beneath your BFCT1R A dedicated mat provides superior stability and firmness for a proper workout MOVING THE BFCT1R This cross trainer is easy to move around safely To move the BFCT1R 1 Grasp the Handles 2 Carefully pull the handles towards you while pushing the front of the cross trainer downward 3 Simply roll the BFCT1R on its two wheels to the desi...

Page 23: ... AA batteries into the console Observe polarity After battery installation reinstall the console s Battery Cover 32 1 2 3 4567 8 Tension ConTr o l loW HiGH AdjustTENSION CONTROL by rotating the TENSION CONTROL knob Rotate clockwise to increase tension Rotate counter clockwise to decrease tension ...

Page 24: ...rst exercise session LCD DISPLAY UP RECOVERY DOWN BODY FAT RESET GO MODE SPEAKER CONSOLE FEATURES F e a t u r e D e s c r i p t i o n LCD Display Console screen MODE Cycle through console programming BODYFAT Calculate Body Fat percentage BMI and BMR RESET GO Reset the display value UP RECOVERY Increases a value Time Age Distance Calories DOWN Decreases a value Time Age Distance Calories ...

Page 25: ...c a t i o n Speed 0 0 99 9 mph 0 1 Mile Hour Time 0 00 99 59 s 1 Second Calories 0 999 Calories 0 1 1 Calorie Hand Pulse 40 240 bpm 1 Beat Minute Distance 0 9 99mi 99 9 mi 0 01 0 1 Mile TIME DIS CAL PULSE 0 40 0 05 0 6 P 5 9 SPEED TIME DISTANCE CALORIES PULSE SPEED M ...

Page 26: ...press the MODE button to advance to the next function Thedisplayissetforadistanceof2 5mi TEMP 76ºf UP RECOVERY MODE DOWN RESET GO BODY FAT UP RECOVERY MODE DOWN RESET GO BODY FAT TIME DIS CAL PULSE 0 00 0 00 0 0 0 0 0 SPEED TEMP 76ºf UP RECOVERY MODE DOWN RESET GO BODY FAT UP RECOVERY MODE DOWN RESET GO BODY FAT TIME DIS CAL PULSE 3 00 0 00 0 0 o 0 0 SPEED TEMP 76ºf UP RECOVERY MODE DOWN RESET GO ...

Page 27: ...crease the effectiveness of the exercise EnterthedesiredTEMPERATUREreadout CelsiusorFahrenheit bypress ing UP RECOVERY or DOWN to change between Cel sius or Fahrenheit Press the MODE button to complete program ming the display ThedisplayissetforFahrenheit Start your workout The programmed sections of the display will start counting down as the exercise progresses When one of the target goals has b...

Page 28: ...alorie needs Enter your WEIGHT LB by pressing UP RECOVERY or DOWN toincrease decreaseyoursetweight Press MODE to advance to the next parameter setting Weightissetat95lb TEMP 76ºf UP RECOVERY MODE DOWN RESET GO BODY FAT UP RECOVERY MODE DOWN RESET GO BODY FAT TIME DIS CAL PULSE 0 00 0 00 0 0 0 0 0 SPEED TEMP 76ºf UP RECOVERY MODE DOWN RESET GO BODY FAT UP RECOVERY MODE DOWN RESET GO BODY FAT TEMP 3...

Page 29: ...T GO BODY FAT UP RECOVERY MODE DOWN RESET GO BODY FAT TEMP 3 29 NO YEAR 76º f TEMP 76ºf UP RECOVERY MODE DOWN RESET GO BODY FAT UP RECOVERY MODE DOWN RESET GO BODY FAT TEMP 3 70 NO in 76º f Enter your AGE YEAR by pressing UP RECOVERY or DOWN to increase decrease your age setting Press MODE to proceed to next parameter setting USER3is29yearsold Enter your SEX by pressing UP RECOVERY or DOWN to sele...

Page 30: ... e s e Male 30 years 14 14 20 20 1 25 25 1 35 35 Male 30 years 17 17 23 23 1 28 28 1 38 38 Female 30 years 17 17 24 24 1 30 30 1 40 40 Female 30 years 20 20 27 27 1 33 33 1 43 43 BODYFAT PARAMETERS The chart below is used to reference your BODYFAT results Results are for therapeutic purposes only BMI INDEX The chart below is used to reference your BMI Body Mass Index results Results are for therap...

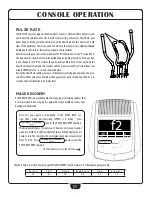
Page 31: ...non themea sured Heart Rate value may be higher than your actual pulse rate during the first 2 3 seconds then will stabilize to a normal level TEMP 76ºf UP RECOVERY MODE DOWN RESET GO BODY FAT UP RECOVERY MODE DOWN RESET GO BODY FAT TIME PULSE 0 00 o f2 PULSE RECOVERY PULSERECOVERYisanexcellentguideformanytypesoftrainingregimesthat userecoveryheartrateasaprogressguideandtospotproblemssuchasover he...

Page 32: ... heart to readjust to the decreased demand HOW OFTEN It is most often recommended that you exercise a few times a week to maintain cardiovascular fit ness If you have other goals such as weight or fat loss you will achieve your goal faster with more frequent exercise Remember that your ultimate goal should be to make exercise a lifetime habit Many people are successful staying with a fitness progr...

Page 33: ... carotid artery on your neck located next to your Adam s apple Count your pulse for ten seconds and multiply by six This figure is your heart rate in beats per minute bpm Compare this number to the Target Heart rate zone for your age group TARGET HEART RATE The most common method for calculating your target heart rate is to find your maximum heart rate The standard formula for this is 220 your age...

Page 34: ...the console and verify that the Heart Rate harness is se cure Heart Rate readout is erratic Heart Rate contact pressure Contact obstruction Environmental interference Gripping the Heart Rate contacts too tight may cause calculation readout errors Try to maintain moderate pressure when holding onto the Heart Rate contacts Remove all jewelry when using the BFCT1R Make sure hands are not completely d...

Page 35: ...d result in personal injury For information about product operation or service go to www bestfitness com or contact an au thorized Best Fitness dealer or a Best Fitness factory authorized service company or contact Best Fitness customer service at one of the following Retain this Owner s Manual for future reference Toll Free 1 800 556 3113 Phone 1 708 427 3555 Fax 1 708 427 3556 Hours M F 8 30 5 0...

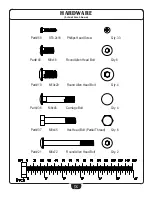
Page 36: ... 2x18 Phillips Head Screw Qty 33 Part 45 M8x16 Round Allen Head Bolt Qty 8 Part 10 M10x20 Round Allen Head Bolt Qty 4 Part 36 M8x45 Carriage Bolt Qty 4 Part 37 M8x45 Hex Head Bolt Partial Thread Qty 6 Part 21 M8x72 Round Allen Head Bolt Qty 2 ...

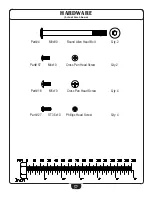
Page 37: ...37 HARDWARE Actual Size Shown Part 4 M8x90 Round Allen Head Bolt Qty 2 Part 57 M4x10 Cross Pan Head Screw Qty 2 Part 16 M5x10 Cross Pan Head Screw Qty 4 Part 27 ST3 5x10 Phillips Head Screw Qty 4 ...

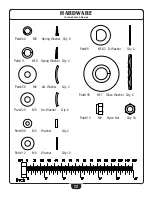
Page 38: ... M10 Spring Washer Qty 4 Part 58 M8 Arc Washer Qty 2 Part 20 M8 Arc Washer Qty 6 Part 60 M5 Washer Qty 2 Part 12 M8 Washer Qty 10 HARDWARE Actual Size Shown Part 9 M16 2 D Washer Qty 4 Part 35 M17 Wave Washer Qty 4 Part 13 M8 Nylon Nut Qty 10 ...

Page 39: ...Right Foot Plate L 1 Handle Bar M 1 Left Front Handle Shroud N 1 Right Front Handle Shroud O 1 Right Rear Handle Shroud P 1 Left Rear Handle Shroud Q 1 Right Stride Shroud R 1 Left Stride Shroud S 2 Lower Foot Frame Shroud T 2 Upper Foot Frame Shroud U 1 Front Upright Shroud V 1 Rear Upright Shroud W 1 Console Logo X 1 BF Shroud Badge Y 2 Drive Wheel Logo Part numbers are required when ordering pa...

Page 40: ... 15t 20 6 Arc Washer M8 19OD x 1 5t x R30 21 2 Round Allen Head Bolt M8x72 22 2 Front Leg End Cap 25 6 Bushing 16ID x 31OD x23t 27 4 Phillips Head Screw ST3 5 x 10 29 2 Foam Grip Upper Handle 30 2 Round End Cap Upper Handle 31 1 Console 32 1 Console Battery Cover 33 1 Cross Head Pan Screw M5x55 34 1 Arc Washer M5 35 4 Wave Washer M17 23OD x 0 3t 36 4 Carriage Bolt M8x45 37 6 Hex Head Bolt M8x45 38...

Page 41: ...M6x15 72 6 Spring Washer M6 10 3OD 73 2 Washer M6 12OD x 1 5t 74 2 Shaft Spring Washer M20 75 2 Bearing f20 x f37 x 9t 6904Z 76 4 Allen Head Bolt M6x15 77 1 Plastic Flywheel 78 1 Belt 79 1 Plastic Flywheel Shaft 80 4 Nylon Nut M6 81 1 Cock Wheel 82 1 Hex Head Bolt M5x60 83 2 Hex Head Bolt M6 84 1 Bushing 10ID x 18OD x 6t 85 1 Allen Head Bolt M10x40 86 1 Magnet Sensor 87 2 Phillips Head Screw ST3x1...

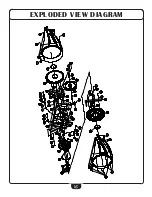
Page 42: ... 42 EXPLODED VIEW DIAGRAM ...

Page 43: ...43 EXPLODED VIEW DIAGRAM ...

Page 44: ... improve the product Body Solid machines maintain several patented and patent pending features and designs All rights reserved on all design patents and utility patents www BestFitness com Serial Number is Located on the Frame Model Name BFCT1R Purchase Date _______________________________ SerialNumber _______________________________ ...

Reviews: