12
13
15.
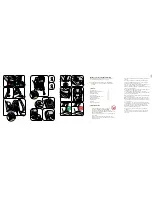
The height indicator of the floorsupport shows green when the
floor support is in contact with the floor. (29)
16.
If you are installing against the dashboard and the seat is not
in contact with the dashboard yet, release the anchor belts and
position the floor support to the shortest length.
17.
Tighten the anchor belts again till the seat is in contact with
the dashboard.
18.
Adjust the floor support so it is in contact with the floor of
the vehicle.
19.
Positioned in the back seat of the vehicle, you should, if
possible, push the front seat of the vehicle backwards, so that
it is in contact with the child seat. If it is not possible to obtain
contact with the child seat, push the backrest of the front seat of
the vehicle forward so that the distance between child seat and
back rest of the front seat of the vehicle is minimum 25 cm.
20.
Adjustments of the front seat of the vehicle might bring slack in
the anchor belts; tighten the anchor belts again.
21.
To enlarge the space for the legs of the child, you can move the
front brace outwards with the ratchet. Keep this space as small
as possible.
1.
Place the seat sideways into the car with the front brace
towards you.
2.
Turn the seat into the right position (with the front brace
against the back rest).
3.
Position the floor support around 5cm. above the floor.
4.
The height indicator of the floor support shows grey when
the floor support is above the floor. (23)
5.
In the front seat of the vehicle, you should position the seat
against the dashboard. If it is not possible to obtain contact
with the dashboard, position the front seat of the vehicle
as far as possible backwards, preferable with a minimum
distance between child seat and dashboard of 25 cm.
6.
Position the 3 point car belt. Place the hip belt over the base
of the seat behind the belt guiding horns on each side and
the belt hook close to the front brace. Fasten the car belt,
CLICK! (24)
7.
Pull out all slack of the hip belt.
8.
Place the shoulder belt following the same routing as the hip
belt behind the belt guiding horns on each side and behind
the belt hook. The shoulder belt will twist over the hip belt,
which is OK. (25)
9.
Pull out all slack of the shoulder belt.
10.
Move the front brace outwards with the ratchet. Continue
tightening until the brace is pressed well into the back rest of
the vehicle seat. (26)
11.
Check if the hip belt is tensioned very tight. If not repeat the
installation of the car belt.
12.
Connect the anchor belts with the child seat. (27)
13.
Tighten the anchor belts as tight as possible. It’s most easy
to start with the anchor belt at the inside of the vehicle. (28)
14.
Adjust the floor support so it is in contact with the floor
of the vehicle. Tension the anchor belts again till they are
really tight. (28)
With the anchor belts in place the installation can continue:
• iZi Plus installed rearward-facing in the back seat. (30)
• iZi Plus installed rearward-facing in the front seat. (31)
Summary of Contents for iZi Plus
Page 8: ...B109 8814 N2002082...


