background image

42

GB

56

66

82e

Caution:

· Turn power switch to "O" before

threading or unthreading the machine.

· To release the upper thread tension the

presser foot lever has to be raised. 

· The thread take-up lever must be in the

highest position when threading.

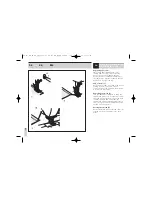
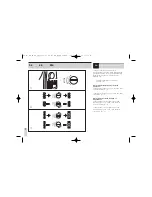
1.

Place spool on pin using appropriate
spool disc (spool turns clockwise). Take
thread through rear guide (A) and then
into slit of upper thread tension. 

2.  Pull thread down to the right of the

cover around point (B)

3.  Take thread up to the left of the cover,

placing it in the take-up lever (C)

4.  Take thread down and through guide

(D). Insert the thread through the eye of
the needle from front to back. (needle
threader page 40) 

5.

Leave about 10 cm (4") of thread loose
behind the needle, or cut the excess
thread by using the thread cutter (E)

Threading the upper thread

EN

56-82e_EN_ES_FR_PT_230807:07_55-90e_EN_ES_FR_PT.qxd  23.8.2007  16:12  Seite 42

Summary of Contents for Bernette 56

Page 1: ...p or insert any object into any opening 14 Do not use outdoors 15 Do not operate where aerosol spray products are being used or where oxygen is being administered When using an electrical appliance basic safety precautions should always be followed including the following Read all instructions before using this sewing machine Keep the instruction at a suitable place that close to the machine and h...

Page 2: ... personnel Replacement parts for a double insulated product must be identical to those parts in the product A double insulated product is marked with the words DOUBLE INSULATION or DOUBLE INSULATED The symbol may also be marked on the product SAVE THESE INSTRUCTIONS This sewing machine is intended for household use only Environmental protection BERNINA is committed to the protection of the environ...

Page 3: ...rir la tapa lubricar o antes de los trabajos de mantenimiento descritos en el manual hay que desconectar la máquina de coser computerizada de la red eléctrica sacar el enchufe de la red eléctrica Cuando se usa un aparato eléctrico tienen que respetarse las siguientes normas de seguridad Lea atentamente todas las instrucciones y las normas de seguridad antes de poner en marcha esta máquina de coser...

Page 4: ...ema Pos eso sólo un especialista puede hacer este trabajo de mantenimiento Usar únicamente piezas de recambio originales Un producto de aislamiento doble está marcado con Doble aislamiento o Aislamiento doble El símbolo puede también indicar semejante producto GUARDAR BIEN ESTE MANUAL DE INSTRUCCIONES Esta máquina de coser computerizada está destinada únicamente para el uso doméstico Protección de...

Page 5: ...emploi comme par ex la lubrification 13 Ne pas introduire ou laisser tomber des objets dans les ouvertures de la machine L emploi d un appareil électrique exige d observer les mesures de sécurité suivantes avant d utiliser la machine lisez attentivement toutes les directives de sécurité de ce manuel Conservez ces directives près de votre machine et transmettez les avec l appareil si vous remettez ...

Page 6: ...on Un produit à double isolation est désigné de la manière suivante isolation double ou A double isolement Le symbole peut également caractériser un tel produit CONSERVEZ SOIGNEUSEMENT CES PRESCRIPTIONS DE SECURITE Cette machine à coudre est destinée exclusivement à l usage domestique Protection de l environnement BERNINA se sent concernée par la protection de l environnement Nous nous efforçons a...

Page 7: ...na de costura caso cabos ou plugues estejam defeituosos e se os mesmos apresentarem defeitos ou ainda caso a máquina tenha caído na água Neste caso leve a máquina de costura ao próximo comerciante especializado autorizado ou a um técnico devidamente competente para que sejam efetuadas inspeção reparos ajuste elétrico ou mecânico 6 Ao usar a máquina de costura não bloqueie as entradas de ar Mantenh...

Page 8: ...racterizado da seguinte forma Isolamento duplo ou Duplamente isolado O símbolo pode também caracterizar tal produto GUARDE OS AVISOS DE SEGURANÇA CUIDADOSAMENTE Esta máquina de costura é indicada apenas para o uso doméstico Protecção ambiental Bernina está empenhada na protecção do ambiente Nós nos esforçamos para minimizar o impacto ambiental dos nossos produtos melhorando continuamente o design ...

Page 9: ...aintenance 122 126 Troubleshooting 128 Index 132 Índice ES Normas de seguridad importantes 3 4 Índice 10 Vista general bernette 56 15 Vista general bernette 66 82e 17 Accesorio bernette 56 19 Accesorio bernette 66 82e 21 Preparación de la máquina 23 57 Tabla de aguja tejido e hilo 59 Selección del punto 63 Funciones de costura estándar 77 Ojales 79 81 Funciones de costura avanzadas 83 121 Mantenim...

Page 10: ...re avancées 83 121 Maintenance 123 127 Maîtrise des pannes 130 Index 134 Conteúdo PT Avisos de segurança importantes 7 8 Conteúdo 11 Vista Geral bernette 56 15 Vista Geral bernette 66 82e 17 Acessórios bernette 56 19 Acessórios bernette 66 82e 21 Preparando a Máquina 23 57 Tabela de Agulha Tecido e de Linha 61 Escolha do Ponto 63 Funções Básicas de Costura 77 Caseados de Botões 79 81 Funções Ampla...

Page 11: ...NA Des tissus fins et fragiles comme la soie aux tissus robustes tels que les jeans ou la toile de voile elle relève tous les défis Conviviale votre machine vous accompagnera fidèlement dans tous vos travaux de couture Pour votre sécurité nous vous conseillons de lire attentivement les prescriptions de sécurité avant de commencer votre travail Lisez également scrupuleusement les directives d emplo...

Page 12: ...0 Stitch length dial 11 Stitch width dial 12 Stitch display 13 Bobbin winder 14 Handle 15 Handwheel 16 Pattern selector dial 17 Power switch 18 Main plug socket 19 Spool pin 20 Bobbin thread guide pre tension 21 Upper thread guide 22 Presser foot lever 23 Pattern Balance 24 Hole for second spool pin 25 Automatic threader Overview EN 56 82e_EN_ES_FR_PT_230807 07_55 90e_EN_ES_FR_PT qxd 23 8 2007 16 ...

Page 13: ...ge de la largeur du point 12 Fenêtre d affichage du motif 13 Dévidoir 14 Poignée 15 Volant à main 16 Bouton sélecteur des points 17 Commutateur principal 18 Raccordement du câble 19 Tige support de bobine 20 Guide de bobinage et prétension 21 Guide fil supérieur 22 Levier de pied de biche 23 Equilibrage du motif du point 24 Fente pour une deuxième tige support de bobine 25 Enfile fil automatique 1...

Page 14: ...ial 13 Bobbin stopper 14 Stitch length dial 15 Stitch display 16 Speed limiting adjustment lever model 82e 17 Quick reference drawer 18 Spool pin 19 Bobbin winder 20 Hole for second spool pin 21 Handwheel 22 Pattern selector dial 23 Power switch 24 Main plug socket 25 Handle 26 Bobbin thread guide pre tension 27 Upper thread guides 28 Presser foot lever 29 Automatic threader 30 Pattern Balance Equ...

Page 15: ... de réglage de la longueur du point 15 Fenêtre d affichage du motif 16 Limitation de la vitesse modèle 82e 17 Tiroir avec directives résumées 18 Tige support de bobine 19 Dévidoir 20 Fente pour une deuxième tige support de bobine 21 Volant à main 22 Bouton sélecteur des points 23 Commutateur principal 24 Raccordement du câble 25 Poignée 26 Guide fil de canette et prétension 27 Guide fil supérieur ...

Page 16: ...Spool pin 12 Spool holder Optional accessories 2 13 Satin stitch foot 14 Overcasting foot G 15 Hemmer foot 16 Blind hem foot L 17 Cording foot 18 Invisible Zipperfoot 19 Quilting foot 1 4 20 Gathering foot 21 Darning Embroidery foot 22 Walking foot 23 Twin needle Optional accessories are not included It must be bought separately Accessories EN 56 82e_EN_ES_FR_PT_230807 07_55 90e_EN_ES_FR_PT qxd 23...

Page 17: ...ige support de bobine 12 Support de bobine Accessoires spéciaux 2 13 Pied pour la broderie 14 Pied pour surjet G 15 Pied ourleur 16 Pied pour points invisibles L 17 Pied pour cordon 18 Pied pour fermeture à glissière cachée 19 Pied pour quilt 1 4 20 Pied pour Fronceur 21 Pied pour reprisage broderie 22 Pied de transport supérieur 23 Aiguille jumelée les accessoires spéciaux ne sont pas livrés avec...

Page 18: ... Spool holder Optional accessories 2 12 Satin stitch foot A 13 Overcasting foot E 14 Hemmer foot K 15 Blind hem foot F 16 Cording foot M 17 Invisible Zipperfoot 18 Quilting foot 1 4 19 Gathering foot 20 Darning Embroidery foot 21 Walking foot 22 Twin needle Optional accessories are not included It must be bought separately Accessories EN 56 82e_EN_ES_FR_PT_230807 07_55 90e_EN_ES_FR_PT qxd 23 8 200...

Page 19: ...bobine 11 Support de bobine Accessoires spéciaux 2 12 Pied pour la broderie A 13 Pied pour surjet E 14 Pied ourleur K 15 Pied pour points invisibles F 16 Pied pour cordon M 17 Pied pour fermeture à glissière cachée 18 Pied pour quilt 1 4 19 Pied pour Fronceur 20 Pied pour reprisage broderie 21 Pied de transport supérieur 22 Aiguille jumelée les accessoires spéciaux ne sont pas livrés avec la machi...

Page 20: ...zontal and push it in the direction of the arrow 1 The inside of the snap in sewing table can be utilized as an accessory box To open tilt the cover towards you 2 Sewing table EN 56 82e_EN_ES_FR_PT_230807 07_55 90e_EN_ES_FR_PT qxd 23 8 2007 16 12 Seite 22 ...

Page 21: ... à l horizontale et encliqueter dans le sens de la flèche 1 L intérieur de la table sert de coffret d accessoires Il suffit de rabattre le couvercle 2 Segure a bancada para engatar horizontalmente e aperte na direção da seta 1 O interior da bancada pode ser utilizado como caixa para acessórios Para abrir gire a tampa para baixo 2 Table rallonge FR Bancada PT Mesa móvil 56 82e_EN_ES_FR_PT_230807 07...

Page 22: ...close push it back The quick reference shows you recommended settings for the stitches and application 3 In this quick reference drawer you will find the most important information on sewing at a glance The color coding of the stitches is the following green Practical Stitches Practical Stitches orange Decorative Stitches Decorative Stitches blue Stretch Stitches Stretch Stitches red Quilt Stitche...

Page 23: ...oints utilitaires orange Decorative Stitches points décoratifs bleu Stretch Stitches points stretch rouge Quilt Stitches points quilt Gaveta com breve instrução PT Para abrir puxe para frente Para fechar empurre de volta 3 Nesta gaveta encontra se uma visão geral com as mais importantes informações para o trabalho de costura O código de cores dos pontos é verde Practical Stitches pontos utilitário...

Page 24: ...ed with the foot controller 4C 315A 100V 4C 316B 110 120V area 4C 326G 230V 4C 326C 220 240V area manufactured by Panasonic Co Ltd Taiwan IMPORTANT NOTICE If the appliance has a polarized plug one blade is wider than the other To reduce the risk of electric shock this plug will fit in a polarized outlet only one way If the plug does not fit fully in the outlet reverse the plug If it still does not...

Page 25: ...gle la vitesse de couture 2 Attention Adressez vous à un électricien qualifié si vous rencontrez un problème lors du raccordement de la machine au secteur Débranchez la machine quand vous ne l utilisez pas Votre machine doit être accompagnée de la pédale 4C 315A 100 volts 4C 316B pour 110 120 volts 4C 326G 230 volts 4C 326C pour 220 240 volts fabriquée par Panasonic Co Ltd Taiwan Important Les tem...

Page 26: ...be used with the foot controller 4C 337A 100V area 4C 337B 110 120V 4C 337G 220 240V area manufactured by Panasonic Co Ltd Taiwan IMPORTANT NOTICE If the appliance has a polarized plug one blade is wider than the other To reduce the risk of electric shock this plug will fit in a polarized outlet only one way If the plug does not fit fully in the outlet reverse the plug If it still does not fit con...

Page 27: ...pédale règle la vitesse de couture 2 Attention Adressez vous à un électricien qualifié si vous rencontrez un problème lors du raccordement de la machine au secteur Débranchez la machine quand vous ne l utilisez pas Votre machine doit être accompagnée de la pédale 4C 337A 100 volts 4C 337B pour 110 120 volts 4C 337G pour 220 240 volts fabriquée par Panasonic Co Ltd Taiwan Important Les températures...

Page 28: ...e presser foot pressure EN The presser foot pressure has been pre set and requires no particular adjustment for regular sewing However it can be adj according your needs For sewing very thin fabric loosen the pressure by turning the screw counter clockwise and for heavy fabric tighten by turning it clockwise 56 82e_EN_ES_FR_PT_230807 07_55 90e_EN_ES_FR_PT qxd 23 8 2007 16 12 Seite 30 ...

Page 29: ...sus fins tournez la vis de réglage dans le sens contraire des aiguilles d une montre et pour les tissus épais dans le sens des aiguilles d une montre Ajuste da pressão do pé calcador PT A pressão do pé calcador está ajustada para normal e prescinde de ajuste especial para o costurar normal A pressão do pé calcador pode ser ajustada conforme a necessidade Para costurar tecidos particularmente finos...

Page 30: ...der b until the cut out c is directly above the pin d 2 Lower the presser foot holder b and the presser foot f will engage automatically Removing the presser foot Raise the presser foot Release the pressure foot by raising lever e located at the back of the foot holder 3 Attaching the seam guide Attach the seam guide g in the slot as illustrated Adjust the distance as required for hems pleats etc ...

Page 31: ... b jusqu à ce que la rainure c se trouver directement au dessus de la tige d 2 Abaisser le support du pied b le pied de biche s encliquette automatiquement Retirer le pied de biche Relever le pied de biche Relever le levier e et retirer le pied en le faisant glisser vers l arrière du support 3 Fixer le guide Glisser le guide g dans le fente comme illustré Adapter 4 l écart pour les ourlets plis et...

Page 32: ...in inside out and hold the thread Push the bobbin to the right towards the bobbin winding position Press the foot control gently The bobbin will stop winding when it is full Push the bobbin to the left to sewing position and remove it Please note When the bobbin winder spindle is in bobbin winding position the machine and the handwheel can not be operated To start sewing push the bobbin winder spi...

Page 33: ...extrémité Repousser la canette vers la droite dans la position d embobinage Appuyer légèrement sur la pédale Le processus s arrête dès que la canette est pleine Repousser la canette vers la gauche et retirer Remarque Quand l axe se trouve en position d embobinage la machine et le volant sont bloqués et ne peuvent pas être actionnés Pour coudre repousser l axe vers la gauche position de couture 1 E...

Page 34: ...e bobbin so that the thread runs in a clockwise direction arrow 2 Pull the thread through the slit and under the finger 3 spring Hold the bobbin case by the hinged latch 4 Insert it into the hook 5 Make sure the bobbin case finger fits into the notch 6 at the top of the race Attention Turn power switch to off O before inserting or removing the bobbin Inserting bobbin EN 56 82e_EN_ES_FR_PT_230807 0...

Page 35: ...ntre flèche 2 Tirer le fil dans la rainure et le faire glisser sous le ressort 3 Tenir le boîtier de canette par sa languette Placer dans le crochet 5 La tige du boîtier de canette doit être dirigée vers le haut et être parfaitement positionnée dans la rainure du crochet 6 Attention Mettre toujours le commutateur principal sur O avant de retirer ou placer la canette Durante a colocação e a retirad...

Page 36: ...rrow marking through the slit under the finger A as far as the pulley B 3 To make sure that the thread is pulled into the tension spring of the bobbin holder press a finger slightly onto the bobbin while pulling As a check you must feel a resistance in the thread feed 4 Pull the thread at the arrow markings into the stitch plate thread guide from B to C To cut off excess thread pull thread back ov...

Page 37: ...re Guider le fil le long des repères en direction de la fente du guide fil sous la tige A jusqu au coude B Vérifier le fil qui doit être passé dans le ressort de tension du support de canette Pendant l enfilage exercer une légère pression sur la canette Vérifier en tirant sur le fil qui doit offrir une certaine résistance Introduire le fil dans le guide fil de la plaque à aiguille en suivant les r...

Page 38: ...ustrated A Loosen the needle clamp screw and tighten again after inserting the new needle 1 B The flat side of the shaft should be towards the back C D Insert the needle as far up as it will go Needles must be in perfect condition 2 Problems can occur with A Bent needles B Blunt needles C Damaged points Inserting the needle EN 56 82e_EN_ES_FR_PT_230807 07_55 90e_EN_ES_FR_PT qxd 23 8 2007 16 12 Sei...

Page 39: ...guille et revisser dès que l aiguille est en place 1 B Le côté plat doit toujours être dirigé vers l arrière C D Repousser l aiguille vers le haut jusqu à la butée L aiguille doit être neuve et ne présenter aucun défaut 2 La couture ne sera pas parfaite si A L aiguille est tordue B L aiguille est émoussée C La pointe de l aiguille est abîmée Atenção Antes da colocação ou da retirada da agulha leve...

Page 40: ...r guide A and then into slit of upper thread tension 2 Pull thread down to the right of the cover around point B 3 Take thread up to the left of the cover placing it in the take up lever C 4 Take thread down and through guide D Insert the thread through the eye of the needle from front to back needle threader page 40 5 Leave about 10 cm 4 of thread loose behind the needle or cut the excess thread ...

Page 41: ...t tirer vers l avant au travers de la fente dans la tension du fil supérieur 2 Guider le fil vers le bas le long et à la droite du recouvrement du levier de fil autour du point B 3 Guider le fil vers le haut le long et à la gauche du recouvrement du levier de fil et tirer dans le levier de fil C 4 Tirer le fil vers le bas dans l oeillet du fil D Enfiler le fil d avant en arrière dans le chas de l ...

Page 42: ...tion B Take the thread round the hook C Take the thread in front of the needle so that the thread will insert into the hook D from bottom to top Release lever A Pull the thread through the needle eye Attention Turn power switch to O Automatic needle threader EN 56 82e_EN_ES_FR_PT_230807 07_55 90e_EN_ES_FR_PT qxd 23 8 2007 16 12 Seite 44 ...

Page 43: ... du crochet C Guider le fil devant l aiguille il doit reposer sur le levier D de bas en haut Relâcher le levier A Tirer le fil au travers du chas Attention Mettre toujours le commutateur principal sur O Leve a agulha para a sua posição mais elevada Empurre a alavanca A completamente para baixo O dispositivo de enfiar linha rebate automaticamente para a posição de colocar a linha B Coloque a linha ...

Page 44: ... loose increase setting C1 C The upper thread tension is too tight decrease setting B1 Note The tension is factory set for best possible sewing results using a thread Metrosene 100 2 The optimum tension may vary when using other or different types of thread and it may be necessary to adjust tension to suit the fabric and stitch type Upper thread tension EN 56 82e_EN_ES_FR_PT_230807 07_55 90e_EN_ES...

Page 45: ...aleur C1 C Tension du fil supérieur trop importante réduire la valeur B1 Remarque La tension a été parfaitement réglée en fabrique avec des fils Metrosene 100 2 dans la canette et pour le fil supérieur Pour obtenir un bon résultat avec d autres fils il est éventuellement nécessaire de modifier les réglages de la tension du fil Il est donc essentiel de toujours effectuer une couture d essai pour ad...

Page 46: ... up through the stitch plate hole Lay both threads to the back under the presser foot 2 Note When the excess thread was cut the thread can be brought up however does not have to Caution When starting to sew do not pull on the taut threads under the presser foot Bringing up the lower thread EN 56 82e_EN_ES_FR_PT_230807 07_55 90e_EN_ES_FR_PT qxd 23 8 2007 16 12 Seite 48 ...

Page 47: ...nette au travers du trou Glisser les deux fils vers l arrière sous le pied 2 Remarque Dès que le fil qui dépasse a été coupé on peut seulement si souhaité faire remonter le fil de canette Attention Ne pas tirer le fil qui repose sous le pied en commençant la couture Segure a linha superior com a mão esquerda Gire o volante para a frente até que a agulha esteja em cima novamente 1 Puxe na linha sup...

Page 48: ...nd the machine will sew forwards again Removing the work 2 Turn the handwheel towards to bring the thread take up lever to its highest position raise the presser foot and remove the work towards the back On model 82e the thread take up lever automatically stops in the correct position by pressing the needle up down position button Cutting the thread 3 Cut both threads with the thread cutter B loca...

Page 49: ... couture en marche arrière A Coudre quelques points en arrière Relâcher la touche et continuer la couture en avant Retirer l ouvrage 2 Tourner le volant vers l avant pour amener le levier de fil dans sa position la plus haute Relever le pied de biche et retirer l ouvrage en le tirant vers l arrière Modèle 82e le levier de fil peut être automatiquement amené dans la bonne position à l aide de la to...

Page 50: ...inary sewing keep the feed dog up for freehand embroidery sewing on buttons and darning drop the feed dog To raise a and lower b feed dog How to drop feed dog EN 56 82e_EN_ES_FR_PT_230807 07_55 90e_EN_ES_FR_PT qxd 23 8 2007 16 12 Seite 52 ...

Page 51: ...aissée pour la broderie à mains libres la couture de boutons et les travaux de reprisage Relever la griffe d entraînement a et l abaisser b Para o costurar normal o transportador fica em cima Ao bordar com mão livre pregar botões e cerzir abaixe o transportador Leve o transportador para cima a e abaixe o b Abaissement de la griffe d entraînement FR Abaixar o transportador PT Escamoteo del arrastre...

Page 52: ...e the sewing speed 3 The machine can be sewed faster when the lever is moved to the right and sew slower when lever is moved to the left Toward slower Toward faster EN Before sewing press the button needle up down 2 LED illuminated when needle position down is activated The stop position of the needle is predetermined by this button Press the button twice to perform one full stitch 56 82e_EN_ES_FR...

Page 53: ...imitación de la velocidad Desplazar esta palanca hacia la derecha o izquierda para modificar la velocidad 3 La máquina cose más rápidamente si la palanca se desplaza hacia la derecha y cose más lentamente si se desplaza hacia la izquierda Dirección más lenta Dirección más rápida Aguja arriba abajo ES Antes de coser pulsar la tecla 2 stop aguja arriba abajo la indicación LED se ilumina en la posici...

Page 54: ... patterns If the patterns are too open turn the dial counterclockwise 2 If the patterns are too close turn the dial clockwise 2 Adjusting the stitch density of buttonhole If the stitches on the right side of the buttonhole are too open turn the dial counterclockwise 3 If the stitches on the right side of the buttonhole are too close turn the dial clockwise 3 Adjust pattern balance EN 56 82e_EN_ES_...

Page 55: ...tif est trop étroit tourner la vis vers la droite 2 Adapter la densité des points des boutonnières Si les points sont trop larges sur le côté droit de la boutonnière tourner la vis vers la gauche 3 Si les points sont trop étroits sur le côté droit de la boutonnière tourner la vis vers la droite 3 Se o padrão de ornamento e os casdeados ao costurar com tecidos especiais forem desiguais gire para aj...

Page 56: ...eedle size to thread size and weight of fabric NEEDLE FABRIC SELECTION NEEDLES HA 1 15 1 15 1 130 705H 15 1 130 705H SUK 130PCL 705H LR LL EXPLANATION Standard sharp needles Sizes range thin to large 9 65 to 18 110 Semi ball point needle scarfed 9 65 to 18 110 Full ball point needle 9 65 to 18 110 Leather needles 12 80 to 18 110 TYPE OF FABRIC Natural woven fabrics wool cotton silk etc Qiana Not r...

Page 57: ...NTE Adaptar el grosor de la aguja al grosor del hilo y al tipo de tejido SELECCIÓN DE LA AGUJA Y DEL TEJIDO AGUJAS HA 1 15 1 15 1 130 705H 15 1 130 705H SUK 130 PCL 130 705H LR LL DESCRIPCIÓN Aguja estándar Grosores de la aguja de finas a gruesas 9 65 hasta 18 110 Aguja con punta semi redonda 9 65 a 18 110 Aguja con punta redonda 9 65 a 18 110 Aguja cortante 12 80 a 18 110 TIPO DE TEJIDO Telas tej...

Page 58: ...nages épais tissus pour manteaux polyester certains cuirs et le vinyle FILS Fils fins en coton nylon et polyester La plupart des fils sont moyennement épais et recommandés pour ces tissus et aiguilles Pour de meilleurs résultats préférer des fils en polyester pour la couture des tissus synthétiques et en coton pour la couture des tissus en matière naturelle fil supérieur et de canette Fils épais p...

Page 59: ...mero mais elevado IMPORTANTE A grossura da agulha deve condizer com a grossura da linha e com o tipo de tecido ESCOLHA DE AGULHA E DE TECIDO AGULHAS HA 1 15 1 15 1 130 705H 15 1 130 705H SUK 130 PCL 130 705H LR LL DESCRIÇÃO Agulha padrão afiada Grossuras da agulha de fina à grossa 9 65 até 18 110 Agulha de ponta semi esférica 9 65 to 18 110 Agulha de ponta esférica 9 65 to 18 110 Agulha de couro 1...

Page 60: ...el select the pattern with the pattern selector dial Adjust the stitch length and the stitch width with the control dials according to the result desired see Quick reference draw To obtain any of the patterns on the second row turn the stitch length dial to S select the pattern desired with pattern selector dial and adjust the stitch width with the stitch width dial To switch to Position S turn th...

Page 61: ...égler et modifier la longueur et la largeur du point avec le bouton de réglage consulter les directives résumées Sélectionner les motifs de points de la deuxième rangée en tournant le bouton de réglage de la longueur de point sur S choisir ensuite le motif avec le bouton sélecteur et la largeur avec le bouton de réglage de la largeur de point modèles 80e 90e Réduire la longueur de point sur 0 avec...

Page 62: ...poses Generally speaking the finer the fabric the finer the thread and shorter the stitch length the heavier the fabric the thicker the thread and longer the stitch length At stitch length 0 the fabric will not move and the needle will keep piercing at the same point Choose your needle position from center position to left needle position by changing the stitch width dial Straight stitching and ne...

Page 63: ... de point réduite plus le tissu est épais plus le fil doit être épais et la longueur de point augmentée Sélectionner la position de l aiguille du centre vers le gauche avec le bouton de réglage de la largeur de point Si la longueur de point se trouve sur 0 le tissu n avance pas et l aiguille pique toujours au même endroit Função do seletor de comprimento de ponto para ponto reto Gire o seletor de ...

Page 64: ...es a suitable stitch length for ordinary purposes Generally speaking the finer the fabric the finer the thread and shorter the stitch length the heavier the fabric the thicker the thread and longer the stitch length At stitch length 0 the fabric will not move and the needle will keep piercing at the same point Choose your needle position from center position to left needle position by changing the...

Page 65: ...ée 2 3 Généralités plus le tissu est fin plus le fil doit être fin et la longueur de point réduite plus le tissu est épais plus le fil doit être épais et la longueur de point augmentée Sélectionner la position de l aiguille du centre vers le gauche avec le bouton de réglage de la largeur de point Si la longueur de point se trouve sur 0 le tissu n avance pas et l aiguille pique toujours au même end...

Page 66: ...nction of stitch length dial while zigzaging The density of zigzag stitches increase as the setting of stitch length dial approaches 0 Neat zigzag stitches are usually achieved at 2 5 or below Satin stitch When the stitch length is set between 0 1 the stitches are very close together producing the satin stitch which is used for making buttonholes and decorative stitches Zigzag stitching EN 56 82e_...

Page 67: ... densité du point zigzag augmente Sélectionner de préférence le point zigzag sur 2 5 ou moins Couture chenille point satin Quand la longueur de point est réglée entre 0 et 1 les points sont très rapprochés et forment ainsi une couture chenille Le point satin est utilisé pour la couture des boutonnières et points décoratifs Função do seletor de largura de ponto A largura máxima de ponto ziguezague ...

Page 68: ... 66 82e Function of stitch length dial while zigzaging The density of zigzag stitches increase as the setting of stitch length dial approaches 0 Neat zigzag stitches are usually achieved at 2 5 or below Satin stitch When the stitch length is set between 0 1 the stitches are very close together producing the satin stitch which is used for making buttonholes and decorative stitches Zigzag stitching ...

Page 69: ...u 0 plus la densité du point zigzag augmente En règle générale le point zigzag sera réglé sur 2 5 ou moins Couture chenille point satin Quand la longueur de point est réglée entre 0 et 1 les points sont très rapprochés et forment ainsi une couture chenille Le point satin est utilisé pour la couture des boutonnières et points décoratifs Função do seletor de largura de ponto A largura de ponto máxim...

Page 70: ...most 1 Place the fabric under the foot Turn the handwheel forward by hand until the needle swings fully to the left It should just pierce the fold of the fabric If it does not adjust the stitch width accordingly 2 Adjust the guide 3 by turning the knob 4 so that the guide just rests against the fold Sew slowly by pressing the foot control lightly guiding the fabric along the edge of the guide a mo...

Page 71: ...comme illustré 1 Glisser le tissu sous le pied Tourner le volant à la main jusqu à ce que l aiguille se trouve tout à gauche Elle ne doit piquer que la pointe du tissu plié Si nécessaire régler et adapter la largeur de point Régler le guide 2 en tournant le bouton 4 jusqu à ce qu il repose sur le rebord du tissu Appuyer légèrement sur la pédale pour commencer la couture et guider le tissu le long ...

Page 72: ... the fabric Stretch overlock For fine knits jerseys neck edges ribbing 1 Double overlock stitch For fine knits handknits seams 2 All overlock stitches are suitable for sewing and neatening edges and visible seams in one operation When neatening the needle should just go over the edge of the fabric Attention Use new needles or ball point needles or stretch needle Overlock stitches EN 56 82e_EN_ES_F...

Page 73: ...ptée au tissu Surjet stretch Pour les lainages fins jerseys bordures d encolure etc 1 Surjet double Pour les lainages fins tricots fait main coutures 2 Tous les points surjet peuvent être utilisés pour la couture et le surfilage de rebords et la couture d ourlets en une seule étape de travail Pour le surfilage d un rebord l aiguille doit à peine piquer sur celui ci Attention Utiliser une nouvelle ...

Page 74: ...cleanly into the left and right holes of the button Set the pattern selector knob on straight stitch and sew a few securing stitches Set the pattern selector knob on zig zag stitch and slowly sew on the button with about 10 stitches Set the pattern selector knob on straight stitch and sew a few securing stitches If a shank is required place a darning needle on top of the button and sew 3 For butto...

Page 75: ...ans les trous du bouton Régler le bouton sélecteur de point sur point droit et coudre quelques points d arrêt Régler le bouton sélecteur de point sur zigzag et coudre lentement le bouton env 10 points Régler le bouton sélecteur de point sur point droit et coudre quelques points d arrêt Glisser une aiguille à repriser sur le bouton pour former une tige 3 Pour les boutons à quatre trous on coudra to...

Page 76: ...between 0 5 1 for stitch density Note Density varies according to the fabric Always test sew a buttonhole Follow the 4 step sequence changing from one step to another with the stitch pattern selector dial Take care not to sew too many stitches in stages 1 and 3 Use seam ripper and cut buttonhole open from both ends towards the middle Tips Slightly reduce upper thread tension to produce better resu...

Page 77: ...uer toujours une boutonnière d essai Suivre les quatre étapes de couture et passer d une à l autre avec le bouton sélecteur de point Ne pas trop coudre de points durant les étapes 1 et 3 Ouvrir la boutonnière avec le découd vite en partant des extrémités en direction du centre Astuces Un meilleur résultat sera obtenu en relâchant légèrement la tension du fil supérieur Glisser un non tissé sous les...

Page 78: ...op the machine when the buttonhole is sewn Making a Buttonhole on Stretch Fabrics fig E When sewing buttonholes on stretch fabric place a gimp thread under the buttonhole foot 1 Mark the position of the buttonhole on the fabric with the tailor s chalk attach the buttonhole foot and set the pattern selection dial to 2 Hook the gimp thread onto the back end of the buttonhole foot then bring the two ...

Page 79: ...udre la boutonnière dans l ordre illustré D 8 Arrêter la machine quand la boutonnière est cousue Couture d une boutonnière sur un tissu stretch E Glisser une ganse sous le pied pour la couture de boutonnières sur des tissus élastiques 1 Placer un repère avec la craie de couturière pour déterminer la position de la boutonnière fixer le pied et régler le bouton sélecteur de point sur 2 Accrocher la ...

Page 80: ...pending on which side of the foot you are going to sew 1 To sew past the zip pull lower the needle into the fabric raise the presser foot and push the zip pull behind the presser foot Lower the foot and continue to sew It is also possible to sew in a length of cord into a bias strip to form a welt 2 56 66 82e Zippers and piping EN 56 82e_EN_ES_FR_PT_230807 07_55 90e_EN_ES_FR_PT qxd 23 8 2007 16 12...

Page 81: ...cée à droite ou à gauche selon la position du pied 1 Pour ne pas coudre sur la coulisse piquer l aiguille dans le tissu relever le pied et faire glisser la coulisse derrière le pied Abaisser le pied et continuer la couture Il est également possible de glisser un fil dans un biais pour former une nervure 2 Ajuste a máquina como é ilustrado Ajuste o seletor de ponto para Ajuste o comprimento do pont...

Page 82: ...turn under the edge twice by about 3 mm 1 8 and sew 4 5 stitches to secure Pull the thread slightly towards the back Insert the needle into the fabric raise the presser foot and guide the fold into the scroll on the foot 1 Gently pull the fabric edge towards you and lower the presser foot Begin sewing guiding the fabric into the scroll by holding it upright and slightly to the left 2 Hemmer foot E...

Page 83: ...ebord du tissu Replier le rebord deux fois 3 mm et arrêter avec 4 à 5 points Tirer légèrement le fil vers l arrière Piquer l aiguille dans le tissu relever le pied et glisser la pliure dans l ergot du pied 1 Tirer légèrement le rebord du tissu vers soi et abaisser le pied Pour commencer la couture glisser le tissu dans l ergot il doit être légèrement tenu en haut et vers la gauche 2 Esta peça pode...

Page 84: ...2e Place patch in position The stitch length can be shortened to produce very close stitches 1 When mending tears it is advisable to use a piece of backing fabric to reinforce The stitch density can be varied by adjusting the stitch length First sew over the center and then overlap on both sides Depending on the type of fabric and damage sew between 3 and 5 rows 2 3 step zig zag EN 56 82e_EN_ES_FR...

Page 85: ...t être réduite pour former des points très denses 1 Il est conseillé pour la réparation de déchirures de glisser une garniture de renforcement sous le tissu abîmé La densité des points peut être modifiée en changeant la longueur de point Coudre tout d abord en partant du milieu et en se dirigeant ensuite vers le bord Coudre de 3 à 5 lignes selon le genre du tissu et l importance du dommage 2 Unir ...

Page 86: ...ment Triple zig zag 2 Pattern selector on For hardwearing seams hems and decorative seams Turn the stitch length dial to S and adjust the stitch width dial between 3 and 5 model 56 Turn the stitch length dial to S and adjust the stitch width dial between 3 and 7 model 66 82e Triple zig zag is suitable for firm fabrics like denim corduroy etc Stitch selection EN 56 82e_EN_ES_FR_PT_230807 07_55 90e_...

Page 87: ...e Punto zigzag triple 2 Regular el botón para selección del punto a Para costuras muy recomendadas dobladillos y dobladillos decorativos Regular el largo del punto a S y el ancho del punto entre 3 y 5 Modelo 56 Regular el largo del punto a S y el ancho del punto entre 3 y 7 Modelos 66 82e El zigzag triple es adecuado para tejidos fuertes tejanos vaqueros tejido Cord Manchester terciopelo etc 89 ES...

Page 88: ...et stitch width control between 4 5 model 56 Set stitch width control between 4 7 model 66 82e This stitch can be used for all types of jersey as well as for woven fabrics 1 Sew at 1 cm 1 4 from the fabric edge and trim the surplus fabric 2 Smocking stitch EN 56 82e_EN_ES_FR_PT_230807 07_55 90e_EN_ES_FR_PT qxd 23 8 2007 16 12 Seite 90 ...

Page 89: ...rgeur de point entre 4 et 5 modèle 56 Régler la largeur de point entre 4 et 7 modèles 66 82e Ce point sera utilisé sur les tissus en jersey ainsi que ceux tissés 1 Coudre à 1 cm du rebord du tissu et découper ensuite le tissu qui dépasse 2 Costurar bainhas camisetas roupas íntimas etc Ajuste a máquina como é ilustrado Ajuste o seletor de ponto para Ajuste o seletor de comprimento de ponto para S A...

Page 90: ...h control between 1 4 Set stitch width control between 3 5 model 56 Set stitch width control between 3 7 model 66 82e Insert the cord between the spring covering the cord groove and the foot The cord should run in the groove One two or three cords can be sewn on The stitch width is adjusted according to the number of cords and the stitch selected 1 2 a model 56 b model 66 82e Cording foot EN 56 82...

Page 91: ... de point entre 1 et 4 Régler la largeur de point entre 3 et 5 modèle 56 Régler la largeur de point entre 3 et 7 modèles 66 82e Guider le fil sous la tige du pied pour cordon Le fil doit être glissé dans la rainure Coudre un deux ou trois fils Régler la largeur de point selon le nombre de fils et le point choisi 1 2 a Modèle 56 b Modèles 66 82e Esta peça pode ser obtida como acessório especial Efe...

Page 92: ...the presser foot bar The lever A should be behind the needle clamp screw B Press the darning foot firmly from behind with your index finger and tighten the screw C 3 First sew round the edge of the hole to secure the threads 4 First row Always work from left to right Turn work by 1 4 and oversew A darning ring is recommended for easier sewing and better results Move the drop feed control to left s...

Page 93: ...e trouver derrière la vis du support d aiguille B Pousser depuis l arrière le pied avec l index et visser C 3 Coudre tout d abord le tour du trou pour arrêter les fils 4 Première ligne travailler toujours de gauche à droite Tourner l ouvrage d un quart et coudre par dessus Il est recommandé d utiliser un cadre pour reprisage qui permettra d obtenir de meilleurs résultats Déplacer vers la gauche le...

Page 94: ...h should go just over the edge of the fabric to create the shell effect Rampart 2 Pattern selector on For flat joining seams sewing on elastic visible hems This stitch can be used for firm thicker fabrics Bridging 3 Pattern selector on For seams place mats tablecloths Decorative joining seam for a fagotted effect Gathering with cord or shirring elastic Scallop stitch 4 Pattern selector on For a de...

Page 95: ...ord pour obtenir l effet coquille recherché Point de fronce 2 Régler le bouton sélecteur de point sur Pour des coutures de rapport plates la couture de rubans élastiques les ourlets Ce point peut être utilisé sur les tissus épais et rigides Point universel 3 Régler le bouton sélecteur de point sur Pour les coutures les sets de table les nappes Couture de rapport décorative Pour de jolis effets ajo...

Page 96: ...titch width control 3 7 model 66 82e For edges tablecloths bed linen cuffs embroidery For an attractive decorative effect adjust the stitch width to maximum Embroidery thread adds to effect Square stitch 1 Pattern selector on model 56 66 82e Decor stitch 2 Pattern selector on model 66 82e Decorative stitches EN 56 82e_EN_ES_FR_PT_230807 07_55 90e_EN_ES_FR_PT qxd 23 8 2007 16 12 Seite 98 ...

Page 97: ...rviettes en lin manchettes points décoratifs On augmentera au maximum la largeur de point et on utilisera des fils décoratifs pour obtenir un plus joli effet Point carré 1 Régler le bouton sélecteur de point sur Pour tous les tissus et travaux modèles 56 66 82e Points décoratifs 2 Régler le bouton sélecteur de point sur Pour tous les tissus et travaux modèles 66 82e Ajuste a máquina como é ilustra...

Page 98: ...together with the under laying fabric to be used Lower the presser foot and alternately sew forward or reverse using the reverse sewing lever Repeat this motion until the area to be darned is filled with rows of stitching For reverse sewing instructions see figure A page 50 Darning EN 56 82e_EN_ES_FR_PT_230807 07_55 90e_EN_ES_FR_PT qxd 23 8 2007 16 12 Seite 100 ...

Page 99: ...e au milieu Glisser sous le pied le tissu à repriser avec la garniture de renfort Abaisser le pied et coudre d avant en arrière utiliser la touche de marche arrière Répéter ces mouvements jusqu à ce que la surface endommagée soit remplie Touche de marche arrière consultez la page 50 ill A Ajuste o seletor de comprimento de ponto para o comprimento desejado Ajuste o seletor de ponto para Posição mé...

Page 100: ...y 6 mm 1 4 Place the lace under the folded edge of the fabric allowing it to underlap the fabric slightly as required by the pattern of the lace Sew on the edge of the fabric fold You can add a decorative touch by using the satin stitch to sew on the lace Attaching lace EN 56 82e_EN_ES_FR_PT_230807 07_55 90e_EN_ES_FR_PT qxd 23 8 2007 16 12 Seite 102 ...

Page 101: ...6 mm Poser la dentelle sous le rebord replié elle doit légèrement reposer sous le tissu ou la couture décorative Coudre sur le rebord du tissu Pour obtenir un effet encore plus décoratif coudre cette dentelle au point satin Ajuste o seletor de comprimento de ponto para o comprimento desejado Ajuste o seletor de ponto para Posição média de agulha Dobre a extremidade do tecido 6 mm aprox Coloque o b...

Page 102: ...applique design and baste it to the fabric Sew slowly around the edge of the design Trim excess material outside the stitching Make sure not to cut any stitches Remove the basting thread Tie top and bottom thread under the applique to avoid unraveling Applique EN 56 82e_EN_ES_FR_PT_230807 07_55 90e_EN_ES_FR_PT qxd 23 8 2007 16 12 Seite 104 ...

Page 103: ...épingler ou surfiler sur le tissu Coudre lentement le long des rebords du motif Découper le tissu qui dépasse des points Attention veiller à ne pas découper les points cousus Retirer les épingles ou les fils de surfilage Nouer le fil supérieur et le fil inférieur sous l appliqué pour empêcher qu ils se divisent Ajuste o seletor de comprimento de ponto para o comprimento desejado Ajuste o seletor d...

Page 104: ...gle needle threading Thread each needle separately Please note When sewing with twin needle always proceed slowly and make sure to maintain low speed to insure quality stitching When using twin needle on zig zag make sure the stitch width dial is set between 0 and 2 5 Do not use twin needle at setting above 2 5 model 56 When using twin needle on zig zag make sure the stitch width dial is set betwe...

Page 105: ...tesse de couture quand vous utilisez une aiguille jumelée Maintenir cette vitesse pendant toute la durée du travail pour garantir un résultat parfait et une belle qualité de point Régler le bouton de réglage de la largeur de point entre 0 et 2 5 aiguille jumelée et point zigzag Ne jamais utiliser une aiguille jumelée avec un réglage qui dépasse 2 5 modèle 56 Régler le bouton de réglage de la large...

Page 106: ...ng and Embroidering Draw the desired lettering or design on the right side of the fabric Stretch the fabric between embroidery hoop as firmly as possible Place the fabric under the needle Make sure the presser foot bar is down in its lowest position Turn the balance wheel towards you to bring up the lower thread through the fabric Sew a few securing stitches at the starting point Hold the hoop wit...

Page 107: ...amme et de la broderie Dessiner les lettres ou motifs sur l endroit du tissu Tendre le tissu dans le cadre de broderie Glisser le tissu sous l aiguille La barre du pied doit se trouver dans sa position la plus basse Tourner le volant vers soi pour aller chercher le fil de canette et le ramener à la surface du tissu Coudre quelques points d arrêt Tenir le cadre à deux mains et guider le travail Dép...

Page 108: ...es of work Quilt 2 Pattern selector on For all fabrics and all types of work Hand look quilt stitch 3 Pattern selector on For all fabrics and all types of work which should have a hand sewn look model 66 82e The bobbin thread must come through the right side Depending on the fabric used increase the upper tension Use monofilament thread 0 hand stitch effect Balance adjust if necessary Quilt stitch...

Page 109: ...r tous les tissus et travaux Point quilt 2 Régler le bouton sélecteur de point sur Pour tous les tissus et travaux Point quilt point à la main 3 Régler le bouton sélecteur de point sur Pour tous les tissus et travaux modèles 66 82e Le fil de canette doit être ramené sur l endroit du tissu Selon le tissu augmenter la tension du fil supérieur Utiliser un monofil pour obtenir un effet broderie à la m...

Page 110: ... allowance 1 8 inch 3 mm Position the fabric under the foot raw edges aligned with the outer edge of the right toe see arrow Stitch perfect 1 8 inch seams The notches on the left edge of the foot are 1 4 inch in front and behind the needle located The centre notch is in line with the point of needle penetration The markings are helpful when the patchwork seam should start or end 1 4 inch in from t...

Page 111: ...issu doit toucher le rebord extérieur droit du pied voir la flèche On obtiendra ainsi une profondeur exacte de couture de 1 8 de inch 3 mm Les rainures gravées sur le rebord du pied présentent un écart de 1 4 de inch devant et derrière l aiguille La rainure du centre se situe à la hauteur de l emplacement de piquage de l aiguille Ces repères représentent une aide précieuse pour les coutures de pat...

Page 112: ...hand groove of foot over coil stitch zipper until the foot hits the slider Remove the garment from the machine To attach the other half of the zipper place the fabric edge on the 5 8 inch marking line on the needle plate as shown in picture 2 With the left hand groove of foot over coil stitch zipper until the foot hits the slider Close zipper Fold the fabric that the zipper is on ride hand side ou...

Page 113: ... supérieur du tissu Coudre la fermeture à glissière jusqu à la butée du coulisseau Retirer l ouvrage de la machine Coudre la deuxième moitié de la fermeture à glissière en plaçant le rebord du tissu sur le repère 5 8 de inch de la plaque à aiguille ill 2 Glisser la ligne dentée sous le renfoncement gauche du pied et coudre la fermeture jusqu à la butée du coulisseau Retirer l ouvrage de la machine...

Page 114: ...control between 2 5 4 3 Sew a single row or multiple rows of straight stitches 4 If more gathering is required loosen the upper thread to about 2 so that the lower thread lies on the under side of the material 5 Pull the lower thread to gather more of the material Gathering EN 56 82e_EN_ES_FR_PT_230807 07_55 90e_EN_ES_FR_PT qxd 23 8 2007 16 12 Seite 116 ...

Page 115: ... longueur de point entre 2 5 et 4 3 Coudre une ou plusieurs lignes de piqûre 4 Relâcher la tension du fil supérieur sur env 2 pour obtenir des fronces importantes et ne pas faire apparaître le fil de canette sur l endroit de l ouvrage 5 Tirer ensuite le fil inférieur pour froncer Esta sapatilha pode ser obtida como acessório especial 1 Monte a sapatilha para pregas Ajuste o seletor de ponto para P...

Page 116: ...see page 32 3 Attach the walking foot to the machine in the following way i The fork arm should fit into the needle screw and clamp 2 ii Slide the plastic attaching head from your left to right so that it is fitted on the presser foot bar iii Lower the presser foot bar iv Tighten the fixation screw 4 Make sure both the needle screw and the fixation screw are tight 5 Draw the bobbin thread up Lay b...

Page 117: ... trouver entre les branches 2 ii Glisser de gauche à droite la tête de fixation en plastique qui doit parfaitement se placer sur la barre du pied iii Abaisser la barre du pied iv Visser la vis de fixation 4 Veiller à ce que la vis de fixation et celle du pied soient parfaitement vissées 5 Ramener le fil de canette sur l endroit et diriger les deux fils vers l arrière sous le pied a Branche b Bouto...

Page 118: ...see page 32 3 Attach the walking foot to the machine in the following way i The arm should fit over the needle screw and clamp 2 ii Slide the plastic attaching head from your left to right so that it is fitted into the presser foot bar iii Lower the presser foot bar iv Tighten the fixation screw 4 Make sure both the needle screw and the fixation screw are tight 5 Draw the bobbin thread up Lay both...

Page 119: ...uver entre les branches 2 ii Glisser de gauche à droite la tête de fixation en plastique qui doit parfaitement se placer sur la barre du pied iii Abaisser la barre du pied iv Visser la vis de fixation 4 Veiller à ce que la vis de fixation et celle du pied soient parfaitement vissées 5 Ramener le fil de canette sur l endroit et diriger les deux fils vers l arrière sous le pied a Branche b Bouton de...

Page 120: ...utwards Remove the hook race cover b and the hook c Clean first the feed dogs with the brush 2 Then clean with a soft cloth hook c hook race d and hook race cover b Lubricate at the point d 1 to 2 drops with sewing machine oil Turn the handwheel until the driver e is in the left position Replace the hook c then the hook race cover b snap back the two retaining arms a Insert bobbin and bobbin case ...

Page 121: ...out d abord la griffe d entraînement avec le pinceau 2 ensuite la coursière avec un chiffon doux c le crochet d et l anneau b Lubrifier les points d avec de l huile spéciale pour machine 1 à 2 gouttes Tourner le volant jusqu à ce que l entraînement e se trouve à gauche Replacer la coursière c et l anneau b et rabattre les deux pattes de blocage a Replacer la canette le boîtier de canette et la pla...

Page 122: ...e it 3 Clean the hook race 4 Clean the feed dog and bobbin holder with a brush then clean them with a soft dry cloth 5 Replace the bobbin holder into the hook race so that the tip A fits to the stopper B Replace the stitch plate and the two screws Insert the bobbin Close the bobbin cover plate replace the presser foot Important Fabric fluff and threads must be removed regulary The drop in system M...

Page 123: ...iffe d entraînement et le support de canette 5 Poser le support de canette dans la glissière du crochet sa pointe a doit reposer dans l arrêt b Monter la plaque à aiguille en visant les deux vis Placer l aiguille fixer le pied et refermer le couvercle du support Vérification Tourner le volant il ne doit opposer aucune résistance Le support de canette ne doit pas tourner Enfiler la machine et effec...

Page 124: ... Loosen the screw a on the left side of the sewing head and remove the face plate b 1 Pull light bulb downward to remove Replace the bulb with same type rated 5w 12V Set the face plate and tighten the screw 2 Light bulb replacement EN 56 82e_EN_ES_FR_PT_230807 07_55 90e_EN_ES_FR_PT qxd 23 8 2007 16 13 Seite 126 ...

Page 125: ...vant de la retirer et de la remplacer Tirer l ampoule vers le bas 2 N utiliser qu une ampoule de max 12 volts 5 watts Ces ampoules sont en vente dans les magasins spécialisés Monter le couvercle frontal visser la vis glisser le couvercle dans sa place habituelle Trocar lâmpada incandescente Atenção Leve a chave principal para 0 Desconecte a máquina da rede de energia elétrica retirando o plugue da...

Page 126: ...y oil has been used 4 The needle is damaged Thread is caught in the hook Correction 1 Rethread the machine 2 Reduce the thread tension lower number 3 Select a larger needle 4 Remove and reinsert the needle flat side towards the back 5 Remove the reel and wind thread onto reel 6 Replace the needle 1 Remove and reinsert needle flat side towards the back 2 Insert a new needle 3 Choose a needle to sui...

Page 127: ... dañada 1 El hilo se ha atascado en la lanzadera Solución 1 Enhebrar nuevamente la máquina 2 Reducir la tensión del hilo número menor 3 Utilizar una aguja más gruesa 4 Sacar la aguja y colocarla de nuevo la parte plana mirando hacia atrás 5 Sacar el hilo y devanarlo en la bobina 6 Cambiar la aguja 1 Sacar la aguja y colocarla de nuevo la parte plana mirando hacia atrás 2 Colocar una aguja nueva 3 ...

Page 128: ... 1 Réenfiler la machine 2 Réduire la tension du fil chiffre inférieur 3 Choisir un numéro supérieur d aiguille 4 Retirer l aiguille et replacer dans la bonne position le côté plat doit se trouver vers l arrière 5 Retirer les fils et enrouler sur la bobine 6 Remplacer l aiguille 1 Retirer l aiguille et replacer dans la bonne position le côté plat doit se trouver vers l arrière 2 Remplacer l aiguill...

Page 129: ...óleo de má qualidade 4 A agulha está danificada 1 A linha ficou agarrada na garra Conserto de defeito 1 Colocar a linha novamente na máquina 2 Reduzir a tensão da linha número mais baixo 3 Escolher uma agulha mais forte 4 Retirar a agulha e colocá la novamente a parte chata para trás 5 Retirar a linha e desbobinar a linha da bobina 6 Substituir a agulha 1 Retirar a agulha e colocá la novamente a p...

Page 130: ... L Light bulb replacement 126 M Maintenance 122 124 Monogramming and embroidering with embroidery hoop 108 N Needle up down 54 Needle fabric thread selection 58 O Overlock stitches 74 Overview 14 16 P Practical stitches 96 Q Quick reference drawer 24 Quilt stitch 110 Quilting 112 S Securing a seam 50 Sewing on buttons 76 Sewing table 22 24 Smocking stitch 90 Speed limiting adjustment 54 Start Stop...

Page 131: ...n el bastidor 109 Montar el soporte del pie prénsatelas 33 N Normas de seguridad importantes 3 4 P Palanca alza prénsatelas en dos escalas 31 Pie prénsatelas para cremallera cubierta 115 Pie prénsatelas para cordones 93 Pie prénsatelas dobladillador 85 Pie prénsatelas transportador 119 121 Punto nido de abeja 91 Punto overlock 75 Punto Quilt 111 113 Punto recto y posición de la aguja 65 67 Punto z...

Page 132: ...ur 85 P Pied de transport supérieur 119 121 Pied pour cordon 93 Pied pour fermeture à glissière cachèe 115 Placer l aiguille 41 Point droit et position de l aiguille 65 67 Point nid d abeille 91 Point quilt 111 Point zigzag 69 71 Point zigzag triple 87 Points décoratifs 99 Points utilitaires 97 Prescriptions de sécurité 5 6 Q Quilt 113 R Raccordement de la machine 27 29 Réduction de la vitesse de ...

Page 133: ...ne 39 Enfiar linha superior 43 Escolha do ponto 63 F Fazer caseados 79 Fazer quilt 113 G Gaveta com breve instrução 25 L Limitação da velocidade 55 M Manutenção 123 125 127 Monogramas e bor dados com o bastidor 109 Montagem do suporte do pé calcador 33 P Parabéns 12 Pescar a linha inferior 49 Ponto em ziguezague 69 71 Ponto overloque 75 Ponto quilt 111 Ponto reto e posição da agulha 65 67 Ponto sm...

Page 134: ...ayout PM Franz Herzer Copyright 2007 by BERNINA International AG Steckborn CH http www bernina com 08 07 EN ES FR PT 021E9R0113 EN 136 56 82e_EN_ES_FR_PT_230807 07_55 90e_EN_ES_FR_PT qxd 23 8 2007 16 13 Seite 136 ...

Reviews: