background image


Film and Slide Scanner     

H031 

Instructions for Use 


Please read and retain these instructions for future reference 

v001: 14/08/20 


①  ②  ③  ○

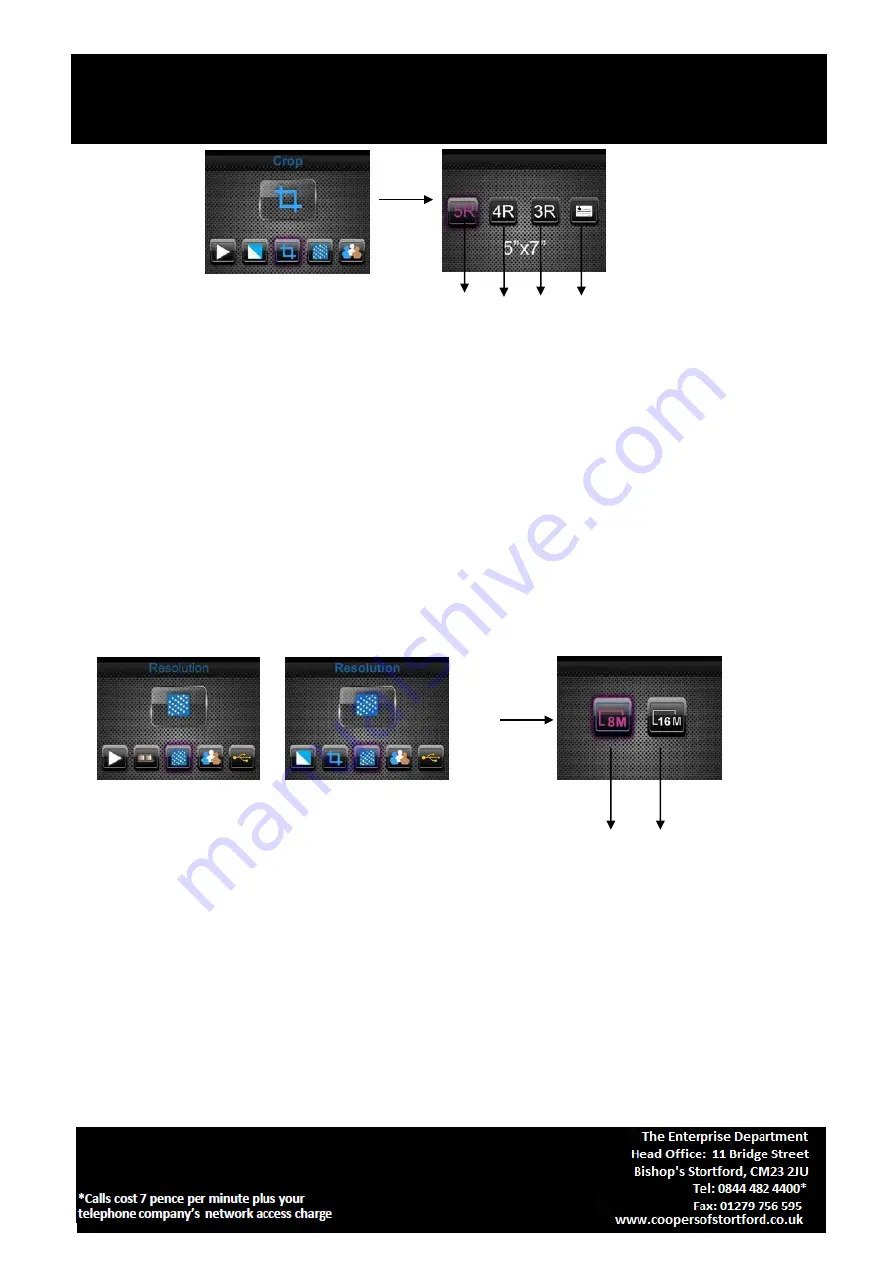
① 5R (5’’X7’’) crop proportion 
② 4R (4’’X6’’) crop proportion 
③ 3R (3 ½ ’’x5’’) crop proportion 
④ Name card crop proportion 


User can press LEFT/RIGHT button to select crop proportion, then press ENTER button to confirm 


Resolution 

Change resolution by enter Resolution menu when power on the device or access the main menu 
Home icon/MODE button anytime. Press LEFT/RIGHT button for Resolution and press ENTER 
button to confirm 

  or 


① 

② 

① 8M resolution 
② 16M resolution 


User can press LEFT/RIGHT button to select resolution, then press ENTER button to confirm 


Language 

Change language definition by entering language menu when power on the device or access the main 
menu by Home icon/MODE button anytime. Press LEFT/RIGHT button for language and press ENTER 
button to confirm. 

Summary of Contents for H031

Page 1: ...AL FORMAT SIMPLE SINGLE PASS SCANNING FOR FILMS WITH ITS 2 4 LCD COLOUR SCREEN YOU CAN VIEW YOUR IMAGES WHILST SCANNING COMES WITH SPECIALLY DESIGNED HOLDERS THAT YOU SIMPLY SLOT YOUR PHOTOGRAPHS SLIDES OR NEGATIVES INTO PUT INTO THE MACHINE AND JUST PRESS A BUTTON TO CONVERT CHOOSE THEN WHETHER TO SAVE TO AN SD CARD NOT INCLUDED OR CONNECT THE SCANNER TO A PC LAPTOP ETC USING THE USB LEAD INCLUDE...

Page 2: ...polation resolution Data conversion 12 bits per color channel Scan Method Single pass Light source Backlight Panel LED light lifetime for on off 10000 times Power Powered from USB 5V adapter included Interface USB 2 0 Dimension 220 x 208 x 147mm Weight 890g Language English French German Italian Spanish Traditional Chinese Simplified Chinese Japanese Contents Technical Specifications 2 1 Safety pr...

Page 3: ... USB connections on your computer If you have too many devices connected to your computer such as a wireless mouse media player mobile phone or other USB powered devices there may not be enough power for the Film Photo scanner to operate properly Servicing The user should not attempt to service the device beyond those means described in the operating instructions All other servicing should be refe...

Page 4: ...H031 Instructions for Use Please read and retain these instructions for future reference v001 14 08 20 3 Description of Parts Film and Photo Scanner Positive Slide Holder Negative Film Holder Photo Name card holder USB Cable ...

Page 5: ...p With the slide holder laid open place the slide into recessed area in the holder the slide should fit perfectly Note Handle slides with care Any dust scratches or fingerprints will show up on your saved images It is recommended to wear cotton gloves when handling slides It is recommended to use compressed air to remove any dust on the slides You can purchase it from an office supply or electroni...

Page 6: ...ll show up on your saved images If possible use cotton gloves when handling negatives It is recommended to use compressed air to remove any dust on the negatives This is not included with the film photo scanner but can be purchased from an office supply or electronics retailer Close the negative holder and press the edges so that it locks in place Hold it in the position as shown in the film photo...

Page 7: ...ng to the marked dimensions on the photo tray Note that for 5 x7 photographs the brackets do not need to be fitted into the photo tray Place the brackets into the slots and slide the brackets downwards to secure Check that they are securely fastened by turning the photo tray upside down The brackets should not fall off 1 Place brackets in photo tray 2 Slide brackets downwards tosecure Right bracke...

Page 8: ... will show up on your saved images Scanned name cards will capture a standard dimension of 91x55mm The scanned image will have a slight border around the name card 7 General operations Note Maybe there is some difference between the preview image and saved image please subject to the image that you saved in SD card Quick Start 1 If you want to scan film please switch two switches on the top of the...

Page 9: ...n indication LED is on 6 Follow the menu on screen for scanning 7 After finishing scanning take out the memory card Note The film photo scanner has a built in memory for recording when there is a memory card inserted data will be saved onto the memory card 8 Or read pictures from PC by USB mode 9 When capturing in either photo or film modes please remember to push both slide switches to the correc...

Page 10: ...nguage mode USB mode Capture mode Playback mode Effect multicolor B W Crop proportion 5 x7 5R 4 x6 4R 3 x5 3R name card Resolution Home MODE No memory card No memory card indicator If there is no memory card inserted into the device a warning icon will be shown on screen when entering the main menu SD SDHC card slot up to 128GB ...

Page 11: ... When entering into capture mode press ENTER button following picture will show on EV means brightness R means red G means green B means blue Press ENTER button to switch press LEFT RIGHT button to adjust data Press SCAN button back to image preview mode Capture Mirror Flip Hard Key If any image requires for Mirror or Flip before capture press LEFT RIGHT button for Mirror Flip function the live vi...

Page 12: ... down image Capture mode live view indicator Once entering capture mode there will be an indicator on the left top corner to indicate it is in live view mode User can also press ENTER button then press LEFT RIGHT button to adjust EV value press SCAN button again to confirm and back to live view mode Capture Edit Menu Save save captured image Cancel cancel any editing with this image Home back to m...

Page 13: ...rn to live view again 1 1 Capture Save Save Press SCAN button once preview live view image will be selected and shown on the TFT which will take between 1 2 second with 2 icons shown on the left side of the screen Save icon will be highlighted for user to confirm by ENTER button after the above step the display will go back to live view mode preview 1 2 Capture Cancel Selected image Select Cancel ...

Page 14: ...r cancel option the display will return to capture mode live view Then user can move the film holder to next target film or change to another photo to capture Memory full Once the internal memory or memory card is full a memory full icon will be shown on screen when pressing SCAN button User has to download the images to PC or replace another memory card to continue Memory full indicator Playback ...

Page 15: ...grees Delete delete this picture stored in internal memory or memory card Exit return to Slide show mode Save save the modified image to internal memory or memory card Home return to main menu Playback Slide Show Single Picture Edit mode User can interrupt stop slide show mode to stand alone playback mode single picture playback by pressing ENTER button Pause slide show Then user is able to scroll...

Page 16: ... will be rotated 90 degrees and cursor will remain at Save Press ENTER button again to save modified result and next picture will be shown For continuously rotate 90 degrees move cursor to rotate again and press ENTER button Same for Rotate 90 function Playback Exit ENTER Once user selects Exit function in edit menu the display will go back to slide show starting with the current picture without a...

Page 17: ... cursor to delete icon again and press ENTER button to confirm Playback Home Select Home icon with LEFT RIGHT button then press ENTER button or press MODE button on top of the device anytime to return to main menu Playback No Picture If there is no picture when enter playback mode a No picture symbol will show on screen Film Type When the Film scanner mode is selected user can change film type by ...

Page 18: ...o scanner mode is selected user can change color effect by enter Effect menu when power on the device or access the main menu by Home icon MODE button anytime Press LEFT RIGHT button for Effect and press ENTER button to confirm Multicolor effect B W effect User can press LEFT RIGHT button to select color effect then press ENTER button to confirm Crop proportion When the Photo scanner mode is selec...

Page 19: ... Change resolution by enter Resolution menu when power on the device or access the main menu Home icon MODE button anytime Press LEFT RIGHT button for Resolution and press ENTER button to confirm or 8M resolution 16M resolution User can press LEFT RIGHT button to select resolution then press ENTER button to confirm Language Change language definition by entering language menu when power on the dev...

Page 20: ...mages on PC User can also press MODE button to go back to main menu Trouble shooting Question There is unwanted stripe appearance at the edge of the image Answer If it is slight stripe move the slide holder gently to and fro in the device until the stripe is no longer visible in the preview window If the stripe is still please contact with our retailer Question The device cannot connect to the com...

Page 21: ...tford use recyclable or recycled packaging where possible Please dispose of all packaging paper cartons packaging in accordance with your local recycling regulations Plastics polybags Contains the following recyclable plastic Code Symbol Type of Plastic Low Density Polyethylene includes ABS Nylon Commonly used for Shopping bags bread bags squeezy bottles stretch pallet wrap bubble wrap multi pack ...

Reviews: