18
EN
EN
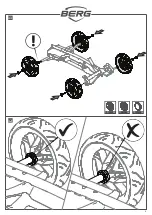
• The correct tire pressure is shown on the outside of the tire. If the tires are at the correct pressure
the product will be light and easy to handle. If the pressure is too low, the tires will leak quicker and
will suffer excessive wear and tear. If the tire pressure is too high, the tire can for example come
loose from the rim, resulting in dangerous situations. Attention: remember that in bright sunlight
and at high temperatures the tire pressure increases! The tires must not come into contact with oil,
grease or fuel. Make sure that the valve caps are always fitted on the valves.
• Incorrect tire pressure will negatively affect the functionality and safety of the hand brake and
parking brake. The brake bar is designed to function optimally at the correct tire pressure.
3.2.3 Steering
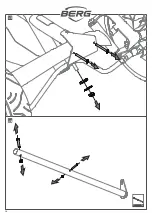
The steering equipment must be checked every month for the following:
• Damage, rust, wear and tear.
• All the nuts and bolts must be tightened.
• Check if the front wheels are properly aligned. If necessary, adjust according to attached scheme.
3.2.4 Chain
The go-kart has a driving mechanism with two chains.
Make sure that the chains are sufficiently oiled so that they can travel freely .
If a chain is too tightly tensioned, the product will be more difficult to pedal and there is a big chance
that wear and tear of the chain and sprocket, among other things, will occur faster. If a chain is not
tight enough, the chain can easily come off the sprocket, or there is a chance of damage to the chain
housing.
When both chains must be tensioned, always begin with the rear/short chain.
To tension the rear chain:
• Remove the protective hood.
• Loosen the nuts of the hub.
• Tension the chain by moving the hub forwards.
• Make sure that the hub remains exactly parallel to the rear axle.
• Tighten the hub nuts again.
• The chain has the correct tension if the middle can be pushed 6 millimeters downwards.
Tensioning the front chain:
• Loosen the bolts of the crank axle at the bottom of the frame.
• Tension the chain by turning the tensioning nut clockwise.
• Tighten the bolts again. It must be possible to push the middle of the chain downwards by 1
centimeter. Check this before you install the protective hood back in its place.
• Install the protective hood back in its place.
X
X+5 mm
Summary of Contents for Rally 2.0
Page 2: ...Go to the BERG toys channel on for installation instruction video s www youtube com bergtoys...
Page 4: ...4 1x 2 1x 1 1 2...
Page 5: ...5 1x 17 3 4...
Page 6: ...6 1x 4 5 6...
Page 7: ...7 1x 8 7 8...
Page 8: ...8 9 10...
Page 9: ...9 2x 10 2x 11 4x 13 11 12...
Page 10: ...10 1x 7 13 14...
Page 11: ...11 1x 16 1x 3 15 16...
Page 12: ...12 1x 6 1x 9 17 18...


