background image

132

Installation

6003480_0 – 27.03.2017

3.5.4 

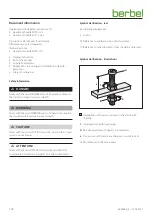
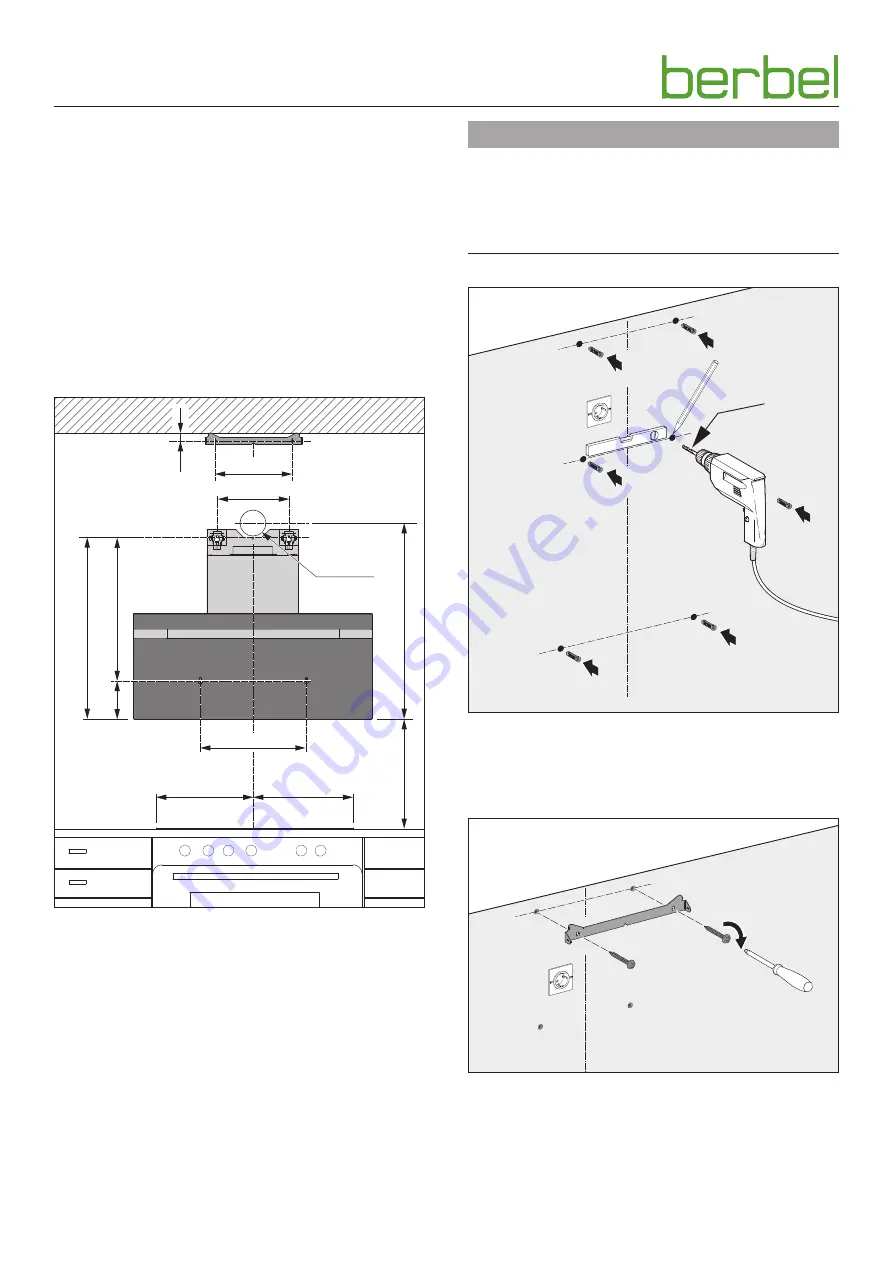
Hang the device in place

The device is designed to be hung on walls. The chimney can 
be adapted to the ceiling height by pulling it out.

When mounting on a solid wall:


Make sure that the wall has sufficient load bearing 
capacity. 


Use the fastening materials provided.

With different installation situations:


Enquire about alternative fastening systems (e.g. consult 
with your architect).


Only use fastening hardware suitable for the type of wall.

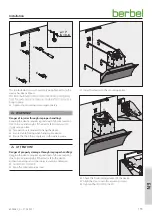
x

540

150

270

690

≥ 765 

1  ⁄  

790 

2

30

290

=

=

400

Ø 165 

2

1

 for extracted air mode with exhaust air duct to the rear.

2

 for hybrid mode with exhaust air duct to the rear.

Safety distance (x):


y

Recommendation 500 mm. 


y

With gas hobs, at least 650 mm.


Determine the hanging position.


Ensure that the chimney mount is correctly positioned:


y

The chimney cannot be mounted if it falls below the 
required measurement (30 mm).


y

Any irregularities (e. g. in the ceiling) can be 
compensated with slotted holes.


Make sure that the safety distance is complied with.


m

WARNING

Risk of death due to explosions or electric shock!

Drilling through gas, water or electrical lines can lead to 
hazardous situations.


Ensure that there are no lines in the wall at the fastening 
points.

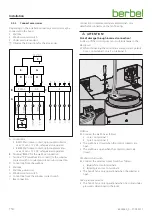
Ø 8


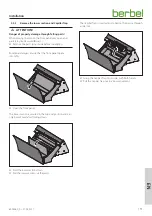
Determine the locations of the fastening points and mark 
them.


Drill the holes in the wall.


Insert the wall plugs into the holes.


Screw the chimney fastening bracket on.

Summary of Contents for BKH 110 GL-2

Page 1: ...hood Glassline 2 DE Gebrauchs und Montageanleitung für die Modelle FR Manuel d utilisation et de montage des modèles IT Istruzioni d uso e di montaggio per i modelli NL Gebruiks en montagehandleiding voor de modellen EN Operating and installation instructions for the models BKH 90 GL 2 BKH 110 GL 2 6003480_0 ...

Page 2: ...ngen führt m WARNUNG Hinweise mit dem Wort WARNUNG warnen vor einer gefährlichen Situation die zum Tod oder zu schweren Verletzungen führen kann m VORSICHT Hinweise mit dem Wort VORSICHT warnen vor einer Situation die zu leichten oder mittleren Verletzungen führen kann m ACHTUNG Hinweise mit dem Wort ACHTUNG warnen vor einer Situation die zu Sach oder Umweltschäden führen kann Symbolerklärung Text...

Page 3: ... 3 5 4 Gerät aufhängen 12 3 5 5 Zubehör anschließen 14 3 5 6 Filter aufsetzen bei Umluft und Hybridbetrieb 15 3 5 7 Abluftleitung anschließen bei Abluft und Hybridbetrieb 16 3 5 8 Spannungsversorgung herstellen 16 3 5 9 Kamin montieren 17 3 5 10 Capillar Trap und Unterschale einsetzen 18 3 5 11 Kontrolle und Inbetriebnahme durchführen 18 4 Bedienung 19 4 1 Sicherheitshinweise zur Bedienung 19 4 2 ...

Page 4: ...ufsichtigt y Benutzer wurden bezüglich des sicheren Gebrauchs des Geräts unterwiesen y Benutzer verstehen Gefahren im Umgang mit dem Gerät y Kinder dürfen nicht mit dem Gerät spielen 1 3 Allgemeine Sicherheitshinweise m WARNUNG Gefahr durch Nichtbeachtung der Gebrauchs und Montageanleitung Diese Anleitung enthält wichtige Informationen für den sicheren Umgang mit dem Gerät Auf mögliche Gefahren wi...

Page 5: ...nigte Raumluft wird dem Raum wieder zugeführt Durch Frischluftzufuhr kann die Luftfeuchtigkeit im Raum reduziert werden Beim Umluftbetrieb ist die Benutzung der Nachlauffunktion erforderlich damit das Gerät die restlichen Geruchsanteile aufnehmen kann Durch Benutzung der Nachlauffunktion wird die Lebensdauer der Filter Füllung erhöht Die Filter Füllung muss regelmäßig erneuert werden 2 2 2 Abluftb...

Page 6: ...g auf der Rückseite vom Haubenkorpus D A B C A Oberschale B Capillar Trap herausnehmbar C Unterschale herausnehmbar D Typenschild auf der Innenseite der Frontblende A B C D A Anschlussklemmen für Mauerkasten Fensterkontakt schalter Multifunktionskontakt und Bus Anbindung B Lüfterabgang mit Führungshilfe für Filter oder Abluftleitung C Stellschrauben für das Ausrichten D Anschlussbuchse für das Net...

Page 7: ...tleistung 187W 193W Leistungsaufnahme Lüfter 170W 170W Leuchtmittel Kochfeld Beleuchtung LED 14 2W 520 lx LED 19 5W 630 lx Farbtemperatur Kochfeld Beleuchtung einstellbar 2700 6500 K 2700 6500 K Leuchtmittel Effektbeleuchtung LED 2 6W 264 lm LED 2 6W 264 lm Breite 898 mm 1098 mm Tiefe 440 mm 440 mm Höhe bei Umluftbetrieb mit Umluftfilter BUF 150 995 1375 mm 995 1375 mm Höhe bei Umluftbetrieb mit U...

Page 8: ...chen Situationen führen z B im Umgang mit Strom oder Gas Stellen Sie sicher dass die Anforderungen an den Montageort unbedingt eingehalten werden y Keine Montage in explosionsgefährdeten Umgebungen y Bei gleichzeitiger Verwendung einer raumluftabhängigen Brennstelle z B Kamin im selben Luftverbund y Eine Sicherheitseinrichtung ist unbedingt erforderlich y Die Sicherheitseinrichtung z B Unterdruckw...

Page 9: ...age Bei Verwendung der Abluftleitung mit anderen Geräten oder bei Anschluss an aktive Abluftkanäle z B Kamin können Gase oder Rauch in den Raum gezogen werden Stellen Sie sicher dass die Anforderungen an die Abluftleitung unbedingt eingehalten werden y Die Abluftleitung wird ausschließlich von diesem Gerät verwendet y Die Abluftleitung besteht aus nicht brennbarem Material gemäß DIN 4102 Klasse 1 ...

Page 10: ...ndere Flächen im Montagebereich z B mit dicker Pappe Stellen Sie sicher dass die Spannungsversorgung unterbrochen ist und bleibt Die Spannungsversorgung erfolgt erst nach Aufforderung im entsprechenden Montageschritt Wenn Zubehör z B Mauerkasten Fensterkontaktschalter zur Montagesituation gehört Die Anleitungen vom Zubehör sind zu beachten Stellen Sie sicher dass Zubehör korrekt montiert und ansch...

Page 11: ...tage Rotationsdämpfer sorgen für eine sanfte Öffnung der Frontblende Öffnen Sie die Frontblende Die Unterschale ist in der oberen Endposition gesichert und nur nach dem Herunterklappen entnehmbar Klappen Sie die Unterschale nach unten Ziehen Sie die Unterschale nach vorne heraus Das Capillar Trap ist eingesteckt und wird durch eine Seitensicherung im Gerät gehalten Fassen Sie das Capillar Trap sei...

Page 12: ...ng nach hinten Sicherheitsabstand x y Empfehlung 500 mm y Bei Gaskochfeldern mindestens 650 mm Ermitteln Sie die Aufhängeposition Achten Sie auf die korrekte Position der Kaminbefestigung y Bei Unterschreiten des Maßes 30 mm kann der Kamin nicht eingehängt werden y Unebenheiten z B bei der Decke können über Langlöcher ausgeglichen werden Stellen Sie sicher dass der Sicherheitsabstand eingehalten w...

Page 13: ... möglich Hängen Sie das Gerät mit zwei Personen auf Sorgen Sie für einen sicheren Stand beim Aufhängen Stellen Sie sicher dass sich keine weiteren Personen im Arbeitsbereich aufhalten m ACHTUNG Gefahr von Sachschäden durch unsachgemäße Handhabung Größe und Gewicht des Geräts verlangen beim Aufhängen viel Kraft Wenn das Gerät herunterfällt können Gerät Küchenmöbel und andere Gegenstände beschädigt ...

Page 14: ...teuerungsleitung vom Fensterkontaktschalter I Bus Anbindung Der Anschluss erfolgt über Kabelklemmen an einem abnehmbaren Stecker am Lüftergehäuse m ACHTUNG Gefahr von Beschädigungen durch falschen Anschluss Eine falsche Polung der Steuerungsleitung kann zu Beschädigungen der Elektronik führen Achten Sie beim Anschluss der Steuerungsleitung auf die korrekte Polung Ader 1 an Klemme 1 Ader 2 an Klemm...

Page 15: ...den Händen verursachen können z B bei grober Handhabung beim Filteraufsatz Setzen Sie den Filter vorsichtig von oben auf Vermeiden Sie Kontakt mit den Seitenblechen Umluftbetrieb 5 Setzen Sie den Umluftfilter von oben auf die Führungshilfe vom Lüftergehäuse Stellen Sie sicher dass der Umluftfilter korrekt montiert ist Hybridbetrieb Abluft nach oben 5 Setzen Sie den Hybridfilter von oben auf die Fü...

Page 16: ...n oben auf den Kragen vom Hybridfilter Stellen Sie sicher dass die Abluftleitung korrekt montiert ist 3 5 8 Spannungsversorgung herstellen Beachten Sie die Spannungsangabe auf dem Typenschild Stecken Sie den Kaltgerätestecker in die Anschlussbuchse auf dem Lüftergehäuse Stecken Sie den Netzstecker in die Steckdose Verlegen Sie die Kabel so dass sie nicht geknickt gequetscht oder beschädigt werden ...

Page 17: ...Gerät zerkratzen können z B Werkzeuge Gürtelschnallen In Abhängigkeit von der Betriebsart werden die beiden Kaminbleche zueinander ausgerichtet Umluft und Hybridbetrieb Die Lüftungsschlitze befinden sich oben und sind nicht verdeckt Abluftbetrieb Das innere Kaminblech kann herausgezogen und umgekehrt eingesteckt werden um die Lüftungsschlitze zu verdecken 1 2 Heben Sie den Kamin mit zwei Personen ...

Page 18: ... Sie die Frontblende 3 5 11 Kontrolle und Inbetriebnahme durchführen m ACHTUNG Gefahr von Störungen durch Feuchtigkeit im Gerät Wenn das Gerät von einer kalten in eine warme Umgebung gebracht wird kann sich im Inneren Feuchtigkeit nieder schlagen Warten Sie 2 3 Stunden bevor Sie das Gerät in Betrieb nehmen Prüfen Sie dass der Netzstecker frei zugänglich ist oder dass eine allpolige Trennvorrichtun...

Page 19: ...ar Trap und geschlossener Unterschale y Bei Umluftbetrieb Keine Abdeckung der Lüftungsausgänge z B Gläser Teller auf oder vor die Lüftungsschlitze Ausströmende Luft muss ungehindert durch die Lüftungsschlitze entweichen können andernfalls kann sich ein Rückstau bilden Wenn die Kochdünste nicht mehr abziehen können besteht Brandgefahr y Bei Abluft oder Hybridbetrieb Eine ausreichende Frischluftzufu...

Page 20: ...rleistung y Leistungsstufe 3 hohe Lüfterleistung Wenn die Intensität der Kochdünste nicht abnimmt schalten Sie in eine höhere Leistungsstufe Schalten Sie beim Anbraten in die Leistungsstufe Power Schalten Sie nach Kochende die Nachlauffunktion ein D 4 3 1 Nachlauffunktion Seite 21 Sorgen Sie regelmäßig für Frischluftzufuhr Verwenden Sie das Gerät auch um andere störende Gerüche zu reduzieren Zum B...

Page 21: ...ol der Leistungsstufe 4 3 2 Kochfeld Beleuchtung Die Kochfeld Beleuchtung ist mit einer energiesparenden LED Beleuchtung ausgestattet Die Beleuchtung kann jederzeit und unabhängig vom Lüfter genutzt werden Die Kochfeld Beleuchtung ist dimmbar Die Einstellung der Farbtemperatur erfolgt im Konfigurations modus D 4 4 Konfiguration Seite 22 Tastfeld Funktion 1x Tastfeld berühren um die Kochfeld Beleuc...

Page 22: ...lds die folgenden Funktionen aktiviert oder deaktiviert werden Tastfeld Funktion 1x Tastfeld berühren Kochfeld Beleuchtung schaltet ein Tastfeld erneut berühren um den Farbdurchlauf zu starten Nach Loslassen des Tastfelds stoppt der Farbdurchlauf die gewählte Farbtemperatur wird gespeichert Tastfeld Funktion Effektbeleuchtung Im Auslieferungszustand ist die Funktion aktiviert 1x Tastfeld berühren ...

Page 23: ...tikel abgeschieden und gesammelt Vor jeder Reinigung Schalten Sie das Gerät aus Stellen Sie sicher dass das Kochfeld und andere berührbare Teile abgekühlt sind m ACHTUNG Gefahr von Beschädigungen durch unsachgemäße Reinigung Scharfkantige Gegenstände Scheuermittel oder ungeeignete Reinigungsmittel können das Gerät beschädigen Folgende Reinigungsmttel sind ungeeignet und dürfen nicht verwendet werd...

Page 24: ...Trap und Unterschale einsetzen Seite 18 Capillar Trap Das Capillar Trap ist eingesteckt und wird durch eine Seitensicherung im Gerät gehalten Fassen Sie das Capillar Trap seitlich mit beiden Händen an Ziehen Sie das Capillar Trap in einer Bogenbewegung heraus Reinigen Sie das Capillar Trap z B in der Spülmaschine Reinigen Sie Flächen und Kanten am Aufnahmeschacht vom Capillar Trap mit einem weiche...

Page 25: ... berührbare Teile müssen abgekühlt sein y Das Lüftergehäuse darf niemals geöffnet werden 6 2 Wartung 6 2 1 Leuchtmittel wechseln Das Gerät ist mit einer wartungsfreien LED Beleuchtung ausgestattet Wenn eine Störung auftritt Wenden Sie sich an Ihren Fachhändler oder an den Kundendienst 6 2 2 Filter Füllung wechseln bei Umluft und Hybridbetrieb Geruchsanteile werden durch die Filter Füllung im Umluf...

Page 26: ...en Sie den Filter mindestens 30 mm an Nehmen Sie den Filter nach vorne heraus Der Wechsel der Filter Füllung erfolgt wie in der zugehörigen Anleitung beschrieben Wechseln Sie die Filter Füllung Reinigen Sie den Filter von außen z B durch Absaugen mit einem Staubsauger Setzen Sie die Filter wieder auf D 3 5 6 Filter aufsetzen bei Umluft und Hybridbetrieb Seite 15 Montieren Sie den Kamin D 3 5 9 Kam...

Page 27: ...ridbetrieb Seite 25 Schlechte Leistung des Geräts y Der Umluftfilter hat sich zugesetzt Erneuern Sie die Filter Füllung des Umluftfilters D 6 2 2 Filter Füllung wechseln bei Umluft und Hybridbetrieb Seite 25 y Der Hybridfilter hat sich zugesetzt Erneuern Sie die Filter Füllung des Hybridfilters D 6 2 2 Filter Füllung wechseln bei Umluft und Hybridbetrieb Seite 25 y Die Abluftleitung wurde nicht sa...

Page 28: ...aft Wenn das Gerät herunterfällt können Gerät Küchenmöbel und andere Gegenstände beschädigt werden Decken Sie das abgekühlte Kochfeld ab Halten Sie den Montagebereich frei Unterbrechen Sie allpolig die Spannungsversorgung des Geräts Ziehen Sie den Netzstecker ab Lösen Sie das innere Kaminblech von der Kamin befestigung Heben Sie den Kamin vom Gerät ab Wenn vorhanden Entfernen Sie vorhandene Anschl...

Page 29: ... Rohstoffe eingespart werden y Die Außenverpackung besteht aus Pappe y Das Füllmaterial und die Einlagen bestehen aus Pappe oder Styropor y Die Schutzfolien und Beutel bestehen aus Polyethylen PE Entsorgen Sie die Verpackung umweltfreundlich getrennt nach Werkstoffen 8 2 Gerät entsorgen m ACHTUNG Gefahr von Umweltschäden durch nicht sachgerechte Entsorgung des Geräts Das Gerät unterliegt der europ...

Page 30: ... FDE Hood 30 5 31 9 FDE Hood Klasse A A LE Hood 36 6 32 3 LE Hood Klasse A A GFE Hood 85 7 84 3 GFE Hood Klasse B C Volumenstrom bei Abluftbetrieb in m h Stufe min max 250 340 260 390 Stufe Power Intensiv 420 480 Volumenstrom bei Umluftbetrieb in m h Stufe min max 190 280 210 330 Stufe Power Intensiv 350 410 Schallleistung bei Abluftbetrieb in db A Stufe min max 50 58 52 60 Stufe Power Intensiv 64...

Page 31: ...I Flach 150 doppelt 1004731 Abluft Set ECO I Rund 150 1004732 Abluft Set ECO II Flach 150 1004733 Abluft Set ECO III Flach 150 doppelt 1004734 9 3 Kontakt Wenn Sie Anregungen oder Fragen haben wählen Sie aus folgenden Möglichkeiten Post berbel Ablufttechnik GmbH Sandkampstraße 100 D 48432 Rheine Telefon 49 0 5971 80 80 9 0 Mo bis Do 8 00 17 30 Uhr und Fr 8 00 16 30 Uhr Telefax 49 0 5971 80 80 9 10...

Page 32: ... graves m AVERTISSEMENT Les indications suivies du mot AVERTISSEMENT signalent une situation dangereuse qui peut entraîner la mort ou des blessures graves m PRUDENCE Les indications suivies du mot PRUDENCE signalent une situation dangereuse qui peut entraîner des blessures légères ou modérées m ATTENTION Les indications suivies du mot ATTENTION signalent une situation dangereuse qui peut entraîner...

Page 33: ...cordement des accessoires 44 3 5 6 Positionnement du filtre en mode recyclage d air et en mode hybride 45 3 5 7 Raccordement de la conduite d évacuation d air vicié en mode évacuation d air vicié et en mode hybride 46 3 5 8 Exécution du raccordement de l alimentation électrique 46 3 5 9 Montage de la cheminée 47 3 5 10 Installer Capillar Trap et l enveloppe inférieure48 3 5 11 Exécution du contrôl...

Page 34: ...ûre de l appareil y Les utilisateurs comprennent les dangers liés à l appareil y Les enfants ne doivent pas jouer avec l appareil 1 3 Consignes de sécurité générales m AVERTISSEMENT Danger en cas de non respect du manuel d utilisation et de montage Ce manuel comporte des informations importantes pour une utilisation sûre de l appareil Les éventuels dangers font l objet d une mention particulière V...

Page 35: ...duit dans la pièce L humidité de l air dans la pièce peut être réduite par une alimentation en air frais En mode recyclage d air l utilisation de la fonction arrêt temporisé est nécessaire pour que l appareil puisse absorber les odeurs résiduelles La fonction arrêt temporisé permet d accroître la durée de vie du remplissage du filtre Le remplissage du filtre doit être renouvelé régulièrement 2 2 2...

Page 36: ...e du corps de hotte D A B C A Enveloppe supérieure B Capillar Trap amovible C Enveloppe inférieure amovible D Plaque signalétique à l intérieur du panneau frontal A B C D A Bornes de connexion pour caisson mural interrupteur de contact de fenêtre contact multifonctions et connexion Bus B Sortie du ventilateur avec auxiliaire de guidage pour filtre ou conduite d évacuation d air vicié C Vis de régl...

Page 37: ...r 170W 170W Ampoule de l éclairage de la plaque de cuisson LED 14 2W 520 lx LED 19 5W 630 lx Température de lumière de l éclairage de plaque de cuisson réglable 2700 6500 K 2700 6500 K Ampoule de l éclairage d effet LED 2 6W 264 lm LED 2 6W 264 lm Largeur 898 mm 1098 mm Profondeur 440 mm 440 mm Hauteur en mode recyclage d air avec filtre de recyclage d air BUF 150 995 1375 mm 995 1375 mm Hauteur e...

Page 38: ...ion de courant ou de gaz S assurer que les exigences relatives au lieu de montage sont bien respectées y Pas de montage dans les environnements explosifs y En cas d utilisation simultanée d un lieu de combustion à air ambiant par ex cheminée dans la même composition d air y Un dispositif de sécurité est indispensable y Le dispositif de sécurité par ex manostat à ouverture minimale de pression P4 c...

Page 39: ...correct En cas d utilisation de la conduite d évacuation d air vicié avec d autres appareils ou en cas de raccordement aux conduits d évacuation d air vicié par ex cheminée des gaz ou fumées peuvent être aspirés dans la pièce S assurer que les exigences relatives à la conduite d évacuation d air vicié sont bien respectées y La conduite d évacuation d air vicié est exclusivement utilisée par cet ap...

Page 40: ...de cuisson et autres surfaces dans la zone de montage par ex avec du carton épais S assurer que l alimentation électrique est coupée et protégée contre tout démarrage intempestif L alimentation électrique a uniquement lieu lorsque cela est indiqué dans l étape de montage correspondante Lorsqu un accessoire par ex caisson mural interrupteur de contact de porte fait partie de la situation de montage...

Page 41: ...tisseurs de vibrations veillent à une ouverture en douceur du panneau frontal Ouvrir le panneau frontal L enveloppe inférieure est fixée en position finale et ne peut être retirée qu après avoir été rabattue vers le bas Rabattre l enveloppe inférieure vers le bas Tirer l enveloppe inférieure vers l avant Le Capillar Trap est inséré et maintenu en position au moyen d une fixation latérale dans l ap...

Page 42: ...uation d air vicié vers l arrière Distance de sécurité x y Recommandation 500 mm y Min 650 mm pour les plaques de cuisson au gaz Déterminer la position de suspension Veiller à ce que la fixation de cheminée soit dans la bonne position y En dessous de 30 mm la cheminée ne peut pas être accrochée y Les irrégularités telles que celles pouvant se trouver sur le plafond peuvent être compensées par des ...

Page 43: ...e Si l appareil tombe des blessures graves sont possibles Accrocher l appareil à deux personnes Veiller à la stabilité lors de l accrochage S assurer que personne d autre ne se trouve dans la zone de travail m ATTENTION Risque de dommages en cas de manipulation incorrecte La taille et le poids de l appareil nécessitent beaucoup de force lors de l accrochage Si l appareil tombe ceci peut endommager...

Page 44: ...de fenêtre H Câble de commande de l interrupteur de contact de fenêtre I Connexion Bus Le raccordement a lieu au moyen de bornes de câble sur un connecteur amovible sur le carter de ventilateur m ATTENTION Risque de dommages en cas de raccordement incorrect Une polarité incorrecte du câble de commande peut entraîner des dommages de l électronique Attention à respecter la polarité lors du raccordem...

Page 45: ... causer des coupures aux mains par ex en cas de manipulation sans précaution de l élément filtrant Placer le filtre avec précaution par le haut Éviter de toucher les tôles latérales Mode recyclage d air 5 Placer le filtre de recyclage d air par le haut sur l auxiliaire de guidage du carter du ventilateur S assurer que le filtre de recyclage d air est correctement monté Mode hybride Air vicié vers ...

Page 46: ... Placer la conduite d évacuation d air vicié par le haut sur la collerette du filtre hybride S assurer que la conduite d évacuation d air vicié est correctement montée 3 5 8 Exécution du raccordement de l alimentation électrique Observer la tension indiquée sur la plaque signalétique Insérer la fiche mâle dans la prise de raccordement du carter de ventilateur Branchez la fiche secteur dans la pris...

Page 47: ...er l appareil par ex outils boucles de ceinture Les deux tôles de cheminée sont alignées l une par rapport à l autre en fonction du mode de fonctionnement Mode recyclage d air et hybride Les grilles d aération sont situées en haut et ne sont pas recouvertes Mode évacuation d air vicié La tôle de cheminée intérieure peut être retirée et insérée de manière inversée pour recouvrir les grilles d aérat...

Page 48: ...s de maintien Fermer le panneau frontal 3 5 11 Exécution du contrôle et de la mise en service m ATTENTION Risque de perturbations en cas d humidité dans l appareil Si vous déplacez l appareil d un endroit froid à un environnement chaud de l humidité peut se condenser à l intérieur de l appareil Attendre 2 à 3 heures avant de mettre l appareil en marche Vérifier que la fiche secteur est facilement ...

Page 49: ...c le Capillar Trap intégré et une enveloppe inférieure fermée y En mode recyclage d air Pas de recouvrement des sorties d aération par ex verres assiettes sur ou devant les grilles d aération L air qui circule doit pouvoir être évacué sans entraves par les grilles d aération un reflux peut se former le cas échéant Lorsque les vapeurs de cuisson ne peuvent plus être aspirées il existe un risque d i...

Page 50: ...sance moyenne du ventilateur y Niveau de puissance 3 Puissance élevée du ventilateur Activer la hotte à un niveau de puissance supérieur si l intensité des vapeurs de cuisine ne diminue pas Pendant la cuisson en faisant revenir commuter l appareil au niveau max de puissance Après la fin de la cuisson utiliser la fonction arrêt temporisé en marche D 4 3 1 Fonction arrêt temporisé page 51 Veiller ré...

Page 51: ...ge de la plaque de cuisson L éclairage de la plaque de cuisson est équipé d un éclairage LED économe en énergie L éclairage peut être utilisé à tout moment et indépendamment du ventilateur L éclairage de la plaque de cuisson est variable La température de lumière peut être réglée en mode configuration D 4 4 Configuration page 52 Touche tactile Fonction Appuyer 1 fois sur la touche tactile pour act...

Page 52: ...ctile Fonction Appuyer 1 fois sur la touche tactile L éclairage de la plaque de cuisson est activé Actionner à nouveau la touche tactile pour démarrer le cycle de couleurs Relâcher la touche tactile et le cycle de couleurs s arrête La température de couleur sélectionnée est enregistrée Éclairage d effet À la livraison la fonction est activée Appuyer 1 fois sur la touche tactile La touche tactile é...

Page 53: ...ont séparées et collectées dans l enveloppe supérieure dans l enveloppe inférieure et dans le Capillar Trap Avant chaque nettoyage Éteindre l appareil Veiller à ce que la plaque de cuisson et autres pièces exposées soient refroidies m ATTENTION Risque de dommages en cas de nettoyage incorrect Les objets tranchants produits abrasifs ou produits de nettoyage inappropriés peuvent endommager l apparei...

Page 54: ... Installer Capillar Trap et l enveloppe inférieure page 48 Capillar Trap Le Capillar Trap est inséré et maintenu en position au moyen d une fixation latérale dans l appareil Saisir latéralement le Capillar Trap des deux mains Enlever le Capillar Trap en faisant un mouvement circulaire Nettoyer le Capillar Trap par ex dans le lave vaisselle Nettoyer les surfaces et bords sur le bac de réception du ...

Page 55: ...nt être refroidies y Le carter du ventilateur ne doit jamais être ouvert 6 2 Entretien 6 2 1 Remplacement des ampoules L appareil est équipé d un éclairage LED sans entretien Lorsqu un défaut survient S adresser à votre revendeur spécialisé ou au service après vente 6 2 2 Remplacement du remplissage du filtre en mode recyclage d air et en mode hybride Les odeurs sont liées au remplissage du filtre...

Page 56: ...Soulever le filtre d au moins 30 mm Sortir le filtre vers l avant Le remplacement du remplissage de filtre a lieu comme décrit dans le manuel correspondant Remplacer le remplissage de filtre Nettoyer le filtre de l extérieur par ex en l aspirant avec un aspirateur Remettre en place le filtre D 3 5 6 Positionnement du filtre en mode recyclage d air et en mode hybride page 45 Monter la cheminée D 3 ...

Page 57: ... et en mode hybride page 55 Mauvais rendement de l appareil y Le filtre de recyclage d air est obstrué Remplacer le remplissage du filtre de recyclage d air D 6 2 2 Remplacement du remplissage du filtre en mode recyclage d air et en mode hybride page 55 y Le filtre hybride est obstrué Remplacer le remplissage du filtre hybride D 6 2 2 Remplacement du remplissage du filtre en mode recyclage d air e...

Page 58: ...Si l appareil tombe ceci peut endommager l appareil le mobilier de cuisine et autres objets Recouvrir la plaque de cuisson refroidie Libérer la zone de montage Couper l alimentation électrique sur tous les pôles de l appareil Débrancher la fiche secteur Desserrer la tôle de cheminée intérieure de la fixation de cheminée Abaisser la cheminée de l appareil Si disponible Retirer le câble de raccordem...

Page 59: ...allage extérieur est en carton y Le matériau de remplissage et les éléments de rembourrage sont en carton ou polystyrène y Les films de protection et sacs sont en polyéthylène PE Éliminer l emballage de manière écologique en triant les matériaux 8 2 Élimination de l appareil m ATTENTION Risque d atteintes environnementales en cas d élimination incorrecte de l appareil La hotte est soumise à la dir...

Page 60: ...ood A A LE Hood 36 6 32 3 Classe LE Hood A A GFE Hood 85 7 84 3 Classe GFE Hood B C Débit volumétrique en mode évacuation d air vicié en m h Niveau min max 250 340 260 390 Niveau Power Intensif 420 480 Débit volumétrique en mode recyclage d air en m h Niveau min max 190 280 210 330 Niveau Power Intensif 350 410 Puissance acoustique en mode évacuation d air vicié en db A Niveau min max 50 58 52 60 ...

Page 61: ...Kit d extraction II plat 150 1004730 Kit d extraction III plat 150 double 1004731 Kit d extraction ECO I rond 150 1004732 Kit d extraction ECO II plat 150 1004733 Kit d extraction ECO III plat 150 double 1004734 9 3 Contact En cas de doute ou de question nous contacter de la manière suivante Courrier berbel Ablufttechnik GmbH Sandkampstraße 100 D 48432 Rheine Téléphone 49 0 5971 80 80 9 0 Lun à je...

Page 62: ...gravi m AVVERTENZA Indicazioni contrassegnate dalla parola AVVERTENZA indicano situazioni di pericolo che potrebbero causare morte o lesioni fisiche gravi m ATTENZIONE Indicazioni contrassegnate dalla parola ATTENZIONE indicano situazioni che potrebbero causare lesioni di bassa o media entità m NOTA BENE Indicazioni contrassegnate dalle parole NOTA BENE indicano situazioni che possono causare dann...

Page 63: ...llegamento degli accessori 74 3 5 6 Inserimento del filtro nella versione filtrante e ibrida 75 3 5 7 Collegamento del condotto dell aria di scarico nella versione aspirante e ibrida 76 3 5 8 Collegamento dell alimentazione 76 3 5 9 Montaggio del camino 77 3 5 10 Inserimento Capillar Trap e vaschetta inferiore 78 3 5 11 Esecuzione controllo e messa in funzione 78 4 Utilizzo 79 4 1 Indicazioni di s...

Page 64: ... essere stati istruiti sull uso sicuro dell apparecchio y Questi utilizzatori comprendono i pericoli insiti nell uso dell apparecchio y Non lasciare che i bambini giochino con l apparecchio 1 3 Indicazioni generali di sicurezza m AVVERTENZA Pericolo in caso di inosservanza delle istruzioni d uso e di montaggio Le presenti istruzioni contengono importanti informazioni per l uso sicuro dell apparecc...

Page 65: ... nell ambiente Attraverso il ricambio d aria è possibile ridurre l umidità dell aria nella stanza Nella versione filtrante è necessario utilizzare la funzione di spegnimento ritardato affinché l apparecchio possa rimuovere gli odori restanti Utilizzando la funzione di spegnimento ritardato si allunga la durata del contenuto del filtro Il contenuto del filtro deve essere sostituito regolarmente 2 2...

Page 66: ...ul retro del corpo cappa D A B C A Vaschetta superiore B Capillar Trap removibile C Vaschetta inferiore removibile D Etichetta delle specifiche sul lato interno del pannello frontale A B C D A Morsetti cassetta a muro e contatto di prossimità per finestra contatto multifunzione e collegamento bus B Tubo di scarico con guida per filtro o condotto dell aria di scarico C Viti di regolazione per l all...

Page 67: ...e 170W 170W Lampadine illuminazione del piano di cottura LED 14 2W 520 lx LED 19 5W 630 lx Temperatura colore dell illuminazione del piano cottura regolabile 2700 6500 K 2700 6500 K Lampadine illuminazione d effetto LED 2 6W 264 lm LED 2 6W 264 lm Larghezza 898 mm 1098 mm Profondità 440 mm 440 mm Altezza nella versione filtrante con filtro di ricircolo BUF 150 995 1375 mm 995 1375 mm Altezza nella...

Page 68: ...oni pericolose per es in relazione alla corrente e al gas Assicurarsi di rispettare obbligatoriamente i requisiti per il luogo di montaggio y Non eseguire il montaggio in atmosfere potenzialmente esplosive y In caso di contemporaneo utilizzo di una fiamma libera dipendente dall aria interna per es camino in un sistema comune di aspirazione aria y È obbligatorio installare un dispositivi di sicurez...

Page 69: ...hi o in caso di collegamento a condotti di scarico attivo per es camino è possibile che gas o fumo vengano tirati all interno dell ambiente Assicurarsi di rispettare obbligatoriamente i requisiti per il condotto dell aria di scarico y Il condotto dell aria di scarico viene utilizzato esclusivamente da questo apparecchio y Il condotto dell aria di scarico è costituito da materiale non infiammabile ...

Page 70: ... altre superfici nell area di montaggio per es con un cartone spesso Assicurarsi che l alimentazione sia e resti disconnessa Il collegamento alla rete elettrica deve avvenire soltanto quando richiesto nel corrispondente passaggio di montaggio Se un accessorio per es cassetta a muro contatto di prossimità per finestra rientra nella situazione di montaggio Rispettare le istruzioni dell accessorio As...

Page 71: ...nterno Ammortizzatori rotanti assicurano una dolce apertura del pannello frontale Aprire il pannello frontale La vaschetta inferiore è fissata nella posizione finale superiore e può essere rimossa solo ribaltandola verso il basso Ribaltare la vaschetta inferiore verso il basso Tirare la vaschetta inferiore in avanti Il Capillar Trap è innestato e viene mantenuto nell apparecchio mediante una sicur...

Page 72: ...versione ibrida con condotto dell aria scarico verso la parte posteriore Distanza di sicurezza x y Raccomandazione 500 mm y Per i piani cottura a gas almeno 650 mm Stabilire la posizione di aggancio Prestare attenzione alla corretta posizione di montaggio del camino y Se non viene rispettata la quota minima 30 mm il camino non può essere agganciato y Irregolarità ad es del soffitto possono essere ...

Page 73: ... apparecchio a parete solo lavorando in due persone Assicurarsi di avere una postura stabile durante l installazione dell apparecchio Assicurarsi che non vi siano altre persone nell area di lavoro m NOTA BENE Pericolo di danni materiali dovuti a movimentazione impropria dell apparecchio Le dimensioni e il peso dell apparecchio richiedono molta forza per l installazione a parete Se l apparecchio ca...

Page 74: ...inestra H Cavi di comando del contatto di prossimità per finestra I Collegamento bus Il collegamento avviene mediante i morsetti per cavi ad una spina rimovibile sull alloggiamento del ventilatore m NOTA BENE Pericolo di danneggiamenti in caso di collegamento errato Una errata polarità dei cavi di comando può causare danni alla parte elettronica dell apparecchio Durante il collegamento dei cavi di...

Page 75: ...in caso di movimentazione inaccurata durante l inserimento del filtro Inserire attentamente il filtro dall alto Evitare il contatto con le lamiere laterali Versione filtrante 5 Inserire il filtro di ricircolo dall alto sulle guide dell alloggiamento del ventilatore Assicurarsi che il filtro di ricircolo sia stato montato correttamente Versione ibrida Scarico dell aria verso l alto 5 Inserire il fi...

Page 76: ...arico dall alto sul colletto del filtro ibrido Assicurarsi che il condotto dell aria di scarico sia stato montato correttamente 3 5 8 Collegamento dell alimentazione Rispettare i dati di tensione riportati sulla targhetta Inserire la spina dell apparecchio nella presa di collegamento sull alloggiamento del ventilatore Inserire la spina di alimentazione nella presa Posare i cavi in modo tale che no...

Page 77: ...ere lontani gli oggetti che possono graffiare l apparecchio per es utensili fibbie di cinture A seconda del modo operativo le due lamiere vengono allineate tra loro Versione filtrante e ibrida Le fessure di ventilazione si trovano in alto e sono nascoste Versione aspirante La lamiera interna può essere estratta e inserta in senso inverso per nascondere le fessure di ventilazione 1 2 Sollevare il c...

Page 78: ... frontale 3 5 11 Esecuzione controllo e messa in funzione m NOTA BENE Pericolo di malfunzionamenti in caso di umidità nell apparecchio Se l apparecchio viene trasportato da un ambiente freddo in un ambiente caldo è possibile che all interno dello stesso si crei della condensa Attendere 2 3 ore prima di mettere in funzione l apparecchio Verificare che la spina di alimentazione sia liberamente acces...

Page 79: ...e il Capillar Trap è inserito e la vaschetta inferiore è chiusa y Nella versione filtrante Non coprire le uscite di ventilazione per es non porre bicchieri piatti su o davanti alle fessure di ventilazione L aria che fuoriesce deve poter fluire liberamente attraverso le fessure di ventilazione altrimenti si può creare un ristagno Quando i vapori di cottura non possono più essere aspirati vi è peric...

Page 80: ...nza ventilatore elevata Se l intensità dei vapori di cottura non risponde passare a un livello di potenza più elevato In caso di cottura di arrosti attivare il livello di potenza Power Al termine della cottura attivare la funzione di spegnimento ritardato D 4 3 1 Funzione di spegnimento ritardato pagina 81 Assicurare un regolare ricambio d aria Utilizzare la cappa aspirante anche per ridurre altri...

Page 81: ... comando del livello di potenza lampeggia 4 3 2 Illuminazione del piano di cottura L illuminazione del piano cottura è dotata di una illuminazione a LED a risparmio energetico L illuminazione può essere utilizzata in qualsiasi momento indipendentemente dal ventilatore L illuminazione del piano di cottura è dimmerabile L impostazione della temperatura del colore viene eseguita in modalità di config...

Page 82: ...denti si possono attivare o disattivare le seguenti funzioni Tasto Funzione Toccare il tasto 1 volta L illuminazione del piano di cottura si accende Toccare nuovamente il tasto per avviare la sequenza di colori Dopo aver rilasciato il tasto la sequenza di colori si arresta la temperatura colore selezionata viene memorizzata Illuminazione d effetto Alla consegna dell apparecchio questa funzione è a...

Page 83: ...ente Nella vaschetta superiore nella vaschetta inferiore e nel Capillar Trap le particelle di sporco vengono separate e raccolte Prima di ogni pulizia Spegnere l apparecchio Assicurarsi che il piano cottura e le altre parti accessibili siano fredde m NOTA BENE Pericolo di danneggiamenti in caso di pulizia impropria Oggetti taglienti abrasivi o detersivi non idonei possono danneggiare l apparecchio...

Page 84: ... 3 5 10 Inserimento Capillar Trap e vaschetta inferiore pagina 78 Capillar Trap Il Capillar Trap è innestato e viene mantenuto nell apparecchio mediante una sicurezza laterale Afferrare con entrambe le mani i lati del Capillar Trap Estrarre il Capillar Trap eseguendo un movimento curvato Pulire il Capillar Trap per es in lavastoviglie Pulire le superfici e i bordi sul vano porta Capillar Trap con ...

Page 85: ...sere lasciate raffreddare y L alloggiamento del ventilatore non deve mai essere aperto 6 2 Manutenzione 6 2 1 Sostituzione delle lampadine L apparecchio è dotato di una illuminazione a LED che non richiede manutenzione In caso di malfunzionamenti Rivolgersi al proprio rivenditore specializzato o all assistenza clienti 6 2 2 Sostituzione il contenuto del filtro per la versione filtrante e ibrida Gl...

Page 86: ...ido Sollevare il filtro di almeno 30 mm Estrarre il filtro in avanti La sostituzione del contenuto del filtro avviene come descritto nelle istruzioni corrispondenti Sostituire il contenuto del filtro Pulire il filtro dall esterno ad es aspirando con un aspirapolvere Rimontare il filtro D 3 5 6 Inserimento del filtro nella versione filtrante e ibrida pagina 75 Montare il camino D 3 5 9 Montaggio de...

Page 87: ...ina 85 Cattiva resa dell apparecchio y Il filtro di ricircolo si è consumato Cambiare il contenuto del filtro di ricircolo D 6 2 2 Sostituzione il contenuto del filtro per la versione filtrante e ibrida pagina 85 y Il filtro ibrido si è consumato Cambiare il contenuto del filtro ibrido D 6 2 2 Sostituzione il contenuto del filtro per la versione filtrante e ibrida pagina 85 y Il condotto dell aria...

Page 88: ...chiedono molta forza durante le operazioni di sgancio Se l apparecchio cade l apparecchio stesso i mobili della cucina e altri oggetti possono venire danneggiati Coprire il piano cottura lasciato raffreddare Mantenere l area di montaggio sgombra Scollegare in modo omnipolare l alimentazione dell apparecchio Estrarre la spina di alimentazione Allentare la lamiera interna dall attacco per camino Sol...

Page 89: ...pimento e gli inserti sono costituiti da cartone o polistirolo y Le pellicole protettive e i sacchetti sono realizzati in polietilene PE Smaltire l imballo in modo ecologico separando i diversi materiali 8 2 Smaltimento dell apparecchio m NOTA BENE Pericolo di danni all ambiente in caso di smaltimento improprio dell apparecchio L apparecchio è soggetto alla Direttiva Europea 2012 19 CE e non deve ...

Page 90: ...asse FDE Hood A A LE Hood 36 6 32 3 Classe LE Hood A A GFE Hood 85 7 84 3 Classe GFE Hood B C Portata volumetrica per la versione aspirante in m h Livello min max 250 340 260 390 Livello Power Intensiv 420 480 Portata volumetrica per la versione filtrante in m h Livello min max 190 280 210 330 Livello Power Intensiv 350 410 Potenza acustica per la versione aspirante in db A Livello min max 50 58 5...

Page 91: ... scarico aria II Piatto 150 doppio 1004731 Set scarico aria ECO I Rotondo 150 1004732 Set scarico aria ECO II Piatto 150 1004733 Set scarico aria ECO III Piatto 150 doppio 1004734 9 3 Contatti In caso di domande o commenti selezionare una delle seguenti opzioni Posta berbel Ablufttechnik GmbH Sandkampstraße 100 D 48432 Rheine Telefono 49 0 5971 80 80 9 0 Da Lun a Gio ore 8 00 17 30 Ven ore 8 00 16...

Page 92: ...ING Aanwijzingen met het woord WAARSCHUWING waarschuwen voor een gevaarlijke situatie die ernstig of dodelijk letsel tot gevolg kan hebben m VOORZICHTIG Aanwijzingen met het woord VOORZICHTIG waarschuwen voor een situatie die licht of middelzwaar letsel tot gevolg kan hebben m ATTENTIE Aanwijzingen met het woord ATTENTIE waarschuwen voor een situatie die materiële schade of milieuschade tot gevolg...

Page 93: ...Filter plaatsen bij luchtcirculatiemodus en hybride modus 105 3 5 7 Afzuigleiding aansluiten bij afzuig en hybride modus 106 3 5 8 Elektrische voeding aansluiten 106 3 5 9 Rookkanaal monteren 107 3 5 10 De Capillar Trap en de onderste schaal aanbrengen 108 3 5 11 Controle en inbedrijfstelling uitvoeren 108 4 Bediening 109 4 1 Veiligheidsinstructies voor de bediening 109 4 2 Bedieningspaneel 109 4 ...

Page 94: ... Gebruikers begrijpen de gevaren bij het omgaan met het apparaat y Kinderen mogen niet met het apparaat spelen 1 3 Algemene veiligheidsinstructies m WAARSCHUWING Gevaar door het niet opvolgen van de gebruiks en montagehandleiding Deze handleiding bevat belangrijke informatie voor een veilige omgang met het apparaat Er wordt apart op mogelijke gevaren gewezen Lees deze handleiding zorgvuldig door D...

Page 95: ...aar de ruimte geleid Door toevoer van frisse lucht kan de luchtvochtigheid in de ruimte gereduceerd worden Bij de luchtcirculatiemodus is het gebruik van de naloopfunctie noodzakelijk opdat het apparaat de resterende geurtjes op kan nemen Door het gebruik van de naloopfunctie wordt de levensduur van de filtervulling verhoogd De filtervulling moet regelmatig vernieuwd worden 2 2 2 Afzuigmodus De ge...

Page 96: ...hting aan de achterkant van de body van de kap D A B C A Bovenste schaal B Capillar Trap uitneembaar C Onderste schaal uitneembaar D Typeplaatje aan de binnenkant van de frontplaat A B C D A Aansluitklemmen voor wandkasten raamcontact schakelaars multifunctioneel contact en bus verbinding B Ventilatorafvoer met geleidingshulp voor filter of afzuigleiding C Stelschroeven voor het uitlijnen D Aanslu...

Page 97: ...ermogen 187W 193W Vermogensverbruik ventilator 170W 170W Lampen kookplaatverlichting LED 14 2W 520 lx LED 19 5W 630 lx Kleurtemperatuur kookplaatverlichting instelbaar 2700 6500 K 2700 6500 K Lampen effectverlichting LED 2 6W 264 lm LED 2 6W 264 lm Breedte 898 mm 1098 mm Diepte 440 mm 440 mm Hoogte bij circulatiemodus met circulatiefilter BUF 150 995 1375 mm 995 1375 mm Hoogte bij circulatiemodus ...

Page 98: ...t stroom of gas Zorg ervoor dat de eisen aan de montageplaats absoluut in acht genomen worden y Geen montage in omgevingen met explosiegevaar y Bij gelijktijdig gebruik van een ruimteluchtafhankelijke brander b v rookkanaal binnen één en dezelfde luchtmassa y Een veiligheidsvoorziening is absoluut noodzakelijk y De veiligheidsinrichting b v onderdrukschakelaar P4 gecontroleerd volgens DIN 18841 20...

Page 99: ...ontage Bij gebruik van de afzuigleiding met andere toestellen of bij aansluiting op actieve afvoerluchtkanalen b v rookkanaal kunnen gassen of rook de ruimte binnengezogen worden Zorg ervoor dat de eisen aan de afzuigleiding absoluut in acht genomen worden y De afzuigleiding wordt uitsluitend door dit apparaat gebruikt y De afzuigleiding bestaat uit niet brandbaar materiaal overeenkomstig DIN 4102...

Page 100: ...e kookplaat en andere vlakken in het montagegedeelte b v met dik karton Zorg ervoor dat de elektrische voeding onderbroken is en blijft De elektrische voeding wordt pas ingeschakeld na de vraag hiertoe in de betreffende montagestap Wanneer accessoires b v wandkast raamcontactschakelaar bij de montagesituatie horen De handleidingen van de accessoires moeten in acht genomen worden Zorg ervoor dat de...

Page 101: ...oor de montage uit Rotatiedempers zorgen ervoor dat de frontplaat zachtjes opengaat Doe de frontplaat open De onderste schaal is in de bovenste eindpositie geborgd en kan alleen na het neerklappen worden verwijderd Klap de onderste schaal omlaag Trek de onderste schaal er naar voren toe uit De Capillar Trap is aangebracht en wordt door een borging aan de zijkant in het apparaat gehouden Pak de Cap...

Page 102: ...ren 2 voor hybride modus met afzuigleiding naar achteren Veiligheidsafstand x y Aanbevolen 500 mm y Bij gaskookplaten ten minste 650 mm Bepaal de ophangpositie Zorg voor een correcte positie van de kanaalbevestiging y Is de maat te klein minder dan 30 mm dan kan het kanaal niet worden ingehaakt y Oneffenheden bijv bij het plafond kunnen worden gecompenseerd via sleufgaten Zorg ervoor of de veiligh...

Page 103: ... is ernstig letsel mogelijk Hang het apparaat met twee personen op Zorg voor een veilige standplaats bij het ophangen Zorg ervoor dat er verder geen personen in de werkzone aanwezig zijn m ATTENTIE Gevaar voor materiële schade door ondeskundig gebruik De grootte en het gewicht van het apparaat vergen bij het ophangen veel kracht Wanneer het apparaat valt kunnen het apparaat keukenmeubels en andere...

Page 104: ...aar H Besturingsleiding van de raamcontactschakelaar I Busverbinding De aansluiting wordt uitgevoerd met kabelklemmen aan een verwijderbare stekker op de ventilatorbehuizing m ATTENTIE Gevaar voor beschadigingen door verkeerde aansluiting Een verkeerde poling van de besturingsleiding kan tot beschadigingen van de elektronica leiden Let bij het aansluiten van de besturingsleiding op een correcte po...

Page 105: ... aan de handen kunnen veroorzaken b v bij ruwe aanpak bij het plaatsen van het filter Plaats het filter voorzichtig van bovenaf Vermijd contact met de zijplaten Luchtcirculatiemodus 5 Zet het circulatiefilter aan de bovenkant op de geleidingshulp van de ventilatorbehuizing Zorg ervoor dat het circulatiefilter correct gemonteerd is Hybride modus afzuiging naar boven 5 Zet het hybride filter aan de ...

Page 106: ...ovenkant op de kraag van het hybride filter Zorg ervoor dat de afzuigleiding correct gemonteerd is 3 5 8 Elektrische voeding aansluiten Let op de aangegeven spanning op het typeplaatje Steek de IEC stekker in de aansluitbus op de ventilatorbehuizing Steek de stekker in het stopcontact Leg de kabel zo dat deze niet kan worden geknikt bekneld kan raken of kan worden beschadigd of bij het vervangen v...

Page 107: ...apparaat kunnen bekrassen b v werktuigen gespen Afhankelijk van de bedrijfsmodus worden de twee rookkanaalplaten op elkaar afgestemd Luchtcirculatiemodus en hybride modus De ventilatiesleuven bevinden zich aan de bovenkant en zijn niet bedekt Afzuigmodus De binnenste rookkanaalplaat kan eruit getrokken en omgekeerd ingestoken worden om de ventilatiesleuven te bedekken 1 2 Licht het rookkanaal met ...

Page 108: ...ouden Sluit de frontplaat 3 5 11 Controle en inbedrijfstelling uitvoeren m ATTENTIE Gevaar voor storingen door vocht in het apparaat Wanneer het apparaat van een koude naar een warme omgeving gebracht wordt kan er aan de binnenkant vocht neerslaan Wacht 2 3 uur voordat u het apparaat in bedrijf neemt Controleer of de netstekker vrij toegankelijk is en of er een alpolige scheidingsinrichting minste...

Page 109: ...lleen met geplaatste Capillar Trap en gesloten onderste schaal y Bij luchtcirculatiemodus Geen afdekking van de ventilatie uitgangen b v glazen borden op of voor de ventilatiesleuven Uitstromende lucht moet ongehinderd door de ventilatiesleuven kunnen ontsnappen anders kan opstopping ontstaan Wanneer de kookdampen niet meer weg kunnen trekken bestaat brandgevaar y Bij afzuig of hybride modus er mo...

Page 110: ...mogensniveau 3 hoge ventilatorcapaciteit Wanneer de intensiteit van de kookdampen niet afneemt schakelt u naar een hoger vermogensniveau Schakel bij het aanbraden naar het vermogensniveau Power Schakel na het koken de naloopfunctie in D 4 3 1 Naloopfunctie pagina 111 Zorg voor een regelmatige toevoer van frisse lucht Gebruik het apparaat ook voor het verminderen van andere storende geuren Bijvoorb...

Page 111: ... Kookplaatverlichting De kookplaatverlichting is uitgerust met een energiebesparende LED verlichting De verlichting kan altijd en onafhankelijk van de ventilator gebruikt worden De kookplaatverlichting is dimbaar Het instellen van de kleurtemperatuur gebeurt in de configuratiemodus D 4 4 Configuratie pagina 112 Tiptoets Functie 1x tiptoets aanraken om de kookplaatverlichting in of uit te schakelen...

Page 112: ...iptoets aan te raken de volgende functies geactiveerd of gedeactiveerd worden Tiptoets Functie 1x tiptoets aanraken Kookplaatverlichting wordt ingeschakeld Tiptoets nogmaals aanraken om de kleurendoorloop te starten Na loslaten van de tiptoets stopt de kleurendoorloop de geselecteerde kleurtemperatuur wordt opgeslagen Effectverlichting In de toestand bij levering is de functie geactiveerd 1x tipto...

Page 113: ...rap worden de vuildeeltjes afgescheiden en verzameld Voor elke reiniging Schakel het apparaat uit Zorg ervoor dat de kookplaat en andere delen die aangeraakt kunnen worden zijn afgekoeld m ATTENTIE Gevaar voor beschadigingen door ondeskundige reiniging Voorwerpen met scherpe randen schuurmiddelen of ongeschikte reinigingsmiddelen kunnen het apparaat beschadigen De volgende reinigingsmiddelen zijn ...

Page 114: ... Trap en de onderste schaal aanbrengen pagina 108 Capillar Trap De Capillar Trap is aangebracht en wordt door een borging aan de zijkant in het apparaat gehouden Pak de Capillar Trap met beide handen aan de zijkanten vast Trek de Capillar Trap in een boog eruit U kunt de Capillar Trap bijv in de afwasmachine reinigen Reinig de vlakken en randen op de opnameschacht van de Capillar Trap met een zach...

Page 115: ...ookplaat en andere delen die aangeraakt kunnen worden moeten afgekoeld zijn y De ventilatorbehuizing mag nooit geopend worden 6 2 Onderhoud 6 2 1 Lampen vervangen Het apparaat is voorzien van een onderhoudsvrije led verlichting Wanneer er sprake is van een storing Neem contact op met uw dealer of de klantenservice 6 2 2 Filtervulling vervangen bij luchtcirculatie modus en hybride modus Geurtjes wo...

Page 116: ...lter minimaal 30 mm op Neem het filter naar voren uit het apparaat Het verwisselen van de filtervulling wordt uitgevoerd zoals in de desbetreffende handleiding wordt beschreven Vervang de filtervulling Reinig het filter van buiten b v door afzuigen met een stofzuiger Zet het filter er weer op D 3 5 6 Filter plaatsen bij luchtcirculatiemodus en hybride modus pagina 105 Monteer het rookkanaal D 3 5 ...

Page 117: ... apparaat y Het circulatiefilter is dichtgeslibd Vervang de filtervulling van het circulatiefilter D 6 2 2 Filtervulling vervangen bij luchtcirculatiemodus en hybride modus pagina 115 y Het hybride filter is dichtgeslibd Vervang de filtervulling van het hybride filter D 6 2 2 Filtervulling vervangen bij luchtcirculatiemodus en hybride modus pagina 115 y De afzuigleiding werd ondeskundig aangeslote...

Page 118: ...van veel kracht Wanneer het apparaat valt kunnen het apparaat keukenmeubels en andere voorwerpen beschadigd raken Dek de afgekoelde kookplaat af Houd het montagegedeelte vrij Onderbreek op alle polen de stroomvoorziening van het apparaat Trek de netstekker eruit Maak de binnenste rookkanaalplaat van de rookkanaalbevestiging los Neem het rookkanaal van het apparaat af Indien aanwezig Haal de aanwez...

Page 119: ...door kunnen waardevolle grondstoffen gespaard blijven y De buitenverpakking is van karton y Het vulmateriaal en de inzetstukken zijn van karton of styropor y De beschermfolies en zakjes zijn van polyethyleen PE Verwijder de verpakking op milieuvriendelijke wijze als gescheiden materialen 8 2 Apparaat afvoeren m ATTENTIE Gevaar voor milieuschade door niet vakkundig afvoeren van het apparaat Het app...

Page 120: ...od 30 5 31 9 FDE Hood klasse A A LE Hood 36 6 32 3 LE Hood klasse A A GFE Hood 85 7 84 3 GFE Hood klasse B C Volumestroom bij afzuigmodus in m h Niveau min max 250 340 260 390 Niveau Power Intensief 420 480 Volumestroom bij luchtcirculatiemodus in m h Niveau min max 190 280 210 330 Niveau Power Intensief 350 410 Geluidsniveau bij afzuigmodus in db A Niveau min max 50 58 52 60 Niveau Power Intensie...

Page 121: ...fzuiglucht set III vlak 150 dubbel 1004731 Afzuiglucht set ECO I rond 150 1004732 Afzuiglucht set ECO II vlak 150 1004733 Afzuiglucht set ECO III vlak 150 dubbel 1004734 9 3 Contact Wanneer u suggesties of vragen heeft kiest u uit de volgende mogelijkheden Post berbel Ablufttechnik GmbH Sandkampstraße 100 D 48432 Rheine Telefoon 49 0 5971 80 80 9 0 Ma t m do 8 00 17 30 uur en vr 8 00 16 30 uur Fax...

Page 122: ...ARNING Notes with the word WARNING warn of a hazardous situation that could result in serious injuries or death m CAUTION Notes with the word CAUTION warn of a situation that could result in minor injuries m ATTENTION Notes with the word ATTENTION warn of a situation that could result in damage to property or to the environment Symbol clarification text Handling requirement y Listing D Reference t...

Page 123: ...nd Capillar Trap 131 3 5 4 Hang the device in place 132 3 5 5 Connect accessories 134 3 5 6 Install filter with recirculating and hybrid operation 135 3 5 7 Connect exhaust air ducting with exhausted air and hybrid mode 136 3 5 8 Establish electrical power supply 136 3 5 9 Mount the chimney 137 3 5 10 Insert the Capillar Trap and lower section 138 3 5 11 Check and carry out commissioning 138 4 Ope...

Page 124: ... regard to safe use of the device y Users understand the hazards involved with the device y Children may not play with the device 1 3 General safety instructions m WARNING Hazard through a disregard of the operating and installation instructions This manual contains important information for the safe handling of the device Separate reference is made to possible hazards Read through this manual tho...

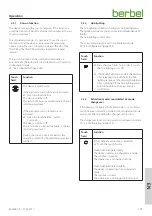
Page 125: ...r is fed back into the room The humidity in the room can be reduced with the fresh air feed In recirculated air mode it is necessary to use the run on function so that the device can remove the remaining odours Using the run on function increases the life of the filter filling The filter filling must be replaced at regular intervals 2 2 2 Extracted air mode The cleaned room air can be routed to th...

Page 126: ...Effect lighting on the rear of the hood body D A B C A Upper section B Capillar Trap removable C Lower section removable D Type plate on the inside of the front panel A B C D A Connection terminals for wall box window contact switch multifunction contact and bus connection B Fan outlet with guide for filter or exhaust air ducting C Adjusting screws for alignment D Socket for the mains cable ...

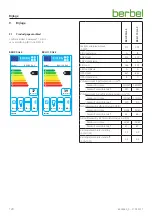
Page 127: ... Fan power consumption 170W 170W Lighting hob lighting LED 14 2W 520 lx LED 19 5W 630 lx Colour temperature hob lighting setting 2700 6500 K 2700 6500 K Lighting effect lighting LED 2 6W 264 lm LED 2 6W 264 lm Width 898 mm 1098 mm Depth 440 mm 440 mm Height in recirculated air mode with recirculated air filter BUF 150 995 1375 mm 995 1375 mm Height in recirculated air mode with recirculated air fi...

Page 128: ...ituations e g in the handling of electrical power or gas Make sure that the requirements for the installation location are complied with y Do not install in potentially explosive atmospheres y Whilst using a heating point which uses air from the room as its oxygen supply e g fireplace y A safety device is absolutely essential y The safety device e g under pressure monitor P4 tested per DIN 18841 2...

Page 129: ...yxiation hazard due to improper installation When using the exhaust air ducting with other devices or when connecting an active exhaust air channel e g chimney gases or smoke can be drawn into the room Make sure that the requirements for the exhaust air ducting are complied with y The exhaust air ducting is used exclusively by this device y The exhaust air ducting is made of non combustible materi...

Page 130: ... hob and other parts that could be touched have cooled down Protect the hob and other surfaces in the installation area e g with thick cardboard Ensure that the power supply is switched off and remains so Connect the power supply only when instructed to do so in the installation instructions If accessories e g wall box window contact switch are required for the installation Observe the instruction...

Page 131: ...ts lying inside before installation Rotational dampers ensure that the front panel opens smoothly Open the front panel The lower section is secured in the top end position and can only be removed after folding down Fold the lower section down Pull the lower section out forwards The Capillar Trap is inserted and is held in the device through a side lock Grasp the Capillar Trap on its sides with bot...

Page 132: ... hybrid mode with exhaust air duct to the rear Safety distance x y Recommendation 500 mm y With gas hobs at least 650 mm Determine the hanging position Ensure that the chimney mount is correctly positioned y The chimney cannot be mounted if it falls below the required measurement 30 mm y Any irregularities e g in the ceiling can be compensated with slotted holes Make sure that the safety distance ...

Page 133: ... weight If the device falls down serious injuries are possible Two persons are required to hang the device Ensure stable footing when hanging the device Ensure that no other people are in the working area m ATTENTION Danger of property damage through improper handling Hanging the device requires a great deal of physical exertion due to its size and weight If the device falls the device kitchen fur...

Page 134: ...F Wall box power unit G Window contact switch H Control line from the window contact switch I Bus connection Connection is implemented via cable terminals on a detachable connector on the fan housing m ATTENTION Risk of damage through incorrect connection A mix up of the control wires can result in damage to the electronics When connecting the control line ensure correct polarity Core 1 on termina...

Page 135: ... edges that can cause cutting injuries to the hands e g with rough handling of the filter attachment Carefully fit the filter from above Avoid contact with the side panels Recirculated air mode 5 Place the recirculated air filter onto the guide on the fan housing from above Ensure that the recirculated air filter is correctly installed Hybrid mode exhaust air upwards 5 Place the hybrid filter onto...

Page 136: ...xhaust air ducting onto the collar of the hybrid filter from above Ensure that the exhaust air duct is correctly fitted 3 5 8 Establish electrical power supply Observe the voltage specifications on the rating plate Plug the cold device plug into the socket on the fan housing Plug the mains plug into the socket Route the cable such that it is not kinked crushed or damaged and so that it will not ge...

Page 137: ...ts that could scratch the device far away from it e g tools belt buckles The chimney ducts are aligned with one another depending on the operating mode Recirculating mode and hybrid mode The ventilation slots are located at the top and are not covered Extracted air mode The inner chimney duct can be drawn out and re inserted upside down in order to cover the ventilation slots 1 2 Lift the chimney ...

Page 138: ...tly and is held by the retaining magnets Close the front panel 3 5 11 Check and carry out commissioning m ATTENTION Risk of disruptions due to moisture in the device If the device is moved from a cold environment into a hot one condensation may form inside Wait about 2 3 hours before bringing the device into service Check that the mains plug is freely accessible or that an all pole isolating devic...

Page 139: ...Trap is fitted and with the lower section closed y In recirculated air mode Do not cover the air outlets e g glasses plates on or in front of the ventilation slots Out flowing air must be able to escape through the ventilation slots without impediment Otherwise backpressure may form If the cooking vapours are no longer able to escape there is a danger of fire y With exhausted air or hybrid operati...

Page 140: ...r level 1 lowest fan power y Power level 2 medium fan power y Power level 3 high fan power If the intensity of the cooking vapours does not subside switch to a higher power level Switch to the POWER setting if frying Turn on the run on function when you have finished cooking D 4 3 1 Run on function page 141 Check the fresh air supply at regular intervals Use the device also to reduce other unpleas...

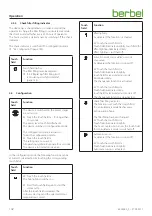
Page 141: ... power level will flash 4 3 2 Hob lighting The hob lighting is fitted with energy saving LED lighting The lighting can be used at any time and independently of the fan The hob lighting is dimmable The colour temperature is set in configuration mode D 4 4 Configuration page 142 Touch field Function Press the touch field 1x in order to switch the hob lighting on or off Hold touch field down to start...

Page 142: ...ing touch fields Touch field Function Touch the touch field 1x The hob lighting switches on Press the touch field again to start the colour cycle After the touch field is released the colour cycle stops and the selected colour temperature is saved Touch field Function Effect lighting As delivered the function is activated Touch the touch field 1x Touch field illuminates brightly touch field for ef...

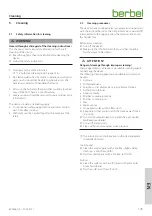
Page 143: ...m The dirt particles are separated off and collected in the upper section the lower section and in the Capillar Trap Before every cleaning Turn off the device Make sure that the hob and other parts that could be touched have cooled down m ATTENTION Danger of damage through improper cleaning Sharp edged objects abrasive or unsuitable cleaning agents can damage the device The following cleaning agen...

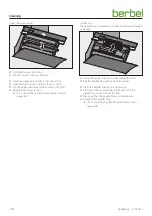
Page 144: ...sert the Capillar Trap and lower section page 138 Capillar Trap The Capillar Trap is inserted and is held in the device through a side lock Grasp the Capillar Trap on its sides with both hands Pull the Capillar Trap out in a bow movement Clean the Capillar Trap e g in a dishwasher Clean the surfaces and edges on the recess for the Capillar Trap with a soft moist cloth Make sure that the Capillar T...

Page 145: ...r y The hob and other parts that can be touched must be cooled down y Never open the fan housing 6 2 Maintenance 6 2 1 Changing the lamps The device is fitted with maintenance free LED lighting In the event of a fault Please consult your dealer or customer services 6 2 2 Replacing filter filling with recirculating and hybrid mode Odours are trapped in the filter filling in the recirculating air fi...

Page 146: ...er Lift the filter at least 30 mm Remove the filter to the front The replacement of the filter filling is carried out as described in the associated instructions Change the filter filling Clean the filter from the outside e g through extraction with a vacuum cleaner Re fit the filter D 3 5 6 Install filter with recirculating and hybrid operation page 135 Mount the chimney D 3 5 9 Mount the chimney...

Page 147: ...5 Poor device performance y The recirculated air filter is clogged Replace the filter filling of the recirculated air filter D 6 2 2 Replacing filter filling with recirculating and hybrid mode page 145 y The hybrid filter is clogged Replace the filter filling of the hybrid filter D 6 2 2 Replacing filter filling with recirculating and hybrid mode page 145 y The exhaust pipe was not properly connec...

Page 148: ...eat deal of physical exertion due to its size and weight If the device falls the device kitchen furnishings and other objects could be damaged Cover the cooled hob Keep the installation area clear Disconnect all poles of the power supply for the device Pull out the mains plug Loosen the inner chimney duct from the chimney mount Lift the chimney away from the device If present Remove any accessory ...

Page 149: ... The outer packaging is made from cardboard y The filling material and the insets are made from cardboard or styrofoam y The protective film and bags are made from polythene PE Dispose of the packaging in an environmentally friendly manner separated by materials 8 2 Dispose of the device m ATTENTION Risk of environmental damage due to improper disposal of the device The device is subject to the Eu...

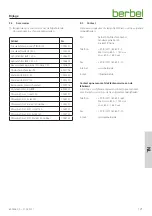
Page 150: ...FDE Hood 30 5 31 9 FDE Hood Class A A LE Hood 36 6 32 3 LE Hood Class A A GFE Hood 85 7 84 3 GFE Hood Class B C Flow rate in extracted air mode in m h Stage min max 250 340 260 390 Stage Power Intense 420 480 Flow rate in recirculated air mode in m h Stage min max 190 280 210 330 Stage Power Intense 350 410 Noise power level in extracted air mode in db A Stage min max 50 58 52 60 Stage Power Inten...

Page 151: ...r set III flat 150 double 1004731 Exhaust air set ECO I round 150 1004732 Exhaust air set ECO II flat 150 1004733 Exhaust air set ECO III flat 150 double 1004734 9 3 Contact If you have any questions or suggestions please select from the following options Post berbel Ablufttechnik GmbH Sandkampstraße 100 D 48432 Rheine Telephone 49 0 5971 80 80 9 0 Mon to Thu 8 00 17 30 hrs and Fri 8 00 16 30 hrs ...

Page 152: ...6003480_0 27 03 2017 ...
Reviews: