


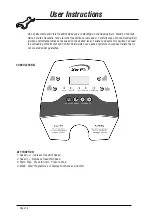


User Instructions
PROGRAMME CHART
1
2
3
4
5
6
7
8
9
10
11
12
13
14
15
16
17
18
19
20
P1
1
1
2
2
3
3
4
4
4
4
4
4
4
4
3
3
2
2
1
1
P2
1
2
3
4
5
5
4
3
2
1
1
2
3
4
5
5
4
3
2
1
P3
5
5
5
3.5
5
1
3 3.5
3.5
Prog
Km
Stage
3.5 5
5
5
5
5
4
2
3.5
3.5
3.5
P4
1
2
1
3
3
2
2
4
4
5
5
4
2
2
3
1
4
4
2
1
ERROR SIGNALS / TROUBLESHOOTING
Should your Treadmill fail to operate, please check the Console Display for any of the following Error Signals
Er 1: The Console Display panel is not receiving a signal from the Motor or Control Board
Er 3: Over voltage; where there has been a mains power surge
Er 4: Over current; where the current to the Treadmill exceeds safe levels
Er 5: User over-weight or excess load
Er 6: Bad Motor connection or Motor failure
Er 7: Control Board isn’t receiving a signal or power feed
SAFE: Safety protection – shut down
Should you experience a problem or malfunction with your Treadmill, please note the ERROR CODE above and Contact
CUSTOMER SUPPORT by any of the means listed on the back page of this manual if you are unable to reset the Treadmill.
OPERATION INSTRUCTION
1. PREPARATION BEFORE START
1.1 Plug in the power cord and press the power key at the down front part of the machine. If the machine is not
operated or moved for a long time, please turn off the power.
1.2 Nip the safe key on the clothes and put the switch of magnet into the computer. If the safety magnet is not
put into the assigned location, then the machine will not work.
2. START
2.1 Press START/STOP, the machine begins to work with starting speed 0.8 KM/h
2.2 Press SPEED can control the speed, with one press 0.1 KM/h will be increased or decreased. Press the key
without stop can get to the speed you want. The highest speed is 8.0 KM/h while the lowest is 0.8 KM/h.
3. TWO WAYS TO STOP THE MACHINE
3.1 Pulling the safe key will put a quick stop to the machine which will beep. Before restart, please put the yellow
magnet to the original place.
3.2 Press START/STOP, the machine will stop working
Page
20
Summary of Contents for Xer-Fit
Page 22: ...Assembly Page 22 ...


