background image

Page : 5

Step By Step Assembly Instructions

1

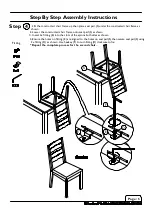
. Lift the constructed chair frame up then place seat pad (5) under the constructed chair frame as

shown.

2. Lower the constructed chair frame onto seat pad (5) as shown.

3

. Insert 2x fitting (E) into the slots of the aprons both sides as shown.

4. Ensure the holes on fitting (E) are aligned to the holes on seat pad (5) then secure seat pad (5) using

2x fitting (D) as shown. Use hexkey (F) to turn fitting (D) clockwise to fix.

* Repeat the complete process for the second chair.

Step   4

D

E

F

E

Fitting

5

Summary of Contents for PROVENCE SLATTED CHAIR

Page 1: ... whom you bought this product This product takes approximately 5 MINUTES to assemble with 1 PERSON All assembly should be performed on a flat stable clean and soft surface This product is HEAVY it should be assembled as near as possible to the point of use TAKE CARE WHEN LIFTING to avoid personal injury and or damage to the product The fitting pack contains SMALL ITEMS which should be KEPT AWAY FR...

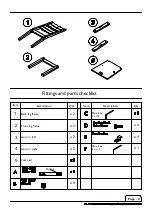
Page 2: ... Fittings and parts checklist 2 x 2 Item Description Qty Item Description Qty 1 x 2 Back leg frame Front leg frame Apron left Apron right 3 4 x 2 Seat pad 5 x 8 Hex key 5 x 100 x 4 x 4 x 1 Hex key 4 x 110 O ring ...

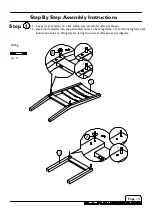
Page 3: ...ns A x 4 1 1 Lay parts 1 and 2 on a flat stable clean and soft surface as shown 1 2 Insert 4x dowel A into the pre drilled holes on back leg frame 1 and front leg frame 2 Ensure the holes on fitting A are facing the correct direction as per diagram A A 1 2 ...

Page 4: ...aprons to back leg frame 1 using 2 x grip screws B as shown Use hex key C to turn fitting B clockwise to fix Step 3 Place front leg frame 2 onto top of aprons 3 and 4 as shown Ensure steel dowels A and large wooden dowels are aligned correctly with the mating holes to avoid damage Secure front leg frame 2 to both aprons 3 and 4 using 2 x grip screws B as shown Use hexkey C to turn fitting B clockw...

Page 5: ...nstructed chair frame onto seat pad 5 as shown 3 Insert 2x fitting E into the slots of the aprons both sides as shown 4 Ensure the holes on fitting E are aligned to the holes on seat pad 5 then secure seat pad 5 using 2x fitting D as shown Use hexkey F to turn fitting D clockwise to fix Repeat the complete process for the second chair Step 4 D E F E Fitting 5 ...

Page 6: ...r allow any liquid to contact with the veneers for a long period of time as this can permanently damage the surface Do not use any abrasive cleaner or harsh detergent as this can damage the surface of the veneers Upholstered furniture The upholstery should not be exposed for long periods to direct sunlight as this may cause fading and deterioration of the cover material Protect from exposure to so...

Reviews: