background image

  23

  Using the projector

Eng
lish

Adjusting the projected image

Adjusting the projection angle 

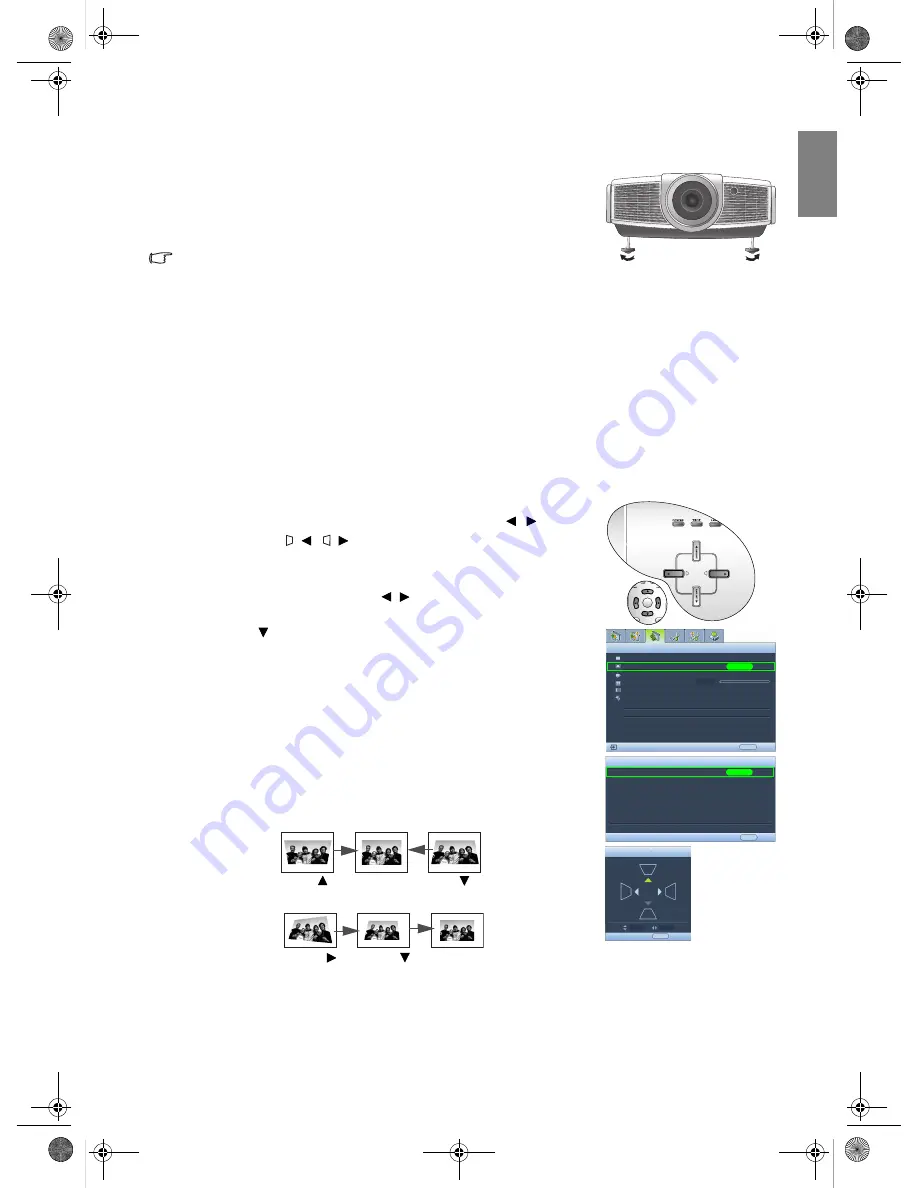
There are four adjuster feet on the bottom of the projector. These can be used if 
necessary to change the projection angle. Screw the feet in or out as appropriate 
to aim and level the projection angle. 

If the screen and the projector are not perpendicular to each other, the 
projected image becomes vertical trapezoidal. To correct this problem, see 

"Correcting picture distortion" on page 23

 for details.

Correcting picture distortion

Keystoning occurs when the projector is not perpendicular to the screen and is where the projected picture 
displays visible as a trapezoid shape like either of the following:

Two parallel sides (left and right, or top and bottom) but is noticeably wider on either side.

No parallel sides.

To correct the picture's shape, you can perform the following steps.
1.

Adjust the projection angle. Move the projector to be in front of the center of the screen with the base of the 
lens level with the top or bottom edge of the screen.

2.

If the picture is stilled distorted, or the projector is unable to be positioned as described above, you will 
need to manually correct the picture.

Using the remote control or projector

i. Press one of the Arrow keys on the remote control ( , 

) or 

projector ( /

,  /

) to display the Keystone page.

ii. See step 

iv

 below for further operation.

Using the OSD menu

i. Press MENU and then press  /  until the Display menu is 

highlighted.

ii. Press  

to 

highlight 

Keystone and press ENTER. The Keystone page 

displays.

iii. Highlight 2D Keystone and press ENTER. The keystone correction 

page displays.

iv. Press the key whose keystone icon is similar to the shape of the 

projected picture. Continue pressing the same key or press the other 
keys until you are satisfied with the shape.
The values on the lower portion of the page change while pressing. 
When the values reach their maximum or minimum with repeated 
key presses, the picture's shape will stop changing. You will not be 
able to change the picture further in that direction.

ENTER

1

2

3

Aspect Ratio

Keystone

Position
Overscan Adjustment
PIP
PC & Component YPbPr Tuning

Display

EXIT  Back

0

S-Video

ENTER

Keystone

2D Keystone

ENTER

EXIT    Back

Keystone

EXIT 


Back

Anamorphic

1

0

Press

.

Press

  .

Two parallel sides

No parallel sides

1. Press

. 2. Press .

W20000-en.book  Page 23  Monday, October 22, 2007  3:35 PM

Summary of Contents for W20000 Home Cinema Series

Page 1: ...W20000 W5000 Digital Projector Home Cinema Series User Manual Welcome W20000 en book Page 1 Monday October 22 2007 3 35 PM ...

Page 2: ...nput source 19 Using the menus 20 Fine tuning the image size and clarity20 Securing the projector 21 Using a security cable lock 21 Utilizing the password function 21 Adjusting the projected image 23 Adjusting the projection angle 23 Correcting picture distortion 23 Using the preset and user modes 24 Fine tuning the picture quality 26 Advanced picture quality controls 27 Selecting the aspect ratio...

Page 3: ...ble cart stand or table as it may fall and be damaged Do not place inflammables near the projector Do not use if tilted at an angle of more than 10 degrees left to right nor at angle of more than 15 degrees front to back 3 Do not store the projector on end vertically Doing so may cause the projector to fall over causing injury or resulting in damage 4 Do not place the projector in any of the follo...

Page 4: ...ector Liquids spilled into the projector will void your warranty If the projector does become wet disconnect it from the power point and call BenQ to have the projector repaired 9 Do not look straight into the projector lens during operation It may harm your sight 10 Do not operate the projector lamp beyond the rated lamp life Excessive operation of lamps beyond the rated life could cause a lamp t...

Page 5: ...as insecticide or some types of cleaner near the projector Do not have rubber or plastic products touching the projector for a long time They will leave marks on the finish If cleaning with a chemically treated cloth be sure to follow the cleaning product s safety instructions Disposal This product contains the following materials which are harmful to human bodies and environment Lead which is con...

Page 6: ...nto place Notes on handling batteries Do not mix old batteries with new ones or mix different types of batteries Avoid leaving the remote control and batteries in an excessive heat or humid environment like the kitchen bathroom sauna sunroom or in a closed car Dispose of used batteries according to the battery manufacturer s instructions and local environment regulations for your region If the rem...

Page 7: ...ation This projector s unique cooling system design prevents unnecessary fan noise and is rated at less than 25dB in normal mode and a low 23dB when in Whisper mode Motorized lens shift The remote control can be used to adjust vertical lens shift from the comfort of your armchair which is particularly useful if the projector has been ceiling mounted and accessibility to its panel controls is diffi...

Page 8: ...ngton lock slot W20000 1 2 3 4 6 5 G Y H V B PB CB R PR CR 12V TRIGGER S VIDEO RS 232 Y PB CB PR CR VIDEO HDMI 7 8 9 11 11 10 10 12 13 HDMI ports 14 Component Video inputs RCA support Y PB PR or Y CB CR video signal 15 Composite Video input RCA 16 S Video input mini 4 pin DIN 17 Component video inputs BNC support Y PB PR Y CB CR or RGB video signal 18 RGB High Definition inputs BNC supports RGBHV ...

Page 9: ... Selecting a preset mode on page 24 for details 12 ENTER button Enacts the selected On Screen Display OSD menu item 13 EXIT button Goes back to previous OSD menus exits and saves any changes made using the On Screen Display OSD menu See Using the menus on page 20 for details 1 Foucs ring Adjusts the focus of the projected image 2 Zoom ring Adjusts the size of the projected image 3 POWER indicator ...

Page 10: ...LENS button Displays the setting page for the adjustment of the motorised vertical Lens shift value See Shifting the projection lens vertically on page 12 for details 13 IRIS button Displays the setting bar for the adjustment of the motorised aperture lens IRIS See Adjusting contrast ratio via IRIS on page 29 for details 14 LIGHT button Turns on the remote control backlight for about 10 seconds Pr...

Page 11: ...en This is the most common way to position the projector for quick setup and portability 3 Floor rear Select this location with the projector placed near the floor behind the screen Note that a special rear projection screen is required Set Floor Rear after you turn the projector on 2 Ceiling Front Select this location with the projector suspended from the ceiling in front of the screen Purchase t...

Page 12: ...he screen projection distance and the vertical offset height of the projector from the horizontal edge of the screen offset Shifting the projection lens vertically The vertical lens shift control provides flexibility for installing your projector It allows the projector to be positioned slightly above or below the top level of the projected images The lens shift offset is expressed as a percentage...

Page 13: ...ine the aspect ratio of your screen 16 9 or 4 3 2 Measure the distance between the projector and where you want to position the screen This is the projection distance 3 Refer to the table and find the closest match to your measurement in the average distance from screen column labelled Average Check that your measured distance is between the min and max distances listed on either side of the avera...

Page 14: ...max zoom Average Max distance with min zoom Highest lens position cm C Lowest lens position cm D 41 51 91 167 184 201 5 46 50 62 111 204 225 245 6 56 60 75 133 245 270 294 7 67 70 87 155 286 315 343 9 78 80 100 177 327 360 392 10 90 90 112 199 367 404 441 11 101 100 125 221 408 449 490 12 112 110 137 244 449 494 539 14 123 120 149 266 490 539 588 15 134 130 162 288 531 584 637 16 146 140 174 310 5...

Page 15: ...Ceiling Center of the lens Diagonal Ceiling Installation Screen Dimensions Projection Distance in cm Offset Diagonal inch Height cm Width cm Min distance with max zoom Average Max distance with min zoom Highest lens position cm C Lowest lens position cm D Image Height cm 41 62 83 154 169 184 5 42 47 50 76 102 187 206 225 6 51 57 60 91 122 225 248 270 7 62 69 70 107 142 262 289 315 8 72 80 80 122 1...

Page 16: ...not to be confused with composite Video Digital TV tuner and DVD players output Component Video natively so if available on your devices this should be your connection method of choice in preference to composite Video See Connecting component video devices on page 17 for how to connect the projector to a component video device Better video quality The S Video method provides a better quality analo...

Page 17: ...ided for connection to video output devices If you have a BNC type component video cable you can alternatively connect through the BNC component video sockets You should also connect the separate audio cable to a suitable audio amplifier G Y H V B PB CB R PR CR 12V TRIGGER S VIDEO RS 232 Y PB CB PR CR VIDEO HDMI HDMI cable From audio output terminals To audio input terminals HDMI device DVD player...

Page 18: ...is not displayed after the projector is turned on and the correct video source has been selected please check that the video source device is turned on and operating correctly Also check that the signal cables have been connected correctly Many laptops do not turn on their external video ports when connected to a projector Usually a key combination like Fn F3 or CRT LCD key turns the external disp...

Page 19: ... equipment at the same time When the projector is first turned on it will attempt to reconnect with the input source which was in use when the projector was last shut down To select the video source Using the remote control or projector Press one of the Source buttons on the remote control or press SOURCE on the projector repeatedly until your desired signal is selected To switch between HDMI 1 an...

Page 20: ...nguage 4 Press MENU once or EXIT twice on the projector or remote control to leave and save the settings The first press leads you back to the main menu and the second press closes the OSD menu Picture Mode Load Settings From Brightness Contrast Tint Sharpness Reset Picture Settings Rename User Mode Picture Basic S Video Cinema EXIT Back Color 2 50 50 50 0 Language Splash Screen My Screen Projecto...

Page 21: ...assword and press to select On The Input Password page displays 4 As the picture indicates the four arrow keys respectively represent 4 digits 1 2 3 4 According to the password you desire to set press the arrow keys on the remote control or projector to enter six digits for the password Once the password is set the OSD menu returns to the Password page IMPORTANT The digits being input will display...

Page 22: ...t after the password is entered so that it is available to you should you ever forget it Password __ __ __ __ __ __ Keep this manual in a safe place 6 Confirm the new password by re entering the new password 7 You have successfully assigned a new password to the projector Remember to enter the new password next time the projector is started 8 To leave the OSD menu press MENU Disabling the password...

Page 23: ...rted or the projector is unable to be positioned as described above you will need to manually correct the picture Using the remote control or projector i Press one of the Arrow keys on the remote control or projector to display the Keystone page ii See step iv below for further operation Using the OSD menu i Press MENU and then press until the Display menu is highlighted ii Press to highlight Keys...

Page 24: ...here there is a small amount of ambient light User 1 User 2 User 3 Recalls the customized settings See Setting the User 1 User 2 User 3 mode on page 25 for details Fine tuning the selected picture mode The pre defined picture mode settings can be altered via the available items shown in the Picture Basic and Picture Advanced menus To fine tune the picture mode 1 Press MENU and then press until the...

Page 25: ...s to highlight the item you want to rename and press ENTER The first letter will be highlighted by a white box 3 Press to select the first character 4 Press to move along until the new name is set and press ENTER to confirm 5 Repeat steps 2 4 if you want to change the other names Resetting the picture mode All of the adjustments you ve done in the Picture Basic and Picture Advanced menus can be re...

Page 26: ...it your selected input and viewing environment Adjusting Color Highlight Color in the Picture Basic menu and adjust the values by pressing on the projector or remote control Lower setting produces less saturated colors setting to the minimum value makes the image black and white If the setting is too high colors on the image will be overpowering which makes the image unrealistic Adjusting Tint Hig...

Page 27: ... a preferred setting by pressing on the projector or remote control There are several color temperature settings available 1 Lamp Native With the lamp s original color temperature and higher brightness This setting is suitable for environments where high brightness is required such as projecting pictures in well lit rooms 2 Warm Makes pictures appear reddish white 3 Normal Maintains normal colorin...

Page 28: ...anagement provides six sets RGBCMY of colors to be adjusted to favorite colors When you select each color you can independently adjust its color range and saturation according to your preference To adjust and store the settings 1 In the Picture Advanced menu highlight Color Management and press ENTER The Color Management page displays 2 Highlight Primary Color and press to select a color from amon...

Page 29: ... contrast ratio To manually adjust the contrast ratio Using the remote control 1 Press IRIS The adjustment bar displays 2 Press to lower the contrast and increase brightness or press to raise the contrast and decrease brightness Using the OSD menu 1 Press MENU and then press until the Picture Advanced menu is highlighted 2 Press to highlight IRIS 3 Press to lower the contrast and increase brightne...

Page 30: ...n the original aspect of the source image Anamorphic is most suitable for images which are already in a 16 9 aspect like high definition TV as it displays them without aspect alteration 2 4 3 Scales a picture so that it is displayed in the center of the screen with a 4 3 aspect ratio This is most suitable for 4 3 pictures like computer monitors standard definition TV and 4 3 aspect DVD movies as i...

Page 31: ...ltitude Mode 1 Press MENU and then press until the Advanced Setup menu is highlighted 2 Press to highlight High Altitude Mode 3 Press to select On A confirmation message displays 4 Highlight Yes and press ENTER Operation under High Altitude Mode may cause a higher decibel operating noise level because of increased fan speed necessary to improve overall system cooling and performance If you use thi...

Page 32: ... Main Source or Second Source press to highlight Main Source or Second Source and press ENTER The source selection bar displays 5 Use to highlight the source you want to display for the main bigger or second smaller window and press ENTER to save the setting and go back to the PIP page 6 To make OSD settings to one of the two sources main or second highlight Active Window and press to select the s...

Page 33: ...s menu sets the length of time the OSD will remain active after your last key press The time length ranges from 5 to 30 seconds in 5 second increments Use to select a suitable time Menu Position in the System Setup Menu Settings menu sets the OSD position in five locations Use to select a preferred position Language in the System Setup menu sets your familiar language for the On Screen OSD Menus S...

Page 34: ... any commands until the cooling process is complete Then the Power indicator light is a steady orange once the cooling process has finished and fans stop If the projector will not be used for an extended period turn the main power switch off and unplug the power cable from the power outlet To protect the lamp the projector will not respond to any commands during the cooling process Press again to ...

Page 35: ...ve Warm Normal Cool User 1 User 2 User 3 Color Temperature User_ Fine Tuning Red Gain 0 100 Green Gain 0 100 Blue Gain 0 100 Red Offset 0 100 Green Offset 0 100 Blue Offset 0 100 Gamma Selection 2 2 2 4 2 5 2 6 2 8 Brilliant Color On Off Color Management Primary Color Red Yellow Green Cyan Blue Magenta Range 0 100 Saturation 0 100 Dynamic Black On Off IRIS 0 19 Lens Shift Display Aspect Ratio Anam...

Page 36: ... 30 min 60 min 90 min 120 min 150 min 180 min Background Color Purple Black Blue Menu Settings Menu Display Time 5 sec 10 sec 15 sec 20 sec 25 sec 30 sec Menu Position Center Top Left Top Right Bottom Right Bottom Left Input Source HDMI 1 HDMI 2 Video S Video Component 1 Component 2 RGB HD Auto Source Search On Off Advanced Setup Lamp Lamp Power Normal Whisper Lamp Hours shows lamp hours informati...

Page 37: ...r details Sharpness depends on the selected input source Adjusts the picture to make it look sharper or softer See Adjusting Sharpness on page 26 for details Reset Picture Settings Returns all settings in the Picture Basic and Picture Advanced menus to the factory preset values See Resetting the picture mode on page 25 for details Rename User Mode Renames User 1 User 2 or User 3 See Renaming user ...

Page 38: ...stments See Displaying more than one image source simultaneously on page 32 for details PC Component YPbPr Tuning H Size 0 Adjusts the horizontal width of the picture Phase 0 Adjusts the clock phase to reduce picture distortion Auto Adjusts the phase and frequency automatically FUNCTION default setting value DESCRIPTION Language English Sets the language for the On Screen Display OSD menus See Usi...

Page 39: ... helps you adjust the image size and focus and check that the projected image is free of distortion Color Bar Press ENTER to display the color bar test pattern You can display this test pattern to check that the colors are to your liking Dust Filter Dust Filter Hours Shows the dust filter hours information Reset Dust Filter Timer Resets the duster filter timer to 0 See To clean the filter on page ...

Page 40: ...for technicians and installers to use these standards to obtain optimal picture quality from BenQ video display devices Accordingly we recommend that setup and calibration be performed by an ISF certified installation technician For more information please go to www imagingscience com or contact the place you purchased the projector FUNCTION DESCRIPTION Source Shows the current signal source Pictu...

Page 41: ...ove dirt or dust wipe the case with a soft dry lint free cloth 2 To remove stubborn dirt or stains moisten a soft cloth with water and a neutral detergent Then wipe the case Never use wax alcohol benzene thinner or other chemical detergents These can damage the case Storing the projector If you need to store the projector for an extended time please 1 Make sure the temperature and humidity of the ...

Page 42: ...tly seated in place you will be reminded by messages displayed on the screen until ENTER is pressed on the highlight of OK The projector will automatically shut down within minutes if there has been no further action taken Re install the filter and cover securely then turn on the power again Resetting the filter timer Do not reset the filter timer if the filter has not been replaced 1 After the st...

Page 43: ...as Whisper Using Whisper mode reduces system noise and power consumption If the Whisper mode is selected the light output will be reduced and result in darker projected pictures Setting the projector in Whisper mode also extends the lamp life To set Whisper mode go into the Advanced Setup Lamp Lamp Power menu and press Setting Auto Off This function allows the projector to turn off automatically i...

Page 44: ... lens do not touch the empty lamp compartment when the lamp is removed This lamp contains mercury Consult your local hazardous waste regulations to dispose of this lamp in a proper manner Status Message The lamp has been in operation for 2000 hours Install a new lamp for optimal performance If the projector is normally run with Whisper selected See Getting to know the lamp hour on page 43 you may ...

Page 45: ...and scatter broken glass in the projector To reduce the risk of injuries to fingers and damage to internal components use caution when removing lamp glass that has shattered Do not place the lamp in locations where water might splash on it children can reach it near or above heat sources or near flammable materials Do not insert your hand into the projector when the lamp is removed If you touch th...

Page 46: ...he Lamp page displays 3 Highlight Reset Lamp Timer and press ENTER A warning message displays asking if you want to reset the lamp timer Highlight Reset and press ENTER The lamp time will be reset to 0 Lamp Dust Filter High Altitude Mode Password Key Lock Reset All Settings Advanced Setup EXIT Back S Video ENTER Off Lamp Lamp Power Lamp Hours ENTER EXIT Back Reset Lamp Timer Reset Lamp Timer Reset...

Page 47: ...omer center for purchasing a new lamp Orange Off Red The lamp is not properly attached The lamp has been damaged Please contact your local BenQ customer center for purchasing a new lamp Off Red Off The fans are not working The projector has shutdown automatically If you try to re start the projector it will shutdown again Please contact your dealer for assistance Off Red Red Off Red Green Off Red ...

Page 48: ...ut source device Check the connection See page 16 The input signal has not been correctly selected Select the correct input signal with the Source buttons on the remote control or SOURCE on the projector See page 19 Image is unstable The connection cables are not securely connected to the projector or the signal source Correctly connect the cables to the appropriate terminals See page 16 Picture i...

Page 49: ...C Terminals Input Analog RGB BNC x 5 HDMI V 1 2 x 2 Component Video Y CB CR Y PB PR x 1 Component Video Y CB CR Y PB PR x 1 shared with BNC Composite Video x 1 S Video x 1 Output Control 12VDC Max 0 5 A Serial Connector RS232 8 pin MINI DIN General characteristics Projector weight 9 6 kg 21 2 lbs Power VAC 100 240V 3 2A 50 60Hz Automatic Power consumption Max 340W Operating temperature 0 C to 35 C...

Page 50: ...0 48 363 65 70 56 476 75 75 60 023 78 75 85 68 677 94 5 1152 x 864 1152 x 864 75 67 5 108 1280 x 768 1280 x 768 60 47 396 68 25 60 47 776 79 5 75 60 289 102 25 85 68 633 117 5 1280 x 960 1280 x 960 60 60 108 85 85 938 148 5 1280 x 1024 1280 x 1024 60 63 981 108 75 79 976 135 85 91 146 157 5 1360 x 768 1360 x 768 60 47 712 85 5 1400 x 1050 1400 x 1050 60 64 744 101 60 65 317 121 75 75 82 278 156 14...

Page 51: ...60 67 433 67 5 148 35 148 5 Format Resolution Refresh rate Hz H Freq KHz Pixel Freq MHz 480 60i 720 x 487 59 94 15 734 13 5 480 60p 720 x 483 59 94 31 469 27 576 50i 720 x 576 50 15 625 14 75 576 50p 720 x 576 50 31 25 29 720 50p 1280 x 720 50 37 5 75 25 720 60p 1280 x 720 60 45 74 25 1080 50i 1920 x 1080 50 28 125 31 25 74 25 72 1080 60i 1920 x 1080 59 94 60 33 716 33 75 74 175 74 25 1080 24P 192...

Page 52: ...ves you specific legal rights and you may have other rights which vary from country to country For other information please visit www BenQ com Copyright Copyright 2007 by BenQ Corporation All rights reserved No part of this publication may be reproduced transmitted transcribed stored in a retrieval system or translated into any language or computer language in any form or by any means electronic m...

Page 53: ...h the receiver is connected Consult the dealer or an experienced radio TV technician for help EEC statement for European users This machine was tested against the 89 336 EEC European Economic Community for EMC Electro Magnetic Compatibility and fulfills these requirements MIC statement B class equipment Household purpose info telecommunications equipment As this equipment has undergone EMC registr...

Reviews: