background image

Mounting

11

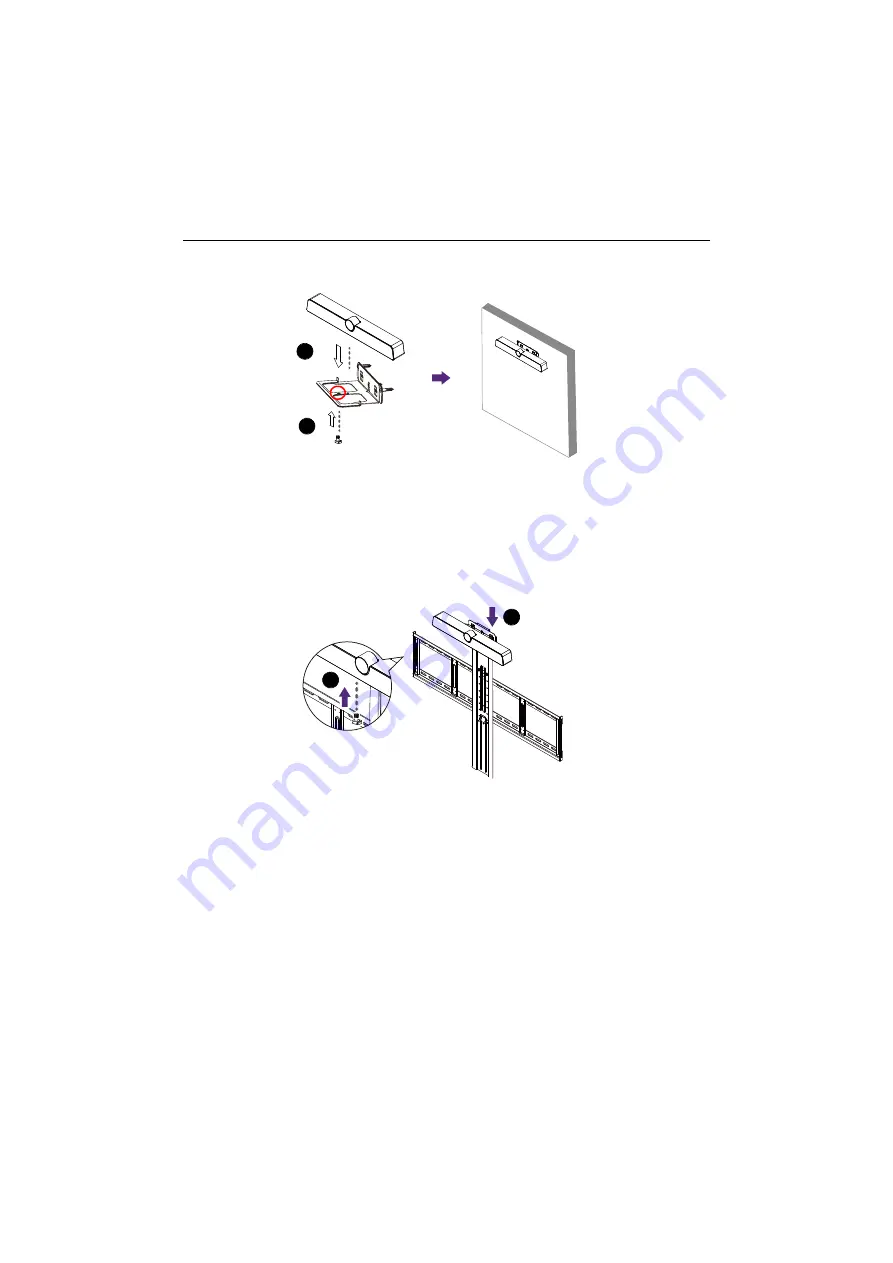
4. Place the product onto the mounting bracket and secure the product by screwing 

the lock screw into the product’s screw hole.

Installing the display mount

You may attach the product to the display by installing the product directly to any tripod 

or bracket with the lock screw.
To attach the product on the display mount:
1. Place the product onto a mounting bracket.
2. Secure the product by screwing the lock screw into the product’s screw hole.

1

2

1

2

Summary of Contents for VC01A

Page 1: ...VC01A Integrated video conference terminal User Manual...

Page 2: ...HDMI inputs The terms HDMI and HDMI High Definition Multimedia Interface and the HDMI Logo are trademarks or registered trademarks of HDMI Licensing Administrator Inc in the United States and other c...

Page 3: ...lated document www BenQ com Business SUPPORT Downloads model name User Manual EU only Dismantled information Available on the user manual download page This document is provided based on Regulation EU...

Page 4: ...uct All in one mode 14 Connect your personal device to the product BYOD mode 15 Basic operations 16 Turning the product on or off 16 Initial setup 16 Updating software 17 Android system interface 18 M...

Page 5: ...ormed by a qualified technician Failure to install this product properly may cause injuries and damages to the personnels and the product itself Check the installation regularly and maintain the produ...

Page 6: ...tripod bracket or table specified by the manufacturer or sold with the apparatus When a cart is used use caution when moving the cart apparatus combination to avoid injury from tip over 13 Unplug thi...

Page 7: ...hemicals which leak from batteries may cause skin irritation If any chemical matter seeps out of the batteries wipe it up immediately using a dry cloth and replace the batteries as soon as possible Du...

Page 8: ...ry x 2 HDMI cable x 1 Quick start guide Camera cover x 1 Mounting kit Integrated video conference terminal will hereinafter be referred to as the product in this document Before discarding the package...

Page 9: ...e Description IR Signal Receiver Receive IR signals Do not obstruct the receiver Screw hole Screw hole for mounting 1 2 1 2 LOCK 1 2 3 4 5 6 7 8 No Name Description LOCK For Kensington lock HDMI OUT V...

Page 10: ...flash drives Used for upgrading LAN Connect RJ45 terminals USB 2 0 Device Type C Connect to the PC for external camera microphone and speaker from the product DC Used for 12V power supply No Name Des...

Page 11: ...d selection Direction key Press for left selection Press to proceed Direction key Press for right selection Direction key Press for downward selection Android system main screen button Return key Voic...

Page 12: ...ent cover 2 Insert two AAA batteries into the battery compartment ensuring that the and signs on the batteries match the and indications on the battery compartment 3 Re install the battery compartment...

Page 13: ...id getting the remote control wet or store it in humid environments like bathrooms If the product s remote control sensor window is exposed to direct sunlight or strong light the remote control may no...

Page 14: ...lock screw Refer to Installing the display mount on page 11 for more information Installing the wall mount Check the mounting component list before installing To install the wall mount 1 Install thre...

Page 15: ...w hole Installing the display mount You may attach the product to the display by installing the product directly to any tripod or bracket with the lock screw To attach the product on the display mount...

Page 16: ...er for a more enhanced meeting experience Refer to Connect your personal device to the product BYOD mode on page 15 for more information Comparison between two modes You can project your computer wire...

Page 17: ...suitable for use with 100 240V AC power only The power cord and outlet illustrated may differ from the ones used in your region Only use an appropriate power cord for your region Never use a power cor...

Page 18: ...d offers apps for wireless projection collaborative meetings files management etc To enable All in one mode 1 Connect power to the product 2 Connect the product to the monitor through a HDMI cable 3 P...

Page 19: ...he audio and video source for your device To enable BYOD mode 1 Connect power to the product 2 Connect the product to your personal device with a USB Type C cable Plug in to USB 2 0 Device port on the...

Page 20: ...me you power it on you will be guided through a series of setup screens Follow the on screen instructions or the steps below to start up and complete the initial setup 1 Turn on the product Wait for i...

Page 21: ...or USB UPDATE to continue the update Or your can skip this step and update the software later To manually update the software 1 Go to System About System updates 2 If there is an update available the...

Page 22: ...Icon Function Description Wireless Projection Shortcut links to InstaShare 2 Refer to Project wirelessly via InstaShare 2 on page 32 for more information Video Conference Shortcut links to TeamViewer...

Page 23: ...e Android main interface to access the side tool bar Icon Function Description Home Tap to return to the main interface Back Tap to return to the previous screen All Apps Tap to show all apps Refer to...

Page 24: ...also enable AMS service set Available offline accounts and check Device information Multiple users Before logging in as User be sure to enter the correct email address and activate AMS service To acce...

Page 25: ...r to create your account through BENQ IAM web service Creating a new account 1 As an administrator to create a new account for regular users go to BenQ Service website https iam benq com Suggested bro...

Page 26: ...d a verifying email is sent to the new account owner If some members in your organization need more privilege to control the AMS service you can activate the users as other roles You can also activate...

Page 27: ...ust be connected to a network to conduct OTA updates or surf the Internet Network setting On the home screen go to Setting System About Status If there is no IP address shown please connect the displa...

Page 28: ...your first time to use the network Key in the password and press Connect The product is now connected to the WLAN If you are connecting to a secured wireless network enter the password for the wirele...

Page 29: ...Menu operations 25 Proxy setting Go to Network Ethernet Select Proxy to go to the proxy setting Enter the proxy host name Enter the using channel...

Page 30: ...el To adjust the audio volume level do either one of the following Press on the remote control to adjust the volume Go to Audio to adjust the volume Use the volume bar to adjust the volume for the dis...

Page 31: ...ou to adjust the display s parameters Refer to Display settings on page 27 for more information Apps Accesses all the applications installed in the product Storage Allows you to manage the product s s...

Page 32: ...k Press OK on the remote control or click the switch to lock or unlock the buttons on the front panel of the display IR lock Press OK on the remote control or click the switch to lock or unlock the re...

Page 33: ...nd their formats in Android Language Keyboard Click to set Language Keyboard in Android Scheduling Click to set the Power off reminder Clone settings Click to export import the settings Factory Reset...

Page 34: ...or scheduled group meetings with any other TeamViewer Meeting users AMS files Provides you with personalized working environment and file management service Refer to AMS file manager overview on page...

Page 35: ...ore information Firefox Allows you to view websites WPS Office Allows you to read PDF files or edit files created in Microsoft Office PowerPoint or Excel Refer to WPS Office on page 43 for more inform...

Page 36: ...taShare 2 When you enter InstaShare 2 the main interface is shown as below Use mouse cursor to have a better user experience Before launching the application make sure your display is properly connect...

Page 37: ...session and participant actions You can also install InstaShare 2 app to manage the meeting session remotely 3 Visit BenQ website or click the link below to view the complete user manual of InstaShar...

Page 38: ...ettings and manage your files and accounts on any IFP that you have logged into To access the AMS files use either of the following methods On the Android main interface select the file manager shortc...

Page 39: ...ected USBs The icon next to Google Drive Dropbox shows that the account is bound to AMS service Folder Path You can browse the file folder in this area Listing Files You can see a list of files from t...

Page 40: ...current image file Magnify the current image Shrink the current image Play the previous image Play pause the current playback You can set display intervals and animation in settings Play the next imag...

Page 41: ...video file Play pause the current audio video file Play the next audio video file Fast forward the audio video Adjust repeats including repeat all repeat one no repeat Adjust the audio video volume A...

Page 42: ...format Video Codec Resolution Bit Rate MPEG1 2 1080P 30 fps 30Mbps MPEG4 1080P 30 fps 30Mbps H 263 1080P 30 fps 30Mbps H 264 4k2k 30 fps 100Mbps H 265 4k2k 60 fps 100Mbps VP8 1920x1080 30fps 30Mbps V...

Page 43: ...t Allows you to choose a default or preset view for the camera Besides the default view you can preset three more views in Move view to accommodate different meeting environments See Set and save a cu...

Page 44: ...pan or tilt the camera view Press on the remote control to zoom in and out 3 After all adjustments are set you can save the camera view to Viewpoint by tapping Save in the middle of the pan and tilt w...

Page 45: ...BenQ App Store is launched you can select the category on the left panel to browse the suggested apps Select an app from the selected category to view the basic description of the app Function Descri...

Page 46: ...2 Tap Manage Printers to choose which printer that you want to use 3 To select a printer Tap an option from the list of available printers on the left panel Tap Scan for Wi Fi Printers to search for...

Page 47: ...ocated in either the dis play s internal memory an external storage device or cloud storage 2 Tap the function menu on the top panel to access the file format s various functions The description below...

Page 48: ...etch to the slides Play Tap to start a slide show Save As Tap to save the presentation file on either the display s internal memory an external storage device or cloud storage Undo Tap to undo an acti...

Page 49: ...r search the Internet from anywhere in the room Already enable AMS service but did not bind your Amazon account to it If you already enable Multi Account Mode and AMS service and you have not yet bind...

Page 50: ...ed 4 It will then show the instruction for the setup Follow the instruction on the screen to complete the setup 5 Download and install Alexa app on your phone Search Saffi and enable it 6 The setup is...

Page 51: ...tput Format H 264 MJPG YUY2 Field of View FOV DFOV 120 Diagonal Adjustable Angle 15 Manual Focus Mode Fixed Focus Focus Distance 0 5m Digital Zoom x5 Camera Presets 3 Auto Framing Yes Microphone Array...

Page 52: ...age Temp C 20 C 60 C Storage Humidity 10 90 RH Non Condensing Operating Humidity 10 90 RH Non Condensing Altitude Below 5000 meters Accessory Remote Control x1 Adaptor Plug x5 US EU AU KR UK HDMI cabl...

Page 53: ...Product information 49 Dimensions Unit mm 462 62 57 30 93 76 76 1 4 20 Screw Hole LOCK...

Page 54: ...tions Make sure that all cables are connected firmly The remote control does not work Check for incorrect battery orientation Check for dead batteries Check your distance and angle from the product Ch...

Reviews: