background image

- 4 -

Hotkeys Introduction

1.Auto Adjustment

When the OSD functions are displayed, press the first button on the left          , and then 
you can automatically optimize the image performance.

2.Volumn Control (Audio matching)

When the OSD functions are displayed, press the first button on the right         to enter 
the “AUTO ADJUSTMENT” menu. Then press      or      to adjust the volume of sound. 
Press          or           to end.

3.Theme Mode Menu

When the OSD functions are displayed, press the second button on the left          to shift 
the mode. You may press       and       to make adjustments between 4 modes.
Press       or          , and then you can leave automatically.

4.Main Menu

When the OSD functions are displayed, press the second button on the right          to 
enter the main menu. And then press        or       to select the option.
Press          to enter into the option. Press        or          to leave.

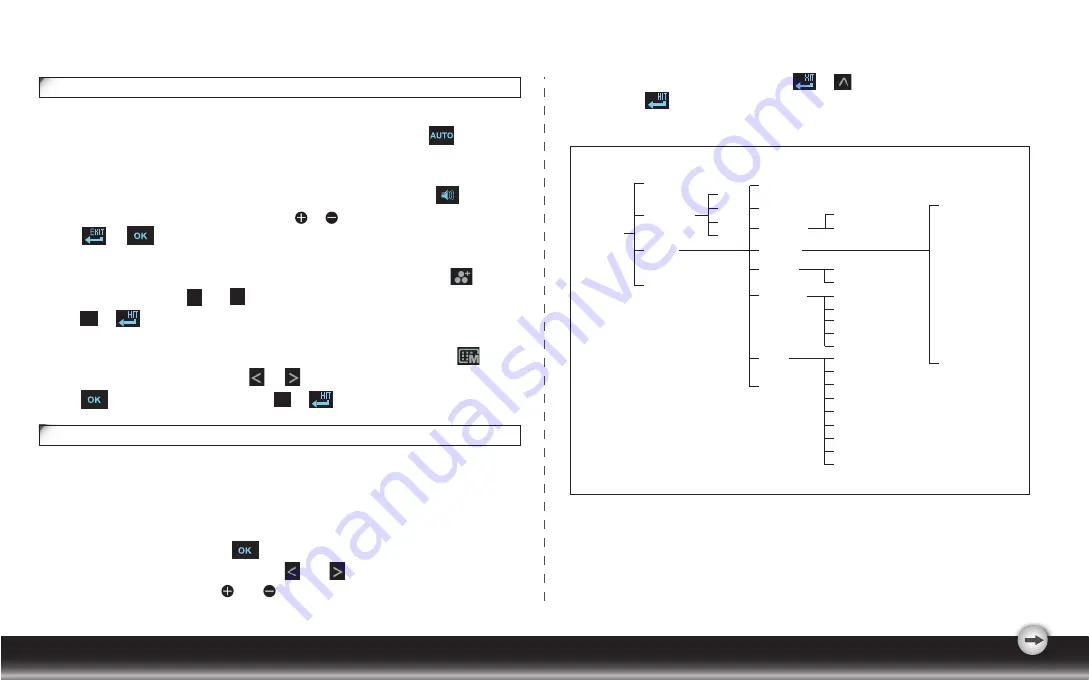
Function Keys Operation

According to the tree-like directory, you can discover the whole OSD system is like a map. 
This tree-like directory can help you to become aware of the whole system. During the 
whole process, you need to know the following actions. 
1. Activate the OSD main menu: Under the energized condition, press any function key to   
execute the function.
2. Confirm the selection: Press the           button.
3. Browse the previous or next option: Press        and       .
4. Adjust the option value: Press       and       to adjust the value.

<

<

E

<

E

<

5. Return to the higher level menu. Press         or        to return to the higher level.
6. Exit: Press          to exit OSD menu; Or if you do not press any button, it will 
automatically disappear after 30 seconds.

E

E

Auto-Adjustment

Theme Mode 

Menu

Audio

General

Movie

Game

Picture

Power

Brightness

Input Signal 

Select

Contrast

OSD Menu 

Language

System

Recall

Display 

Ratio
Color 

Temperature

Power Saving Mode
White Balance
Horizontal Position
Vertical Position
Phase
Clock
DDC/CI
Demo
Information

Native
Full Screen

Red
Green
Blue
Cool
Warm

Analog(D-SUB)
Digital(DVI)

15 lauguages control menu

Function

Menu

English
Deutsch
Français
Italiano
Español

中文
日本語

Norsk

Русский

Svenska
Suomi
Dansk
Polski
Nederlands
Português

(DVI Optional: T221W)

Summary of Contents for T221W

Page 1: ...22 wide LCD Monitor User Manual English Português Pyccкий Deutsch Français Italiano Español Česky Magyar Română Svenska Suomi Nederlands Polski 日本语 简中 繁中 Hrvatski Norsk Dansk ...

Page 2: ...e 1 Transporting the monitor 1 GETTING STARTED Package contents 2 Monitor installation 2 Identifying parts and controls 3 Customizing your Monitor 3 3 Introduction to Hotkeys 4 OSD icon list 5 Troubleshooting 7 Technical Features and Specifications Interface Frequency 8 Addendum Advanced Power Saving Mode 9 FCC compliance 11 The operation of Function menu 4 Working with OSD Group 8 ...

Page 3: ...rgy saving mode after a certain time beneficial both for the user and the environment Electrical safety Emissions Electromagnetic fields Noise emissions Ecology The product must be prepared for recycling and the manufacturer must have a certified environmental management system such as EMSA or ISO 14001 Restrictions on chlorinated and brominated flame retardants and polymers heavy metals such as c...

Page 4: ...tion or shock 3 The apparatus shall only be used between 5 tilted forward and 20 tilted backward as normal operation position If the tilt angle exceeds 20 it shall be used for wall mounting or packaging only Information for users applicable in European Union countries The symbol on the product or its packaging signifies that this product has to be disposed separately from ordinary household wastes...

Page 5: ...Plug the audio cable into the AUDIO port at the rear of the monitor 3 2 Plug the other end of the audio cable into the audio port of your computer or other audio source Monitor installation Package contents Before beginning ensure that the carton contains the following items 1 LCD Monitor 2 Monitor Base the shape of base may vary according to the monitor model 3 Power Cord plug may vary according ...

Page 6: ... show that a button represents different functions in different levels of the architecture Customizing your Monitor Important Important The On Screen Display OSD system provides a full range of customizable tools to optimize your display Although you could perform comprehensive customization we strongly recommend that you use the AUTO ADJUSTMENT function It can utilize the default values to thorou...

Page 7: ...s tree like directory can help you to become aware of the whole system During the whole process you need to know the following actions 1 Activate the OSD main menu Under the energized condition press any function key to execute the function 2 Confirm the selection Press the button 3 Browse the previous or next option Press and 4 Adjust the option value Press and to adjust the value E E 5 Return to...

Page 8: ...st and enlarge the display screen to full screen size 16 10 Native keep the display format as the input signal 4 3 5 4 etc and enlarge the display screen to the maximum w o losing any content part of the screen may be blank Full Screen 16 10 Native 4 3 or 5 4 CONTRAST Adjust the contrast level of the screen Activate the built in color engine to enhance the graphic effects according to the differen...

Page 9: ...is display INFORMATION DEMO RECALL Reset monitor parameters back to factory preset values 2 seconds after activation of this function some of the menus will stimulate feature grading effects 2 times over OSD Icon List DDC CI Select turn on or turn off DDC CI function Factory default on ...

Page 10: ...press a key on the keyboard to wake up the computer 3 Check if the video signal cable is properly connected to the monitor and computer Symptom Check Items 1 Check if your computer is turned on 2 Check if the video signal cable is properly connected to the monitor and computer 1 Ensure that the resolution and or refresh rate is set correctly 1 No picture 2 LED indicator is not lit 1 No picture 2 L...

Page 11: ...y of the supported timing is not requested exactly 4 Normalization of VGA card s deviation will be acceptable 5 Horizontal Frequency 6 Vertical Frequency 8 Technical Features and Specifications Interface Frequency 30 82KHz 56 76Hz Net Net Tilt Angle 473 8 H x296 1 V mm Analog Digital Operating Condition Storage Condition 0 282 H 0 282 V mm D sub DVI D Optional 5 20 About 4 9kg About 510 W x 424 H ...

Page 12: ...n not only save electricity but extend the life of the lights 3 Working principle of the Monitor Life Extension function To minimize the impact of frequent turn on and turn off of LCD monitor the Life Extension function decreases the electricity supplied to the back light of LCD monitor gradually instead of cut it off right away when PC enters sleeping or off mode Please see following comparison g...

Page 13: ...ping mode Even though comparing the advantages of both conditions we still recommend you strongly to set your monitor in Advanced Power Saving mode 5 l How to engage the Monitor Life Extension function You may simply use the OSD control to activate the Monitor Life Extension function 10 1 Press arbitrarily 4 buttons other than the Power Switch on the left to activate the OSD menu 2 Press button to...

Page 14: ...structions may cause harmful interference to radio communications However there is no guarantee that interference will not occur in a particular installation If this equipment does cause harmful interference to radio or television reception which can be determined by turning the equipment off and on the user is encouraged to try to correct the interference by one or more of the following measures ...

Reviews: